OPERATION

NOTE: If you have difficulty changing from one gear range to the other, turn the chuck by hand until the gears engage.

CAUTION:

Never change gears while the tool is running. Failure to obey this caution could result in serious damage to the drill.

QUICK MODE SELECTOR

See Figures 6 - 7, page 15.

The Quick Mode Selector allows you to quickly switch from drill mode to drive mode.

In general, drill mode should be used for drilling and other

heavy duty applications. Drive mode should be used for driving screws. Hammer mode should be used for hammer drilling.

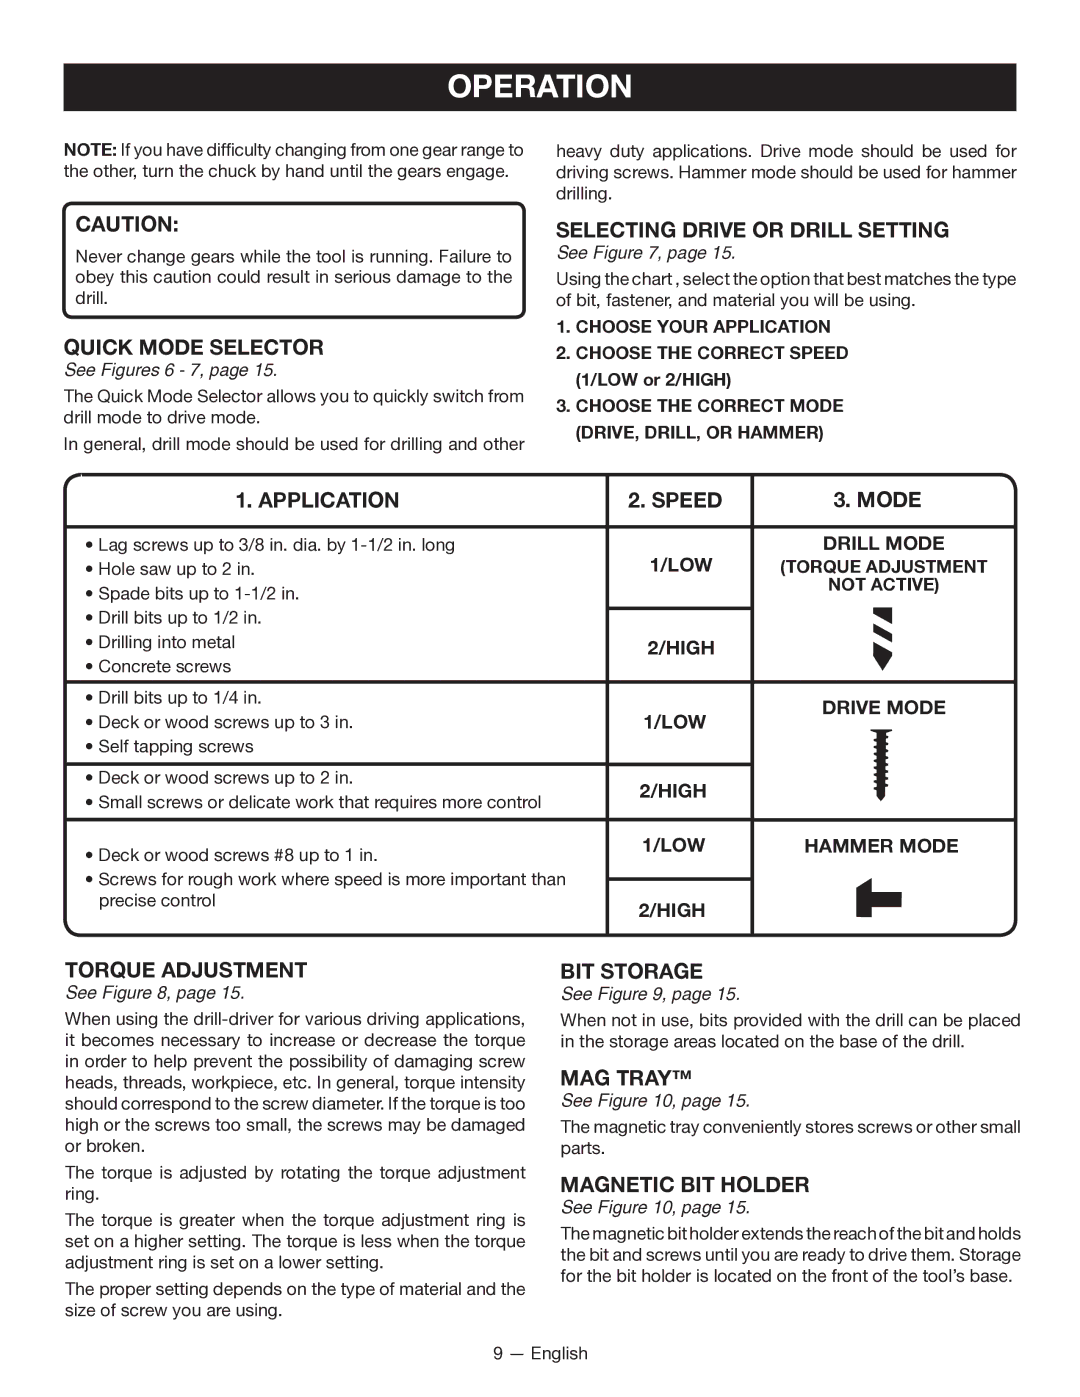
SELECTING DRIVE OR DRILL SETTING

See Figure 7, page 15.

Using the chart , select the option that best matches the type of bit, fastener, and material you will be using.

1.CHOOSE YOUR APPLICATION

2.CHOOSE THE CORRECT SPEED (1/LOW or 2/HIGH)

3.CHOOSE THE CORRECT MODE (DRIVE, DRILL, OR HAMMER)


1. APPLICATION

2. SPEED

3. MODE


• Lag screws up to 3/8 in. dia. by 1-1/2 in. long

1/LOW

DRILL MODE


• Hole saw up to 2 in.

(TORQUE ADJUSTMENT


• Spade bits up to 1-1/2 in.


NOT ACTIVE)


• Drill bits up to 1/2 in.


• Drilling into metal

2/HIGH


• Concrete screws


• Drill bits up to 1/4 in.


DRIVE MODE


• Deck or wood screws up to 3 in.

1/LOW


• Self tapping screws


• Deck or wood screws up to 2 in.

2/HIGH


• Small screws or delicate work that requires more control


• Deck or wood screws #8 up to 1 in.

1/LOW

HAMMER MODE


• Screws for rough work where speed is more important than


precise control

2/HIGH


TORQUE ADJUSTMENT

See Figure 8, page 15.

When using the drill-driver for various driving applications, it becomes necessary to increase or decrease the torque in order to help prevent the possibility of damaging screw heads, threads, workpiece, etc. In general, torque intensity should correspond to the screw diameter. If the torque is too high or the screws too small, the screws may be damaged or broken.

The torque is adjusted by rotating the torque adjustment ring.

The torque is greater when the torque adjustment ring is set on a higher setting. The torque is less when the torque adjustment ring is set on a lower setting.

The proper setting depends on the type of material and the size of screw you are using.

BIT STORAGE

See Figure 9, page 15.

When not in use, bits provided with the drill can be placed in the storage areas located on the base of the drill.

MAG TRAY™

See Figure 10, page 15.

The magnetic tray conveniently stores screws or other small parts.

magnetic bit holder

See Figure 10, page 15.

The magnetic bit holder extends the reach of the bit and holds the bit and screws until you are ready to drive them. Storage for the bit holder is located on the front of the tool’s base.

9 — English

Page 9
Image 9
Ryobi P211 Selecting Drive or Drill Setting, Application Speed Mode, Torque Adjustment, Magnetic bit holder

P211 specifications

The Ryobi P211 is a versatile and powerful tool that stands out in the market of cordless drills. As part of Ryobi’s ONE+ system, this tool operates on an 18V battery platform, making it compatible with other Ryobi tools. This feature alone provides convenience and flexibility for users who want to minimize battery inventories.

One of the standout features of the P211 is its 1/2 inch single sleeve keyless chuck, which provides easy and quick bit changes. This functionality is especially useful for busy professionals and DIY enthusiasts who often switch between various tasks. Additionally, the drill boasts an impressive two-speed transmission, allowing users to select between 0-450 RPM for low speed and 0-1,600 RPM for high speed. This dual-speed capability is essential for tackling different materials and applications, from delicate tasks requiring precision to heavier projects demanding speed and torque.

Equipped with a powerful motor, the Ryobi P211 delivers a maximum torque of 350 in-lbs, enabling users to drive screws and drill into various materials such as wood, metal, and plastic with ease. The 24-position clutch adds further control to the tool, allowing users to adjust the torque setting based on the specifics of the job, thus preventing overdriving and damage to the materials being worked on.

User comfort is also a priority in the design of the Ryobi P211. The drill features a rubberized grip that not only provides a secure hold but also minimizes vibrations, making extended use more comfortable. Furthermore, the built-in LED work light illuminates dark workspaces, providing visibility in tight or dimly lit areas, which is crucial for precision work.

In terms of construction, the Ryobi P211 is built with durability in mind. Its rugged design ensures it withstands the rigors of daily use, appealing to both professionals and DIYers alike. The combination of features, power, and comfort makes the Ryobi P211 a reliable choice for a wide range of tasks, whether drilling pilot holes, driving screws, or working on home improvement projects. Overall, this tool embodies Ryobi's commitment to innovation and practicality, making it a valuable addition to any toolbox.