ADJUSTMENTS

INSTALLING/REMOVING CUTTERS

See Figure 3.

UNPLUG YOUR TRIMMER.

WARNING:

Failure to unplug your trimmer could result in accidental starting causing serious injury.

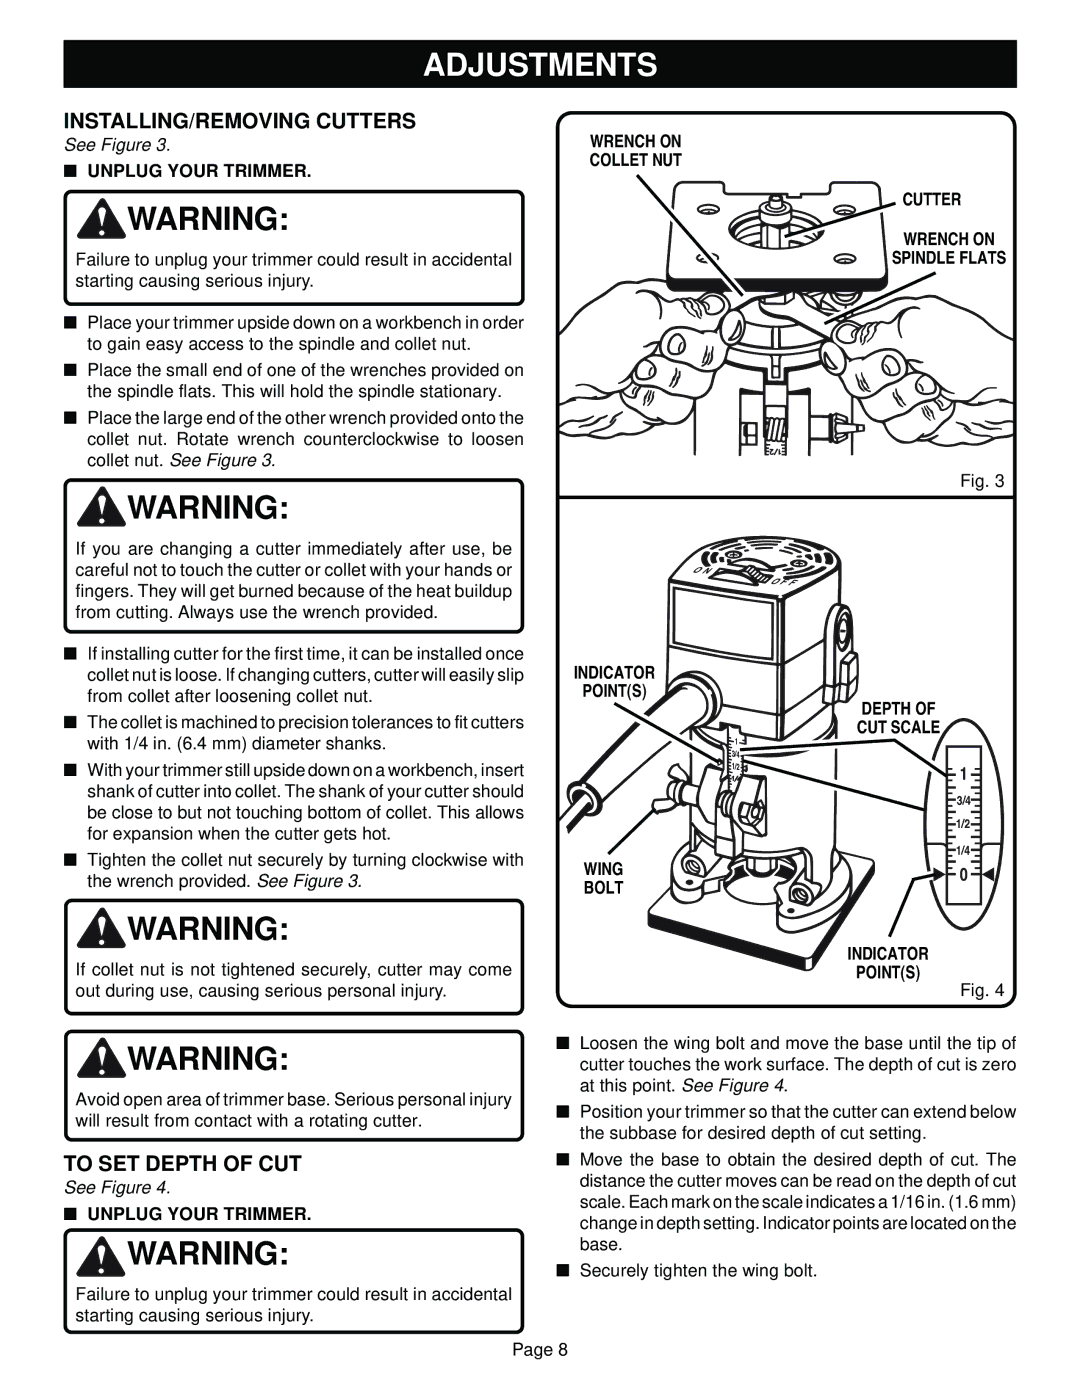
Place your trimmer upside down on a workbench in order to gain easy access to the spindle and collet nut.

Place the small end of one of the wrenches provided on the spindle flats. This will hold the spindle stationary.

Place the large end of the other wrench provided onto the collet nut. Rotate wrench counterclockwise to loosen collet nut. See Figure 3.

WARNING:

If you are changing a cutter immediately after use, be careful not to touch the cutter or collet with your hands or fingers. They will get burned because of the heat buildup from cutting. Always use the wrench provided.

If installing cutter for the first time, it can be installed once collet nut is loose. If changing cutters, cutter will easily slip from collet after loosening collet nut.

The collet is machined to precision tolerances to fit cutters with 1/4 in. (6.4 mm) diameter shanks.

With your trimmer still upside down on a workbench, insert shank of cutter into collet. The shank of your cutter should be close to but not touching bottom of collet. This allows for expansion when the cutter gets hot.

Tighten the collet nut securely by turning clockwise with the wrench provided. See Figure 3.

WARNING:

If collet nut is not tightened securely, cutter may come out during use, causing serious personal injury.

WARNING:

Avoid open area of trimmer base. Serious personal injury will result from contact with a rotating cutter.

TO SET DEPTH OF CUT

See Figure 4.

UNPLUG YOUR TRIMMER.

WARNING:

Failure to unplug your trimmer could result in accidental starting causing serious injury.

WRENCH ON

COLLET NUT

CUTTER

WRENCH ON

SPINDLE FLATS

Fig. 3

O N

O F F

INDICATOR

POINT(S)


DEPTH OF


1

CUT SCALE


3/4


1/2

1


3/4


1/2


1/4

WING


0

BOLT


INDICATOR


POINT(S)


Fig. 4

Loosen the wing bolt and move the base until the tip of cutter touches the work surface. The depth of cut is zero at this point. See Figure 4.

Position your trimmer so that the cutter can extend below the subbase for desired depth of cut setting.

Move the base to obtain the desired depth of cut. The distance the cutter moves can be read on the depth of cut scale. Each mark on the scale indicates a 1/16 in. (1.6 mm) change in depth setting. Indicator points are located on the base.

Securely tighten the wing bolt.

Page 8

Page 8
Image 8
Ryobi TR31-1 specifications INSTALLING/REMOVING Cutters, To SET Depth of CUT, Unplug Your Trimmer

TR31-1 specifications

The Ryobi TR31-1 is a versatile triangular sander designed for both professionals and DIY enthusiasts. Renowned for its compact design and powerful performance, this sander is an essential tool for achieving smooth finishes on various surfaces.

One of the standout features of the Ryobi TR31-1 is its triangular sanding head. This design enables users to easily access tight corners and intricate details, making it ideal for furniture restoration, woodworking, and home improvement projects. The 3-speed settings allow users to customize their sanding experience, providing flexibility for different applications. Whether working on rough surfaces or achieving a fine finish, the adjustable speeds cater to multiple sanding needs.

Equipped with a robust motor, the Ryobi TR31-1 delivers consistent performance, ensuring efficient material removal. The sander operates effectively on a variety of materials, including wood, plastic, and even metal surfaces. This versatility makes it suitable for a wide range of tasks, from smoothing surfaces to removing paint.

Another important characteristic of the TR31-1 is its ergonomic design. The sander features a lightweight structure and an easily maneuverable handle, reducing user fatigue during extended use. Its anti-vibration technology further enhances comfort, allowing users to work steadily and accurately without straining their hands.

The dust collection system is also a notable aspect of the Ryobi TR31-1. It incorporates a built-in dust bag that efficiently collects debris during operation, keeping workspaces cleaner and safer. For users looking to optimize their dust management, the sander is compatible with standard vacuum hoses, offering seamless integration with existing dust extraction systems.

Durability is another key characteristic of the Ryobi TR31-1. Constructed from quality materials, it is built to withstand regular use, making it a reliable choice for long-term projects. The sander is also equipped with easy-to-replace sanding pads, ensuring that users can quickly switch between grits for varying sanding tasks.

In summary, the Ryobi TR31-1 triangular sander combines power, versatility, and comfort. With its unique triangular shape, adjustable speed settings, effective dust collection, and durable build, it stands out as a must-have tool for achieving high-quality finishes in any woodworking or renovation project. Whether you're a hobbyist or a professional, the TR31-1 is designed to meet your sanding needs effectively.