ASSEMBLY

INSTALLING THE WHEEL ASSEMBLY ACCESSORY

See Figures 3 - 4.

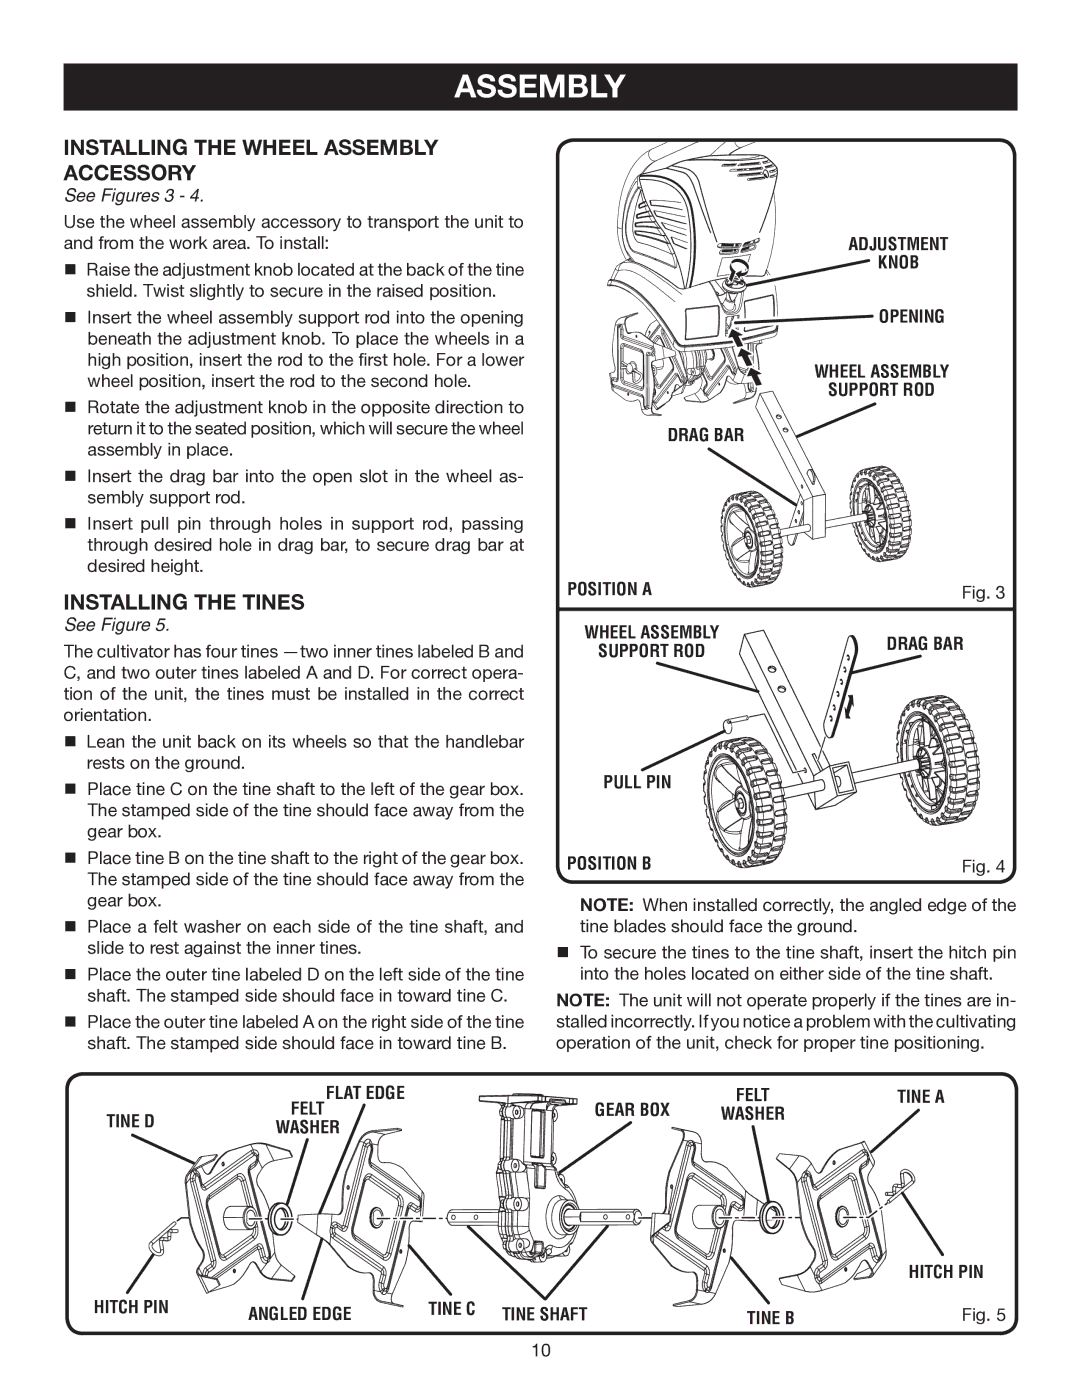
Use the wheel assembly accessory to transport the unit to and from the work area. To install:

nRaise the adjustment knob located at the back of the tine shield. Twist slightly to secure in the raised position.

nInsert the wheel assembly support rod into the opening beneath the adjustment knob. To place the wheels in a high position, insert the rod to the first hole. For a lower wheel position, insert the rod to the second hole.

nRotate the adjustment knob in the opposite direction to return it to the seated position, which will secure the wheel assembly in place.

nInsert the drag bar into the open slot in the wheel as- sembly support rod.

nInsert pull pin through holes in support rod, passing through desired hole in drag bar, to secure drag bar at desired height.

INSTALLING THE TINES

See Figure 5.

The cultivator has four tines —two inner tines labeled B and C, and two outer tines labeled A and D. For correct opera- tion of the unit, the tines must be installed in the correct orientation.

nLean the unit back on its wheels so that the handlebar rests on the ground.

nPlace tine C on the tine shaft to the left of the gear box. The stamped side of the tine should face away from the gear box.

nPlace tine B on the tine shaft to the right of the gear box. The stamped side of the tine should face away from the gear box.

nPlace a felt washer on each side of the tine shaft, and slide to rest against the inner tines.

nPlace the outer tine labeled D on the left side of the tine shaft. The stamped side should face in toward tine C.

nPlace the outer tine labeled A on the right side of the tine shaft. The stamped side should face in toward tine B.

TINE D

FELTFLAT EDGE

WASHER


ADJUSTMENT

KNOB

OPENING

WHEEL ASSEMBLY

SUPPORT ROD

DRAG BAR

POSITION A

Fig. 3

WHEEL ASSEMBLY

DRAG BAR

SUPPORT ROD


PULL PIN

POSITION B

Fig. 4

NOTE: When installed correctly, the angled edge of the tine blades should face the ground.

nTo secure the tines to the tine shaft, insert the hitch pin into the holes located on either side of the tine shaft.

NOTE: The unit will not operate properly if the tines are in- stalled incorrectly. If you notice a problem with the cultivating operation of the unit, check for proper tine positioning.

GEAR BOX

FELT

TINE A

WASHER


HITCH PIN

HITCH PIN

ANGLED EDGE

TINE C

TINE SHAFT

TINE B

Fig. 5


10

Page 10
Image 10
Ryobi Outdoor RY46501A manual Installing the Wheel Assembly Accessory, Installing the Tines, See Figures 3

RY46501A specifications

The Ryobi Outdoor RY46501A is a versatile and robust tool designed to meet the demanding needs of both professional landscapers and DIY enthusiasts. This outdoor power equipment combines advanced features and technology to provide users with a superior yard maintenance experience.

At the heart of the RY46501A is its powerful 38cc 2-cycle engine, which delivers impressive performance and ensures that it can tackle a variety of outdoor tasks with ease. The engine is designed for easy starting and features a reliable ignition system, reducing downtime and allowing users to get straight to work. With its high output capability, this tool excels in cutting thick branches, trimming hedges, and clearing overgrown areas.

One of the standout characteristics of the RY46501A is its lightweight design, which significantly enhances user comfort and reduces fatigue during extended periods of use. The ergonomic handle is designed to provide a comfortable grip, allowing for greater control while working in awkward positions and tight spaces.

The RY46501A incorporates Ryobi's innovative technologies, including an easy-switch head that allows users to interchange attachments quickly. This feature makes the tool exceptionally versatile, as it can be adapted for multiple applications, such as edging, pruning, and cultivating. The compatibility with various Ryobi attachments ensures that users can customize their experience based on the task at hand.

Safety is also a priority with the RY46501A. The integrated safety features reduce the risk of accidents during operation. The automatic chain lubrication system ensures that the cutting components remain well-lubricated, promoting longer life and optimal performance.

Additionally, the RY46501A is designed with user maintenance in mind, featuring accessible air filters and spark plugs that make routine servicing straightforward. This ensures that the tool remains in peak condition, extending its lifespan and maintaining consistent performance.

Overall, the Ryobi Outdoor RY46501A stands out in the crowded market of outdoor tools. Its powerful engine, lightweight design, compatibility with various attachments, and user-friendly features make it an essential tool for anyone looking to maintain their outdoor spaces effectively. Whether tackling residential landscaping projects or managing larger commercial tasks, the RY46501A delivers reliability and efficiency, proving to be a worthy investment for outdoor maintenance.