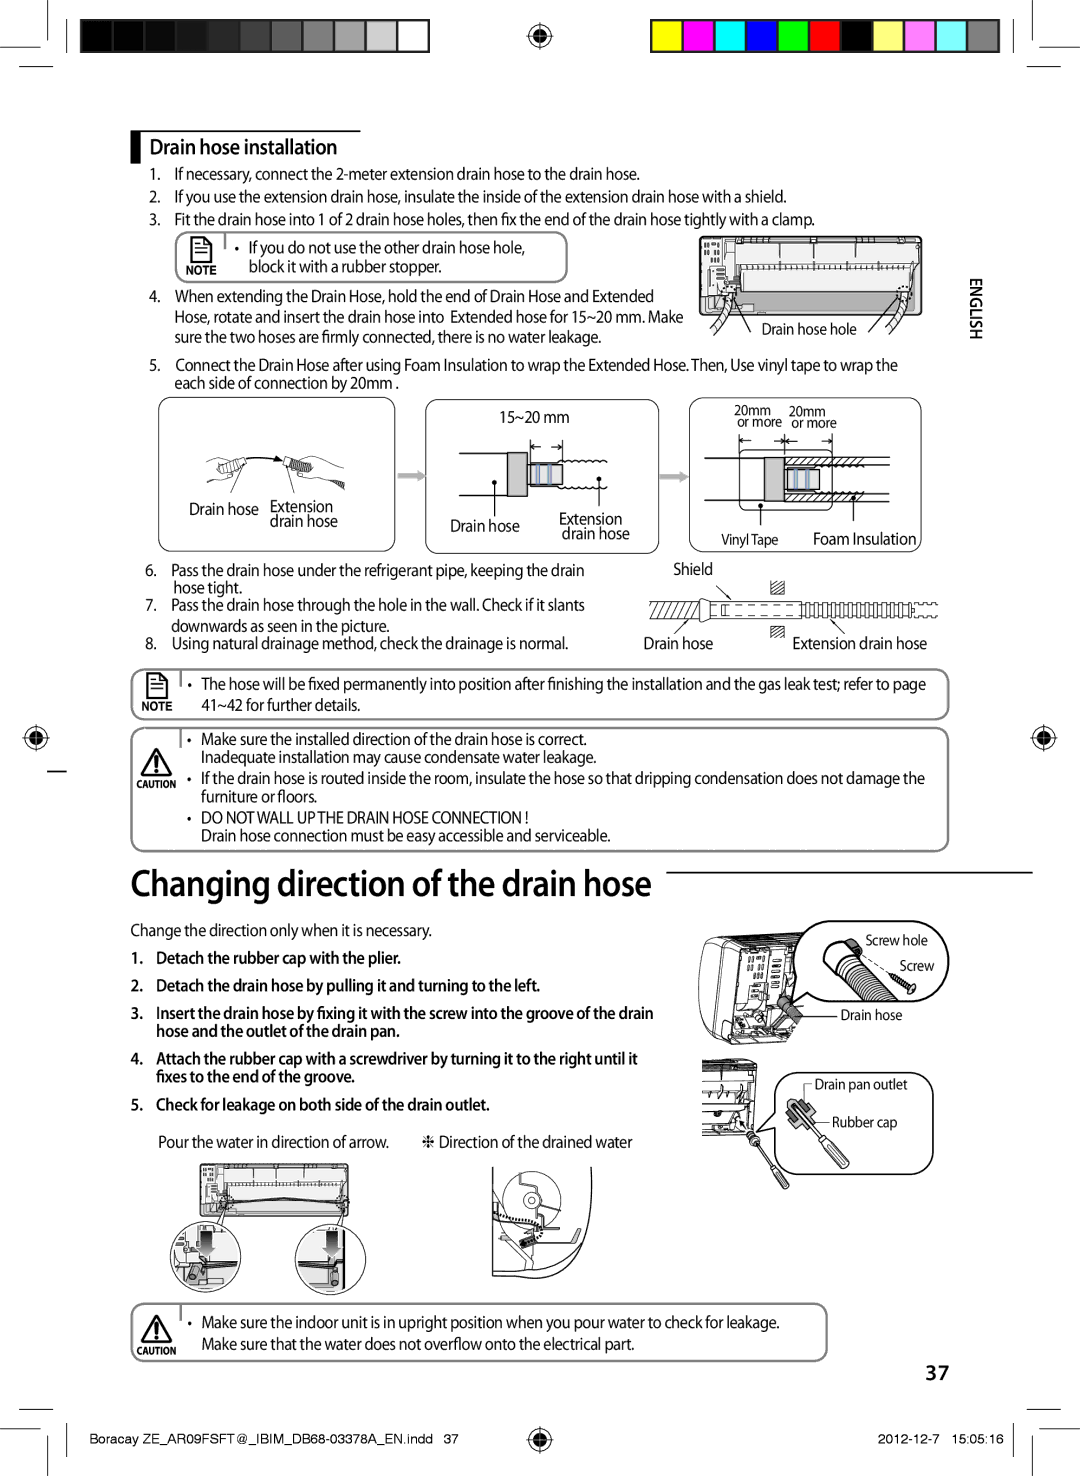
Drain hose installation

1.If necessary, connect the 2-meter extension drain hose to the drain hose.

2.If you use the extension drain hose, insulate the inside of the extension drain hose with a shield.

3.Fit the drain hose into 1 of 2 drain hose holes, then fix the end of the drain hose tightly with a clamp.

• If you do not use the other drain hose hole,

block it with a rubber stopper.

4. When extending the Drain Hose, hold the end of Drain Hose and Extended


Hose, rotate and insert the drain hose into Extended hose for 15~20 mm. Make

Drain hose hole

sure the two hoses are firmly connected, there is no water leakage.


5.Connect the Drain Hose after using Foam Insulation to wrap the Extended Hose. Then, Use vinyl tape to wrap the each side of connection by 20mm .

ENGLISH


15~20 mm

Drain hose

Extension

Drain hose

Extension


drain hose


drain hose

6.Pass the drain hose under the refrigerant pipe, keeping the drain hose tight.

7.Pass the drain hose through the hole in the wall. Check if it slants downwards as seen in the picture.

8.Using natural drainage method, check the drainage is normal.

20mm 20mm or more or more

Vinyl Tape Foam Insulation

Shield

Drain hose

Extension drain hose

• The hose will be fixed permanently into position after finishing the installation and the gas leak test; refer to page

41~42 for further details.

• Make sure the installed direction of the drain hose is correct. Inadequate installation may cause condensate water leakage.

• If the drain hose is routed inside the room, insulate the hose so that dripping condensation does not damage the furniture or floors.

DO NOT WALL UP THE DRAIN HOSE CONNECTION !

Drain hose connection must be easy accessible and serviceable.

Changing direction of the drain hose

Change the direction only when it is necessary.

Screw hole

1.

Detach the rubber cap with the plier.

Screw

2.

Detach the drain hose by pulling it and turning to the left.


3.

Insert the drain hose by fixing it with the screw into the groove of the drain

Drain hose


hose and the outlet of the drain pan.


4.

Attach the rubber cap with a screwdriver by turning it to the right until it


fixes to the end of the groove.

Drain pan outlet


5.

Check for leakage on both side of the drain outlet.


Pour the water in direction of arrow.

Rubber cap


Direction of the drained water

Make sure the indoor unit is in upright position when you pour water to check for leakage.

Make sure that the water does not overflow onto the electrical part.

37

Boracay ZE_AR09FSFT@_IBIM_DB68-03378A_EN.indd 37

2012-12-7 15:05:16

Page 37
Image 37
Samsung AR12FSFTKWQNET, AR09FSFTKWQNET, AR09FSFTKWQNZE manual Changing direction of the drain hose, Drain hose installation

AR12FSFTKWQNZE, AR09FSFTKWQNET, AR12FSFTKWQNET, AR09FSFTKWQNZE specifications

The Samsung AR09FSFTKWQNZE and AR12FSFTKWQNET represent a new standard in air conditioning technology, designed to deliver maximum comfort and efficiency. These models incorporate state-of-the-art features that cater to the needs of modern households.

One of the standout characteristics of the AR series is its advanced inverter technology. This feature allows the air conditioner to adjust its cooling output in real-time, providing consistent temperatures while consuming less energy. This results in lower electricity bills and reduced environmental impact, making it an eco-friendly choice for consumers.

Another remarkable aspect is the Turbo Cooling function, which ensures rapid cooling of spaces, achieving the desired temperature in a significantly shorter time. This is especially beneficial during hot summer days when immediate relief from heat is essential. Additionally, the models come equipped with a Good Sleep Mode, which optimizes the cooling process to ensure a comfortable sleeping environment by maintaining a steady temperature throughout the night.

The air purifying capabilities of the Samsung AR09FSFTKWQNZE and AR12FSFTKWQNET cannot be overlooked. Each unit features a multi-layered filtration system that effectively captures dust, allergens, and odors in the air, promoting a healthier indoor atmosphere. This technology is particularly advantageous for individuals with allergies or respiratory issues.

These air conditioners also prioritize user convenience through features such as Wi-Fi connectivity and Smart Control. Users can manage their cooling preferences remotely via a smartphone app, allowing for greater flexibility and ease of use. This integration with smart home systems enhances the overall user experience.

In terms of design, the Samsung AR series sports a sleek and modern aesthetic that can seamlessly blend into any interior decor. The easy-to-clean surfaces and discreet appearance further add to their appeal.

Overall, the Samsung AR09FSFTKWQNZE, AR12FSFTKWQNET, AR09FSFTKWQNET, and AR12FSFTKWQNZE air conditioners exemplify cutting-edge cooling technology. With their focus on energy efficiency, air purification, and user-friendly features, they represent an ideal choice for consumers seeking comfort, convenience, and environmental responsibility in their HVAC solutions. Whether for a small apartment or a large house, these models are designed to meet diverse cooling needs while enhancing the quality of indoor air.