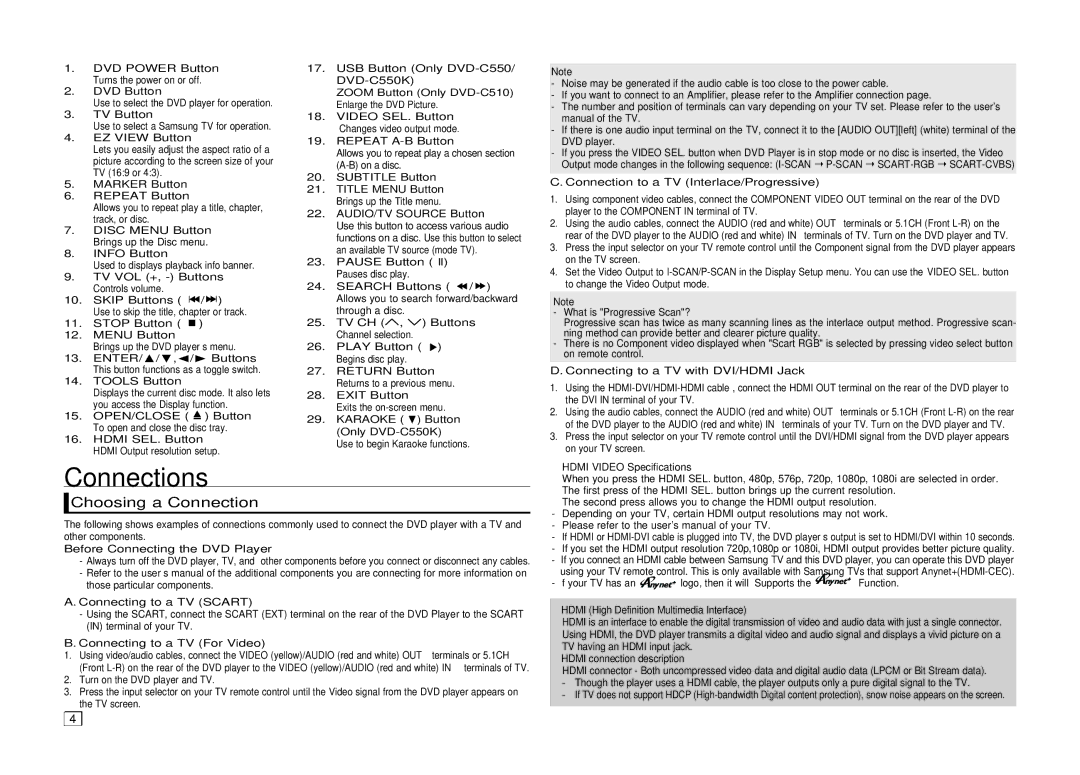
1.DVD POWER Button Turns the power on or off.
2.DVD Button
Use to select the DVD player for operation.
3.TV Button
Use to select a Samsung TV for operation.
4.EZ VIEW Button
Lets you easily adjust the aspect ratio of a picture according to the screen size of your TV (16:9 or 4:3).
5.MARKER Button
6.REPEAT Button
Allows you to repeat play a title, chapter, track, or disc.
7.DISC MENU Button Brings up the Disc menu.
8.INFO Button
Used to displays playback info banner.
9.TV VOL (+,
10.SKIP Buttons ( ![]()
![]() /
/ ![]()
![]() )
)
Use to skip the title, chapter or track.
11.STOP Button ( ![]() )
)
12.MENU Button
Brings up the DVD player’s menu.
13.ENTER/ / , / Buttons This button functions as a toggle switch.
14.TOOLS Button
Displays the current disc mode. It also lets you access the Display function.
15.OPEN/CLOSE ( ![]() ) Button To open and close the disc tray.
) Button To open and close the disc tray.
16.HDMI SEL. Button HDMI Output resolution setup.
17.USB Button (Only
ZOOM Button (Only
18.VIDEO SEL. Button
Changes video output mode.
19.REPEAT
Allows you to repeat play a chosen section
20.SUBTITLE Button
21.TITLE MENU Button Brings up the Title menu.
22.AUDIO/TV SOURCE Button Use this button to access various audio functions on a disc. Use this button to select an available TV source (mode TV).
23.PAUSE Button (![]()
![]() ) Pauses disc play.
) Pauses disc play.
24.SEARCH Buttons (![]() /
/ ![]() ) Allows you to search forward/backward through a disc.
) Allows you to search forward/backward through a disc.
25.TV CH (![]() ,
, ![]() ) Buttons Channel selection.
) Buttons Channel selection.
26.PLAY Button ( ![]() ) Begins disc play.
) Begins disc play.
27.RETURN Button Returns to a previous menu.
28.EXIT Button
Exits the
29.KARAOKE ( ) Button (Only
Use to begin Karaoke functions.
Note
-Noise may be generated if the audio cable is too close to the power cable.
-If you want to connect to an Amplifier, please refer to the Amplifier connection page.
-The number and position of terminals can vary depending on your TV set. Please refer to the user's manual of the TV.
-If there is one audio input terminal on the TV, connect it to the [AUDIO OUT][left] (white) terminal of the DVD player.
-If you press the VIDEO SEL. button when DVD Player is in stop mode or no disc is inserted, the Video Output mode changes in the following sequence:
C. Connection to a TV (Interlace/Progressive)
1.Using component video cables, connect the COMPONENT VIDEO OUT terminal on the rear of the DVD player to the COMPONENT IN terminal of TV.
2.Using the audio cables, connect the AUDIO (red and white) OUT terminals or 5.1CH (Front
3.Press the input selector on your TV remote control until the Component signal from the DVD player appears on the TV screen.
4.Set the Video Output to
Note
-What is "Progressive Scan"?
Progressive scan has twice as many scanning lines as the interlace output method. Progressive scan- ning method can provide better and clearer picture quality.
-There is no Component video displayed when "Scart RGB" is selected by pressing video select button on remote control.
D. Connecting to a TV with DVI/HDMI Jack
1.Using the
2.Using the audio cables, connect the AUDIO (red and white) OUT terminals or 5.1CH (Front
3.Press the input selector on your TV remote control until the DVI/HDMI signal from the DVD player appears on your TV screen.
Connections
 Choosing a Connection
The following shows examples of connections commonly used to connect the DVD player with a TV and other components.
Before Connecting the DVD Player
-Always turn off the DVD player, TV, and other components before you connect or disconnect any cables.
-Refer to the user’s manual of the additional components you are connecting for more information on those particular components.
A.Connecting to a TV (SCART)
-Using the SCART, connect the SCART (EXT) terminal on the rear of the DVD Player to the SCART (IN) terminal of your TV.
B.Connecting to a TV (For Video)
1.Using video/audio cables, connect the VIDEO (yellow)/AUDIO (red and white) OUT terminals or 5.1CH (Front
2.Turn on the DVD player and TV.
3.Press the input selector on your TV remote control until the Video signal from the DVD player appears on the TV screen.
4 |
HDMI VIDEO Specifications
When you press the HDMI SEL. button, 480p, 576p, 720p, 1080p, 1080i are selected in order. The first press of the HDMI SEL. button brings up the current resolution.
The second press allows you to change the HDMI output resolution.
-Depending on your TV, certain HDMI output resolutions may not work.
-Please refer to the user's manual of your TV.
-If HDMI or
-If you set the HDMI output resolution 720p,1080p or 1080i, HDMI output provides better picture quality.
-If you connect an HDMI cable between Samsung TV and this DVD player, you can operate this DVD player using your TV remote control. This is only available with Samsung TVs that support
- f your TV has an | logo, then it will Supports the | Function. |
•HDMI (High Definition Multimedia Interface)
HDMI is an interface to enable the digital transmission of video and audio data with just a single connector. Using HDMI, the DVD player transmits a digital video and audio signal and displays a vivid picture on a TV having an HDMI input jack.
•HDMI connection description
HDMI connector - Both uncompressed video data and digital audio data (LPCM or Bit Stream data).
-Though the player uses a HDMI cable, the player outputs only a pure digital signal to the TV.
-If TV does not support HDCP