DVD
Surround Sound Speaker Setup (C700 only)
The
DDVVDD
Setting Up Display Options
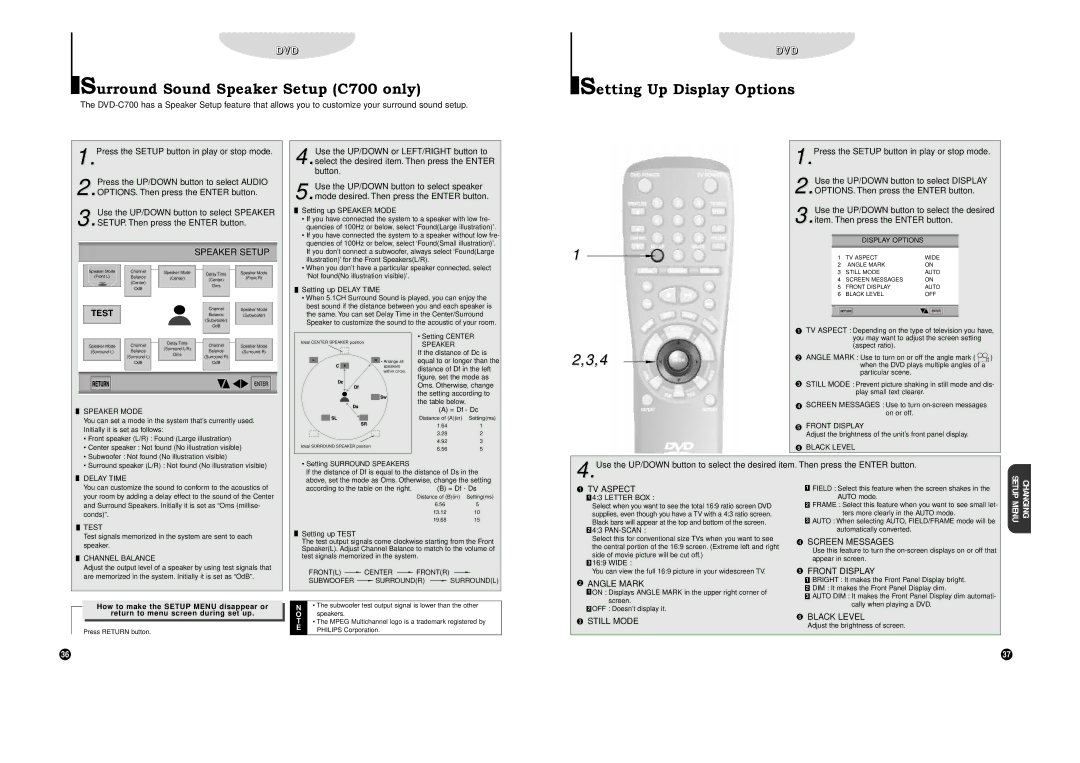
1.Press the SETUP button in play or stop mode.
Press the UP/DOWN button to select AUDIO
2.OPTIONS. Then press the ENTER button.
Use the UP/DOWN button to select SPEAKER
3.SETUP. Then press the ENTER button.
SPEAKER SETUP
4.Use the UP/DOWN or LEFT/RIGHT button to select the desired item. Then press the ENTER button.
5.Use the UP/DOWN button to select speaker mode desired. Then press the ENTER button.
Setting up SPEAKER MODE
• If you have connected the system to a speaker with low fre- |
quencies of 100Hz or below, select ‘Found(Large illustration)’. |
• If you have connected the system to a speaker without low fre- |
quencies of 100Hz or below, select ‘Found(Small illustration)’. |
If you don’t connect a subwoofer, always select ‘Found(Large |
illustration)’ for the Front Speakers(L/R). |
• When you don’t have a particular speaker connected, select |
| 1.Press the SETUP button in play or stop mode. | ||
| 1. |
|
|
| Use the UP/DOWN button to select DISPLAY | ||
| 2.OPTIONS. Then press the ENTER button. | ||
| 2. |
|
|
| Use the UP/DOWN button to select the desired | ||
| 3.item. Then press the ENTER button. | ||
| 3. |
|
|
|
| DISPLAY OPTIONS |
|
1 | 1 | TV ASPECT | WIDE |
| 2 | ANGLE MARK | ON |
Speaker Mode | Channel |
(Front L) | Balance |
| (Center) |
| OdB |
TEST |
|
Speaker Mode
(Center)
Delay Time
(Center)
Oms
Channel
Balance
(Subwoofer)
OdB
Speaker Mode
(Front R)
Speaker Mode
(Subwoofer)
‘Not found(No illustration visible)’. |
Setting up DELAY TIME
•When 5.1CH Surround Sound is played, you can enjoy the best sound if the distance between you and each speaker is the same. You can set Delay Time in the Center/Surround Speaker to customize the sound to the acoustic of your room.
3 | STILL MODE | AUTO |
4 | SCREEN MESSAGES | ON |
5 | FRONT DISPLAY | AUTO |
6 | BLACK LEVEL | OFF |
TV ASPECT : Depending on the type of television you have, | ||
Speaker Mode | Channel |
(Surround L) | Balance |
| (Surround L) |
| OdB |
Delay Time
(Surround L/R)
Oms
Channel
Balance
(Surround R)
OdB
Speaker Mode
(Surround R)
Ideal CENTER SPEAKER position |
• Arrange all |
speakers |
within circle. |
• Setting CENTER SPEAKER
If the distance of Dc is equal to or longer than the distance of Df in the left figure, set the mode as Oms. Otherwise, change the setting according to the table below.
| you may want to adjust the screen setting |
| (aspect ratio). |
2,3,4 | ANGLE MARK : Use to turn on or off the angle mark ( ) |
when the DVD plays multiple angles of a | |
| particular scene. |
| STILL MODE : Prevent picture shaking in still mode and dis- |
| play small text clearer. |
| SCREEN MESSAGES : Use to turn |
SPEAKER MODE
You can set a mode in the system that’s currently used. Initially it is set as follows:
• Front speaker (L/R) : Found (Large illustration) |
• Center speaker : Not found (No illustration visible) |
• Subwoofer : Not found (No illustration visible) |
Ideal SURROUND SPEAKER position |
(A) = Df - Dc
Distance of (A)(in) Setting(ms)
1.641
3.282
4.923
6.565
on or off. |
FRONT DISPLAY |
Adjust the brightness of the unit’s front panel display. |
BLACK LEVEL |
• Surround speaker (L/R) : Not found (No illustration visible) |
DELAY TIME
You can customize the sound to conform to the acoustics of your room by adding a delay effect to the sound of the Center and Surround Speakers. Initially it is set as “Oms (millise- conds)”.
TEST
Test signals memorized in the system are sent to each speaker.
CHANNEL BALANCE
Adjust the output level of a speaker by using test signals that are memorized in the system. Initially it is set as “OdB”.
How to make the SETUP MENU disappear or
return to menu screen during set up.
Press RETURN button.
• Setting SURROUND SPEAKERS
If the distance of Df is equal to the distance of Ds in the above, set the mode as Oms. Otherwise, change the setting
according to the table on the right. | (B) = Df - Ds | |
| Distance of (B)(in) | Setting(ms) |
| 6.56 | 5 |
| 13.12 | 10 |
| 19.68 | 15 |
Setting up TEST
The test output signals come clockwise starting from the Front Speaker(L). Adjust Channel Balance to match to the volume of test signals memorized in the system.
FRONT(L)  CENTER
  FRONT(R)
SUBWOOFER  SURROUND(R)
  SURROUND(L)
N• The subwoofer test output signal is lower than the other
Ospeakers.
T• The MPEG Multichannel logo is a trademark registered by
EPHILIPS Corporation.
4.Use the UP/DOWN button to select the desired item. Then press the ENTER button. | CHANGING SETUP MENU | ||||
| TV ASPECT |
| FIELD : Select this feature when the screen shakes in the | ||
| 1 | ||||
|
| ||||
|
| 4:3 LETTER BOX : |
| AUTO mode. | |
| 1 |
| |||
|
| Select when you want to see the total 16:9 ratio screen DVD |
| FRAME : Select this feature when you want to see small let- | |
|
| 2 | |||
|
|
| |||
|
| supplies, even though you have a TV with a 4:3 ratio screen. |
| ters more clearly in the AUTO mode. | |
|
| Black bars will appear at the top and bottom of the screen. | 3 | AUTO : When selecting AUTO, FIELD/FRAME mode will be | |
|
|
|
| ||
|
| 4:3 |
| automatically converted. |
|
| 2 |
|
| ||
|
| Select this for conventional size TVs when you want to see | SCREEN MESSAGES |
| |
|
| the central portion of the 16:9 screen. (Extreme left and right |
| ||
|
|
| Use this feature to turn the |
| |
|
| side of movie picture will be cut off.) |
|
| |
|
|
| appear in screen. |
| |
|
| 16:9 WIDE : |
|
| |
| 3 |
|
| ||
| FRONT DISPLAY |
| |||
|
| You can view the full 16:9 picture in your widescreen TV. |
| ||
|
|
|
| BRIGHT : It makes the Front Panel Display bright. |
|
| ANGLE MARK | 1 |
| ||
|
| DIM : It makes the Front Panel Display dim. |
| ||
| 2 |
| |||
| 1 | ON : Displays ANGLE MARK in the upper right corner of |
| ||
|
| AUTO DIM : It makes the Front Panel Display dim automati- |
| ||
| 3 |
| |||
|
|
| |||
|
| screen. |
| ||
|
|
| cally when playing a DVD. |
| |
|
| OFF : Doesn’t display it. |
|
| |
| 2 |
|
| ||
| BLACK LEVEL |
| |||
| STILL MODE |
| |||
| Adjust the brightness of screen. |
| |||
|
|
|
| ||
36 | 37 |