Bearbeitung

HDD

Wiedergabeliste bearbeiten

JAN/02/2007 13:47

Szene Nr. 1/6

01

00:02:24

02

0:00:34

03

00:00:31

04

0:01:22


05

0:00:09


06

00:01:06


07

00:00:00


Ändern


Beweg.


Hinzu

Löschen


sWIEDRG

eBEENDEN

HDD


Wiedergabeliste bearbeiten

JAN/02/2007 13:47


Szene Nr. 1/6

01

00:02:24

02

0:00:34

03

00:00:31

04

0:01:22


Wollen Sie die Szene löschen?


Ja


Nein


05

0:00:09


06

00:01:06


07

00:00:00


Ändern


Beweg.


Hinzu

Löschen

<BEWEGEN

sWÄHLEN


rZURÜCK

eBEENDEN

HDD


Wiedergabeliste

JAN/02/2007 13:47


1/3


Nr.

Titel

Länge


001 JAN/02/2007 13:47

00:06:09


002 JAN/02/2007 13:51

00:03:33


003 JAN/02/2007 14:08

00:01:54


i WIDERGABELISTE


4 Jan/02/2007 13:47


7 6 Szene


Bearb.

Sortieren

Titelliste


a Marke eBEENDEN

HDD


Wiedergabeliste

JAN/02/2007 13:51


2/3

Nr.

Titel

Länge


001 JAN/02/2007 13:47

00:06:09


002 JAN/02/2007 13:51

00:03:33

Löschen

003 JAN/02/2007 14:08

00:01:54

KopierenW.-Liste


Neue4WiedergabelisteJan/02/2007 13:51

Alle7auswählen6 Szene

Alle abwählen

Bearb.

Sortieren

Titelliste

a Marke eBEENDEN

HDD


Wiedergabeliste

JAN/02/2007 13:51


2/3


Nr.

Titel

Länge


001 JAN/02/2007 13:47

00:06:09


002 JAN/02/2007 13:51

00:03:33


2 Positionen sind ausgewählt

00:01:54


003 JAN/02/2007 14:08

i W.-Liste


Wollen Sie löschen?


4 Jan/02/2007 13:51

Ja

Nein


7 6 Szene


Bearb.

Sortieren

Titelliste


<BEWEGEN

sWÄHLEN

rZURÜCK

eBEENDEN

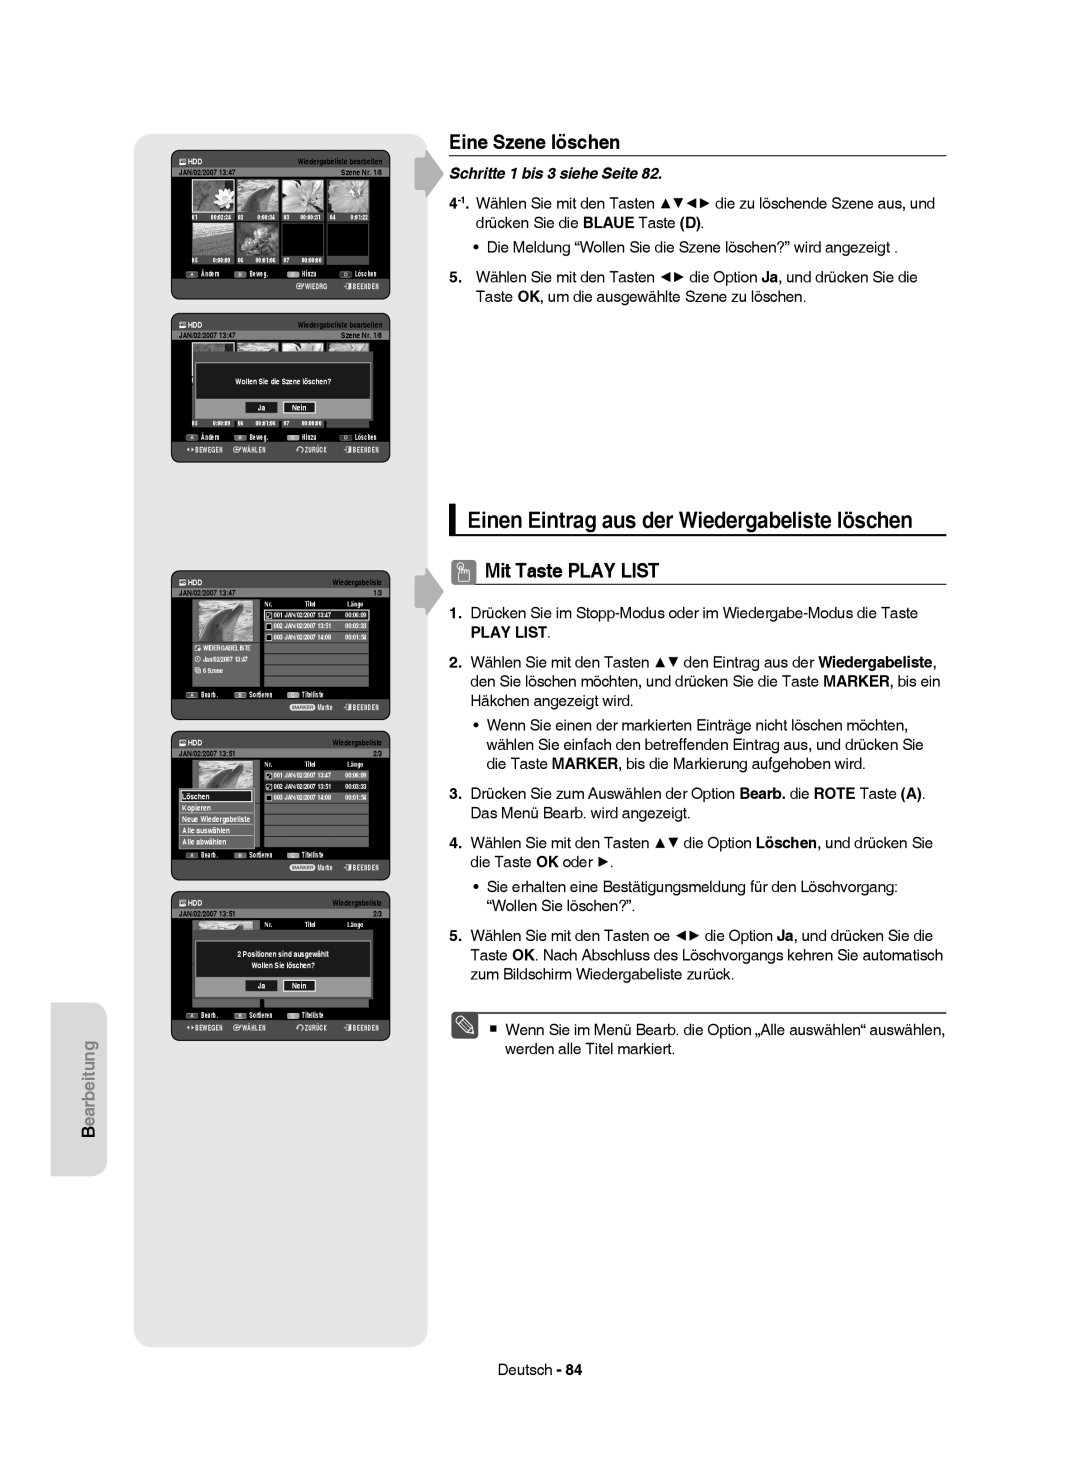
Eine Szene löschen

Schritte 1 bis 3 siehe Seite 82.

4-1.Wählen Sie mit den Tasten ▲▼◄► die zu löschende Szene aus, und drücken Sie die BLAUE Taste (D).

Die Meldung “Wollen Sie die Szene löschen?” wird angezeigt .

5.Wählen Sie mit den Tasten ◄► die Option Ja, und drücken Sie die Taste OK, um die ausgewählte Szene zu löschen.

Einen Eintrag aus der Wiedergabeliste löschen

N Mit Taste PLAY LIST

1.Drücken Sie im Stopp-Modus oder im Wiedergabe-Modus die Taste

PLAY LIST.

2.Wählen Sie mit den Tasten ▲▼ den Eintrag aus der Wiedergabeliste, den Sie löschen möchten, und drücken Sie die Taste MARKER, bis ein Häkchen angezeigt wird.

Wenn Sie einen der markierten Einträge nicht löschen möchten, wählen Sie einfach den betreffenden Eintrag aus, und drücken Sie die Taste MARKER, bis die Markierung aufgehoben wird.

3.Drücken Sie zum Auswählen der Option Bearb. die ROTE Taste (A). Das Menü Bearb. wird angezeigt.

4.Wählen Sie mit den Tasten ▲▼ die Option Löschen, und drücken Sie die Taste OK oder .

Sie erhalten eine Bestätigungsmeldung für den Löschvorgang: “Wollen Sie löschen?”.

5.Wählen Sie mit den Tasten oe ◄► die Option Ja, und drücken Sie die Taste OK. Nach Abschluss des Löschvorgangs kehren Sie automatisch zum Bildschirm Wiedergabeliste zurück.

MWenn Sie im Menü Bearb. die Option „Alle auswählen“ auswählen, werden alle Titel markiert.

Deutsch - 84

Page 84
Image 84
Samsung DVD-HR750/XEG, DVD-HR750/XEB manual Einen Eintrag aus der Wiedergabeliste löschen, Eine Szene löschen, Szene Nr /6

DVD-HR750/AUS, DVD-HR750/XEB, DVD-HR750/XEG, DVD-HR749/XEG specifications

The Samsung DVD-HR750 series, which includes models DVD-HR750/XEG, DVD-HR750/XEB, and DVD-HR750/AUS, is renowned for its versatility and cutting-edge technology in the realm of home entertainment systems. These DVD recorders are designed for users who seek a reliable way to record, playback, and manage their favorite TV shows and movies, merging traditional DVD capabilities with innovative digital recording features.

One of the standout features of the DVD-HR750 series is its built-in hard disk drive (HDD), allowing users to record hours of television content without the need for physical discs. With various capacities, users can easily schedule recordings with the integrated TV guide, making it simple to capture shows and movies with just a few clicks. The HDD also facilitates time-shifting capabilities, enabling viewers to pause, rewind, and replay live television, providing a flexible viewing experience.

In addition to recording, the DVD-HR750 series supports a wide range of media formats, including DVD-RW, DVD-R, DVD+R, and CD formats. This versatility ensures that users can enjoy movies, music, and other content from various sources, maximally utilizing their collections. The devices are equipped with transcoding technology that allows for better playback of different digital formats, improving compatibility across various media.

The Samsung DVD-HR750 models also come with advanced connection options, including HDMI output, offering high-definition video quality for an enhanced viewing experience. The inclusion of USB ports allows for easy transfer and playback of media files from USB drives, expanding the usability further. Additionally, the guides and interfaces are user-friendly, ensuring that even those less familiar with technology can navigate the system with ease.

Moreover, the Samsung DVD-HR750 series emphasizes energy efficiency, complying with modern standards to reduce power consumption while still delivering robust performance. The sleek design and compact build make it a stylish addition to any home entertainment setup, further enhancing its appeal.

In summary, the Samsung DVD-HR750/XEG, DVD-HR750/XEB, and DVD-HR750/AUS models stand out with their robust features, including a built-in HDD for flexible recording, comprehensive media support, easy connectivity options, and user-friendly interfaces. These technologies exemplify Samsung's commitment to delivering high-quality entertainment solutions that cater to the diverse needs of modern viewers.