Description-Rear Panel
Pr | Pb | Y |
COAXIAL | COMPONENT VIDEO OUT |
OPTICAL
RL
ANALOG AUDIO OUT | VIDEO OUT |
Tour of the Remote Control
1
2
3
4
5
6.STOP Button ( ![]() )
)
7.MENU Button
11• Brings up the DVD player’s menu.
8.RETURN Button
•Returns to a previous menu.
9.REPEAT
•Use to mark a segment to repeat between A and B.
12
13 | 10. SUBTITLE Button |
| |
14 | 11. OPEN/CLOSE ( ) Button |
|
• To open and close the disc tray.
1 | 2 | 3 | 4 |
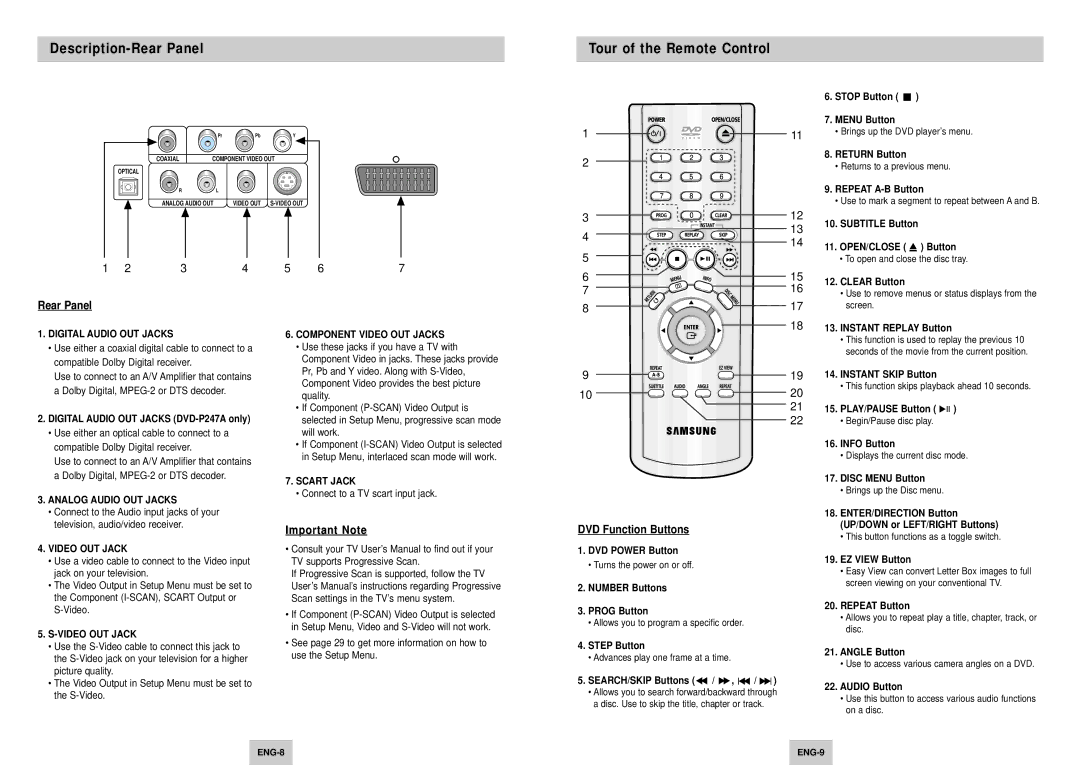
Rear Panel
1. DIGITAL AUDIO OUT JACKS |
• Use either a coaxial digital cable to connect to a |
compatible Dolby Digital receiver. |
Use to connect to an A/V Amplifier that contains |
a Dolby Digital, |
2. DIGITAL AUDIO OUT JACKS |
• Use either an optical cable to connect to a |
compatible Dolby Digital receiver. |
Use to connect to an A/V Amplifier that contains |
a Dolby Digital, |
3. ANALOG AUDIO OUT JACKS |
• Connect to the Audio input jacks of your |
television, audio/video receiver. |
4. VIDEO OUT JACK |
• Use a video cable to connect to the Video input |
jack on your television. |
• The Video Output in Setup Menu must be set to |
the Component |
5. |
5 | 6 | 7 |
6.COMPONENT VIDEO OUT JACKS
•Use these jacks if you have a TV with Component Video in jacks. These jacks provide Pr, Pb and Y video. Along with
•If Component
•If Component
7.SCART JACK
•Connect to a TV scart input jack.
Important Note
• Consult your TV User’s Manual to find out if your |
TV supports Progressive Scan. |
If Progressive Scan is supported, follow the TV |
User’s Manual’s instructions regarding Progressive |
Scan settings in the TV’s menu system. |
• If Component |
in Setup Menu, Video and |
6
7
8
9
10
DVD Function Buttons
1.DVD POWER Button
•Turns the power on or off.
2.NUMBER Buttons
3.PROG Button
•Allows you to program a specific order.
15 | 12. CLEAR Button | |
16 | ||
• Use to remove menus or status displays from the | ||
| ||
17 | screen. |
18 | 13. | INSTANT REPLAY Button |
|
| • This function is used to replay the previous 10 |
|
| seconds of the movie from the current position. |
19 | 14. | INSTANT SKIP Button |
20 |
| • This function skips playback ahead 10 seconds. |
|
|
2115. PLAY/PAUSE Button ( ![]()
![]()
![]() )
)
22• Begin/Pause disc play.
16.INFO Button
•Displays the current disc mode.
17.DISC MENU Button
•Brings up the Disc menu.
18.ENTER/DIRECTION Button (UP/DOWN or LEFT/RIGHT Buttons)
•This button functions as a toggle switch.
19.EZ VIEW Button
•Easy View can convert Letter Box images to full screen viewing on your conventional TV.
20.REPEAT Button
•Allows you to repeat play a title, chapter, track, or disc.
• Use the |
the |
picture quality. |
• The Video Output in Setup Menu must be set to |
the |
• See page 29 to get more information on how to |
use the Setup Menu. |
4. STEP Button
21. ANGLE Button
• Advances play one frame at a time.
• Use to access various camera angles on a DVD.
5. SEARCH/SKIP Buttons ( | / | , | / | ) | 22. AUDIO Button | |
• Allows you to search forward/backward through | ||||||
• Use this button to access various audio functions | ||||||
a disc. Use to skip the title, chapter or track. |
| |||||
| on a disc. | |||||
|
|
|
|
| ||
| ||
|
|
|