DVD-R120/R121
Non sono concessi diritti per l’utilizzo commerciale
Avvertenza
Italiano
Maneggiamento dei dischi
Precauzione
Importanti istruzioni di sicurezza
Manutenzione della cassa esterna
Uso dei dischi MPEG4
Conservazione dei dischi
Specifiche dei dischi
Uso dei dischi CD-R/RW
DVD-RW modalità Video
Non usare i seguenti tipi di dischi
Riproduzione e registrazione di dischi DVD-RAM
DVD-RW modalità VR
Impostazione della opzioni del display
Sommario
Antenna + Registratore DVD +
Altri tipi di collegamenti del cavo di uscita
Registrazione del programma TV visualizzato
Cancellazione di una registrazione
Registrazione da un apparecchio esterno
Registrazione flessibile solo per la
Modalità di registrazione selezionabile
Caratteristiche generali
Scansione progressiva di alta qualità
Riproduzione di file MPEG4
Avvertenze per luso del manuale di istruzioni
Prima di leggere il
Manuale di istruzioni
Simboli utilizzati nel manuale
Uso di un disco DVD-R
Creazione di un elenco brani DVD-RAM/-RW in modalità VR
Uso di un disco DVD-RW in modalità VR
Uso di un disco DVD-RW in modalità Video
Impostazione del telecomando
Accessori
Disimballaggio
Preparazione del telecomando
Codici TV controllabili
Display del pannello anteriore
Descrizione
Pannello anteriore DVD-R120
Ricevitore del telecomando 11. PR
Pannello anteriore DVD-R121
Trasmette i segnali DVD in uscita
Pannello posteriore
Ventola
Il collegamento dell’antenna non
Panoramica del telecomando
Decoder esterno + TV
Guida rapida
Guida rapida
Altri collegamenti
Modalità TV
Collegamento del Altri collegamenti Registratore DVD
Modalità DVD
Scart
Modalità di uscita progressiva, S-Video e video Component
Collegare i cavi dell’antenna RF, come mostra la figura
Caso 1 Collegamento a un jack di uscita Video Composite
Caso 2 Collegamento a un jack di uscita S-Video
Esattamente ai jack di ingresso
Caso 3 Jack di uscita Component Video
Caso 1 Collegamento al televisore
Jack di uscita component Y,PB,PR del
Rosso bianco
Dall’apparecchiatura collegata videoregistratore, STB
Se l’ingresso non viene selezionato
Lettore DVD o videocamera
La selezione di AV3 in viene effettuata
Tasto OK
Navigazione nei menu a schermo
Tasto Menu
Tasti … / † , œ / √
La scansione automatica dei canali viene avviata
Collegare il cavo RF come indicato a pagina
Premere un tasto numerico per selezionare la lingua
Avviare limpostazione automatica
Collegamenti a pagina
Controllare la data e l’ora
OK o √
Per informazioni, vedere la sezione sui
Con lunità in modalità Arresto/Nessun
Disco, premere il tasto Menu
Premere i tasti †…œ √ per selezionare Nazione
Verrà avviata la scansione automatica dei canali
Con lunità in modalità Arresto/Nessun disco
Premere il tasto Menu
Premere il tasto Menu
Impostazione delle opzioni della lingua
Verrà visualizzato il menu di sistema
Impostazione dell’ora nella modalità EP
Con lunità in modalità Arresto/Nessun
Creazione automatica dei
Capitoli
Quindi premere il tasto OK o √
Lumonisita, quindi premere il tasto OK o √
Con lunità in modalità Arresto/Nessun disco
Sì Modalità Nicam
Registrazione DivXR
No Impostare questa opzione solo per registrare
Compressione Dinamica
Impostazione delle opzioni audio
Opzioni audio
Vscite Digital
Modo Component
Jack di uscita video disponibili
Verrà visualizzato il menu di impostazione del video
Jack di uscita video disponibili sono i seguenti
Scansione progressiva
Per disattivare, premere il tasto STOP. Premere il tasto OK
Scansione interlacciata
Tasto STOP.. Premere il tasto OK
Riduzione rumore 3D
Opzioni dello schermo video
Al menu precedente. Premere il tasto
Menu per uscire dal menu
Da 0 a 9 del telecomando
Se si dimentica la password
Impostazione del controllo famigliare
Premere i tasti …† per selezionare
Premere il tasto OK o √
Password’
Se si dimentica la password, seguire la
Informazioni sui livelli di regolazione
DVD-RAM DVD-RW
Prima della registrazione
Dischi registrabili
DVD
DVD-RW modalità Video/-R
Formati di registrazione
Modo Registrazione
Video non registrabile
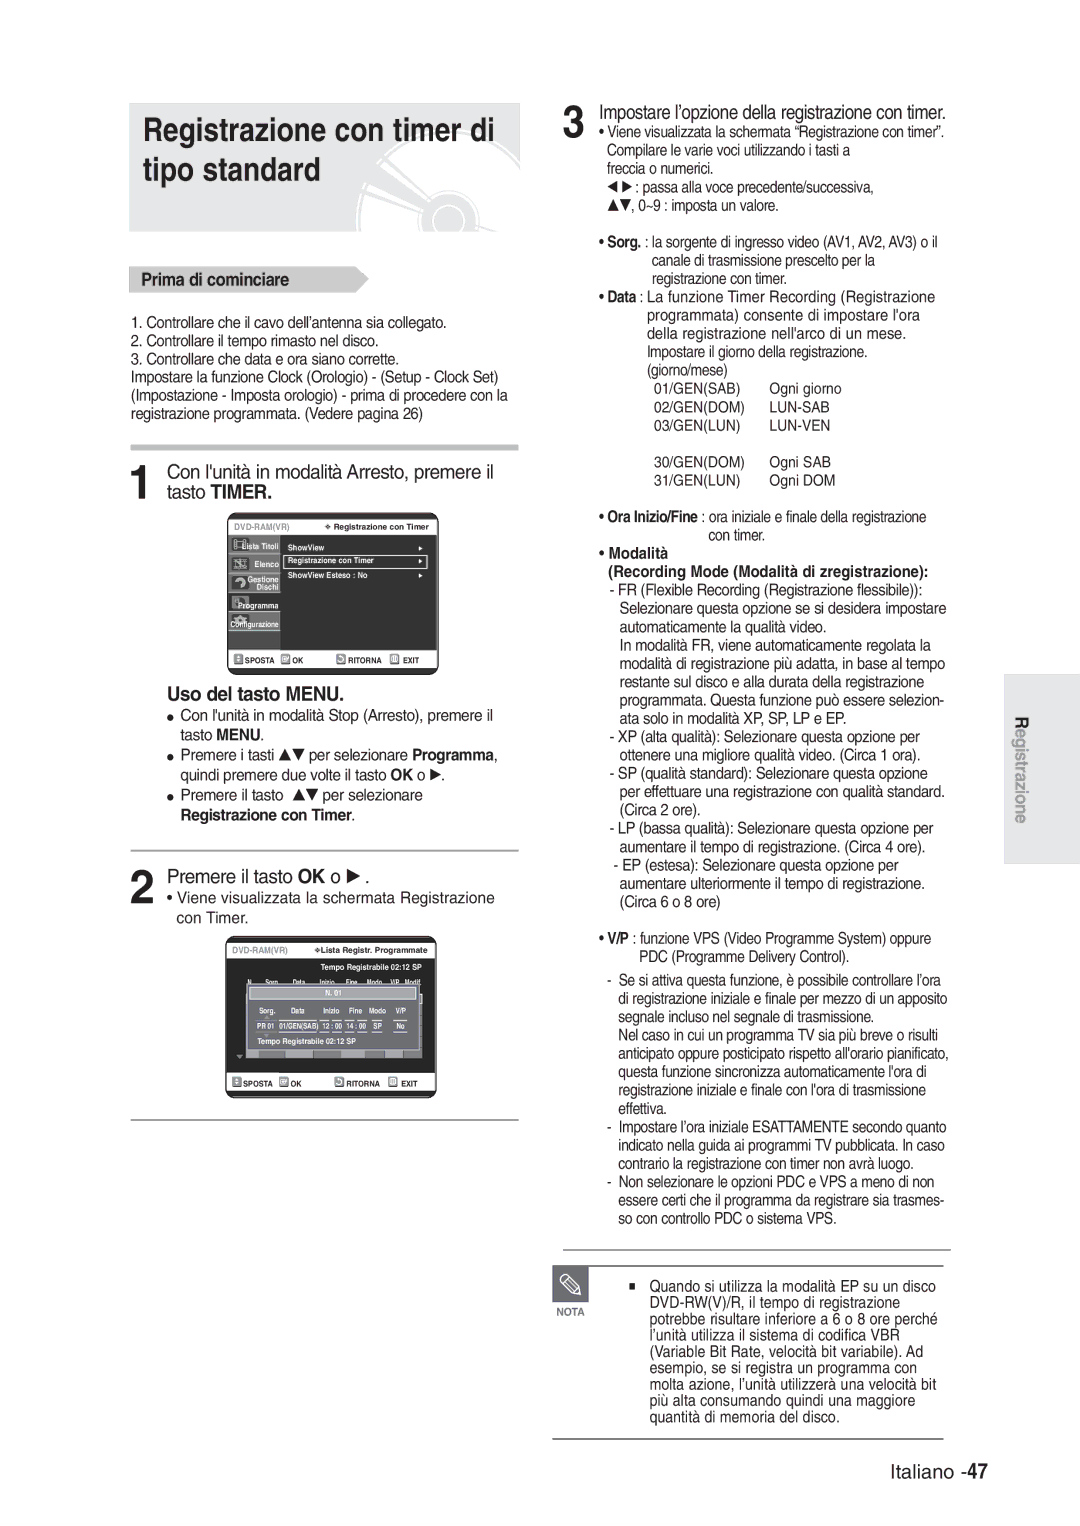
Prima di cominciare
Registrazione del
To in quel momento
Tasto Info
Interruzione della registrazione
SP LP EP XP
Premere il tasto REC
Non utilizzare dischi di authoring DVD-R con questa unità
PR Numero AV1 AV2 AV3 DV
Sospensione della registrazione
Sorgente di ingresso
Copia da una videocamera
Programmi TV da 1 a
Il contatore del timer decresce minuto per
Premere il tasto REC per avviare la registrazione
030 100 .. Sí
Viene visualizzata la schermata Registrazione
Con Timer
Modalità Recording Mode Modalità di zregistrazione
Uso del tasto Menu
Premere il tasto OK o √
La registrazione con timer non entrerà in fun- zione
Premere il tasto OK
La voce selezionata verrà eliminata dallelenco
Con lunità in modalità Arresto, premere il tasto Timer
Tramite il telecomando
Uso della funzione ShowView
Utilizzando il pulsante Menu
Premere il tasto OK
Registrazione dellelenco di registrazioni programmate
ShowView Esteso
DVD-ROM/DVD+RW/PD/MV
Prima della riproduzione
Codice regionale solo per i DVD-Video
Dischi che non possono essere riprodotti
Premere il tasto OPEN/CLOSE
Riproduzione di un disco
Per interrompere la riproduzione premere il tasto Stop
Lista titoli
Uso del disco e menu Titolo
Uso delle funzioni di ricerca
Ricerca allinterno di un capitolo o di un track
Salto di capitoli o tracce
Riproduzione rallentata
Premere i tasti …† per selezionare Tempo
Uso della funzione Ripetizione
Riproduzione ripetuta playback ripetuto
Uso del tasto Repeat
Premere ripetutamente il tasto Repeat per selezionare No
Uso del tasto Anykey
Ripetizione ripetuta playback ripetuto
Premere il tasto Subtitle durante la riproduzione
Selezione del sottotitolo
Uso del tasto Subtitle
Che inizi la ripro
Premere il tasto Audio durante la riproduzione
Selezione della lingua per laudio
Modifica dellangolazione della telecamera
Uso del tasto Audio
Premere i tasti …† œ √ per portarsi sullarea da ingrandire
Zoom in avanti
Uso dei bookmark
Premere il tasto Marker durante la riproduzione
Possibile effettuare solo la riproduzione
Riproduzione di un bookmark Uso degli indicatori
Cancellazione di un bookmark
Riproduzione di un CD audio CD-DA
Riproduzione di un indicatore
Cancellazione di un indicatore
Riproduzione di un CD/MP3 audio
Ripetizione e riproduzione
Tasti del telecomando utilizzati per la
Riproduzione dei CD CD-DA audio
Premere il tasto / Riproduzione veloce X2, X4
Opzione Riproduzione Normale, Casuale, Intro oppure Elenco
Elementi della schermata MP3
Un MP3 nella modalità Riproduzione o Stop
Modalità Opzione Riproduzione Programmazione di track
Premere i tasti œ √ per selezionare Opzione Riproduzione
Premere i tasti …† œ √ per selezionare unimmagine
Riproduzione di una immagine
Descrizione delle funzioni MPEG4
Riproduzione di un file MPEG4
Inserire un disco Jpeg nel vassoio del disco
AVI, .MPEG, .DIVX
Premere il tasto Menu
Riproduzione della lista titoli
Uso del tasto Elenco Titoli
Uso del tasto Menu
Premere i tasti …† per selezionare Titolo
Elementi della schermata Lista titoli
Title List
Registrato premendo il tasto Anykey
Elenco
Lista Titoli
Uso del tasto Menu
Modifica di base Lista Titoli
Rinominare etichettare un titolo
Eliminazione di un titolo
Blocco protezione di un titolo
Gli elementi protetti non possono essere
Eliminazione della sezione di un titolo
Modalità VR
Titolo. Vedere a pagina
Deve essere inferiore a 5 secondi
Premere il tasto OK per eseguire la funzione Elimina
Tasti per la riproduzione
La sezione selezionata viene eliminata
Premere il tasto OK per eseguire la funzione Crea
Creazione di un elenco
Con lunità in modalità di arresto, premere il tasto Menu
Premere il tasto OK nel punto finale
Viene visualizzata nuovamente la schermata Modifica elenco
Modifica dellelenco
Premere il tasto Play List
Lunità riproduce le voci dellelenco Modalità VR
Il titolo modificato viene visualizzato nellapposito campo
Rinominare una voce dellelenco
Digitare i caratteri desiderati utilizzando i tasti …† œ √
Viene visualizzata la schermata Modifica scena
Riproduzione della scena selezionata
Viene selezionato lelemento dellelenco da riprodurre
Modificare utilizzando i tasti per la riproduzione
Premere il tasto OK nel punto iniziale della scena
Premere il tasto OK nel punto finale della scena
Modifica di una scena Sostituzione di una scena
Selezionare il punto finale della sezione in cui si
Aggiunta di una scena
Posizione in cui spostare la scena selezionata
Viene visualizzata la schermata Aggiungi scena
Premere i tasti …† per selezionare Elimina
Copiare una voce nellelenco
Eliminazione di una scena
’elenco brani selezionato verrà copiato
Lelenco può contenere fino a un massimo di 99 voci titoli
Eliminazione di una voce dallelenco
Uso del tasto Playlist
Quindi premere il tasto OK
Al disco viene assegnato un nome
Gestione Dischi
Modifica del nome del disco
Viene visualizzata la schermata Modifica nome
Disattivare la protezione disco
Protezione disco Formattazione di un disco
Formattato o eliminato in modo accidentale
Tutte le liste di titoli saranno eliminate
DVD-RW
Viene visualizzato il messaggio ‘Finalizzare questo disco?’
Finalizzazione di un disco
Modalità V/VR
Definalizzazione di un disco
DVD-RAM/DVD-RW/DVD-R
Risoluzione dei problemi
Alimentazione
Registrazione
Il rapporto lunghezza/altezza è fisso per
Riproduzione
Lalto
Suono
Registrazione con timer
Video
Seguire le istruzioni riportate
Se il problema persiste, rivolgersi al
Telecomando
Varie
Uscita audio
Specifiche
Secam L, PAL B/G
MPEG-II
FAX /92141801 Servizio Clienti Tel
Italia Italy
RD Elettronica Service S.A.S VIA Caldieri 124/126
Ragione Sociale
Audio & Video Point DI Greco S Largo Compiegne
VIA Mondin
Bottasso Giulio VIA Caduti SUL Lavoro
ITA