DVD-VR320
Avertissement
Précautions
Précautions
Comment tenir les disques
DVD-Video, Audio CD
Évitez de toucher la surface dun Disque enregistré
DVD vidéo
CD audio
CD-R et CD-RW
Motion Jpeg n’est pas pris en charge
’utilisez pas les disques suivants
Protection
Table des matières
Au téléviseur par un câble RF
Lecture d’une cassette VHS magnétoscope Alignement
Magnétoscope Système de recherche variable
Avant d’enregistrer
Programmée Utilisation de la fonction ShowView
Caractéristiques
De base
Avant de lire le guide
Une panoplie d’options d’enregistrement
Création dune liste de lecture DVD-RAM/-RW en mode VR
Utilisation d’un DVD-RAM
Utilisation d’un DVD-RW
Utilisation d’un DVD-R
Déballage
Accessoires
En cas de dysfonctionnement de la télécommande
Réglage de la télécommande
Plateau de disques DVD
Boutons Prog
Panneau arrière
Ventilateur
Touches de commande du téléviseur
Touche Timer REC
Touche DVD
Touche F.ADV/SKIP Touches de lecture
Raccordement et configuration
Raccordez l’autre extrémité du câble RF au
Connectez le câble de lantenne
Fiche dentrée correspondante de votre téléviseur
Pé ritel à 21 broches
AV1 TV Au moyen d’un câ ble Pé ritel à 21 broches
Vidéo Composant Vidéo
Numérique Dolby, vous avez la possibilité de contourner
Connexions du récepteur AV
Si votre récepteur A/V est équipé dun décodeur
Connexion des périphériques
Appuyez sur ce bouton de votre télécommande
Navigation dans le Menu de lécran
Boutons … / †,œ / √
Bouton OK
Branchement et réglage automatique
Sélectionnez Pays à laide des touches …† œ √
Attendez que l’heure et la date exactes
’affichent automatiquement
Ré glage automatique de l’horloge
Appuyez sur œ √ pour sélectionner l’heure
Auto Horloge
Oui
Appuyez sur les boutons …† pour sélectionner
Installation Manuelle
Apparaisse à l’écran
Tère suivant ou le Respectivement
Appuyez sur le bouton OK pour sauvegarder le nom
Effacement d’une chaîne mémorisée
Modification du Tableau des chaînes réglées manuellement
Configuration des options de langue
Le menu Configuration de la langue s’affiche
Langue, puis appuyez sur le bouton OK ou √
’option de la langue souhaitée, puis appuyez sur
Compression Dynamique
Configuration des options audio
Sortie Numé rique
Le menu des options Vidéo s’affiche
Format É cran
Vidé o, puis appuyez sur le bouton OK ou √
Configuration du contrôle parental
Propos du niveau dé valuation
Configuration du magnétoscope
Changement du code secret
Systè me, puis appuyez sur le bouton OK ou √
VCR, puis appuyez sur le bouton OK ou √
Dureé de la cassette
Lecture automatique
Ré pé tition automatique
IPC Contrô le Intelligent de l’Image
Appuyez sur les boutons …† pour sélectionner
Temps DVD en Mode EP Création automatique de
Chapitre
Affichage frontal
Ton OK ou √
Non ou Oui, puis appuyez sur le bouton OK ou √
Sortie Vidéo
NICAM, puis appuyez sur le bouton OK ou √
Composant. Reportez-vous à la
Mode Composant
’affiche
Progressif
Annulation du balayage
Les types de disque pris en charge sont les suivants
Disques non compatibles
Code de région pour DVD-Vidéo seulement
Logo
Inséré, l’appareil demeure en mode arrêt
Plateau de disque
Mise en marche initiale de l’appareil
Avec magnétoscope affiche la liste des fichiers à
Utilisation du Disc Menu et du Title Menu
Utilisation des fonctions de recherche et de saut
Lecture au ralenti Lecture par sauts
Lecture au ralenti
Lecture par sauts
Accéder à une scène directement avec
Les DVD-RAM/-RW mode VR, DVD-RW et
Lecture à répétition
’aide des touches …†
Tion à l’aide des touches …†
Pour revenir en mode de lecture normale
Sélection de la langue et du sous-titrage
Utilisation de la touche Anykey
Sé lection de la langue
Appuyez sur la touche Anykey durant une
Zoom avant
De caméra
Utilisation de la touche Angle
Sélection à l’aide des touches …†œ √ puis
Lecture à partir d’un signet
Suppression d’un signet
Appuyez sur la touche Marker durant une lecture
Appuyez sur la touche Marker
La barre de sélection à l’aide des touches œ √
Lecture à partir d’un repère
Suppression d’un repère
Boutons de la télécommande ser- vant à la lecture de CD
Lecture d’un CD audio CD-DA
Lecture d’un CD audio CD-DA
Audio CDCD-DA Screen Elements
Lecture d’un disque
Éléments du menu MP3
De sélection à l’aide des touches œ √
Mode Options de
Lecture Pistes
Lecture d’un disque image
Sélectionnez une image en déplaçant la barre de
Sélection à l’aide des touches …† œ √
1Si vous appuyez sur la touche √ll l’écran du
Navigation par Disque
Appuyez sur le bouton OK ou √ pour sélectionner
DivX
Fichier avi DivX/XviD puis appuyez sur le bouton OK
Alignement
Lecture image par image
Avance/rembobinage à vitesse variable
Saut
Système de recherche variable
Bande à l’endroit de votre choix et appuyez sur la
Avant d’enregistrer
Disques inscriptibles
Mode d’enregistrement
Formats d’enregistrement
DVD-RWmode V/-R
DVD-RAM/-RWmode VR
Le mécanisme de protection Cprm
Enregistrement du programme en cours de visionnage
Pause et reprise d’un enregistrement
Enregistrement à partir d’un périphérique
Enregistrement
Immédiat OTR
Enregistrer par Minuterie
Le chiffre du compteur de la minuterie défile
Retour au menu précédent
Vitesse denregistrement DVD
Quitter sans sauvegarder le réglage actuel
Edition de la liste d’enreg- istrement programmée
Éditer , puis appuyez sur le bouton OK ou √
Cours d’enregistrement
Suppression de la liste d’enregistrement pro- grammée
Sélectionnez Oui en déplaçant la barre de sélec
Utilisation de la fonction ShowView
ShowView, puis appuyez sur le bouton OK ou √
Code ShowView
Si le programme et les horaires sont corrects
Compartiment à cassette du magnétoscope
ShowView Allongé
Avant de commencer l’enregistrement
Fonctionnalités
Au magnétoscope
Vérification de la durée restante
Regarder un autre canal
Toscope et inversement
Copie du DVD au magnétoscope
Copie directe du DVD au magnétoscope
OK ou √
Copie du magnétoscope au DVD
Copie directe du magnétoscope au DVD
Copier, puis appuyez sur le bouton OK ou √
Trouvé
Lecture de la Liste de
Avec la touche Title List
Avec la touche Menu
’écran Liste de Titres s’affiche
Éléments de l’écran de la Liste de Titres
Titre du titre sélectionné
Modification du nom d’un titre
Appuyez sur OK
Verrouillage d’un titre par mesure de protection
Suppression d’un titre
Sélection à l’aide des touches …† puis appuyez
Sur OK ou sur √
Suppression dune partie d’un titre
Présents sur le disque
Appuyez sur la touche OK lorsque vous avez
Positionné le disque au début de la partie à sup
Primer. L’image et l’heure de la position de départ
’affichent dans la sous-fenêtre de la position de
Modifications avancées Liste de Lecture
Création d’une Liste de Lecture
Création d’une nouvelle liste de lecture
Pour revenir au menu Éditer la Liste de Lecture
Lecture de titres dans la Liste de Lecture
Touche Play List
’écran Éditer la Liste de Lecture s’affiche
Avec la touche Menu
’aide des touches …†, puis appuyez sur OK ou sur √
’écran Renommer s’affiche
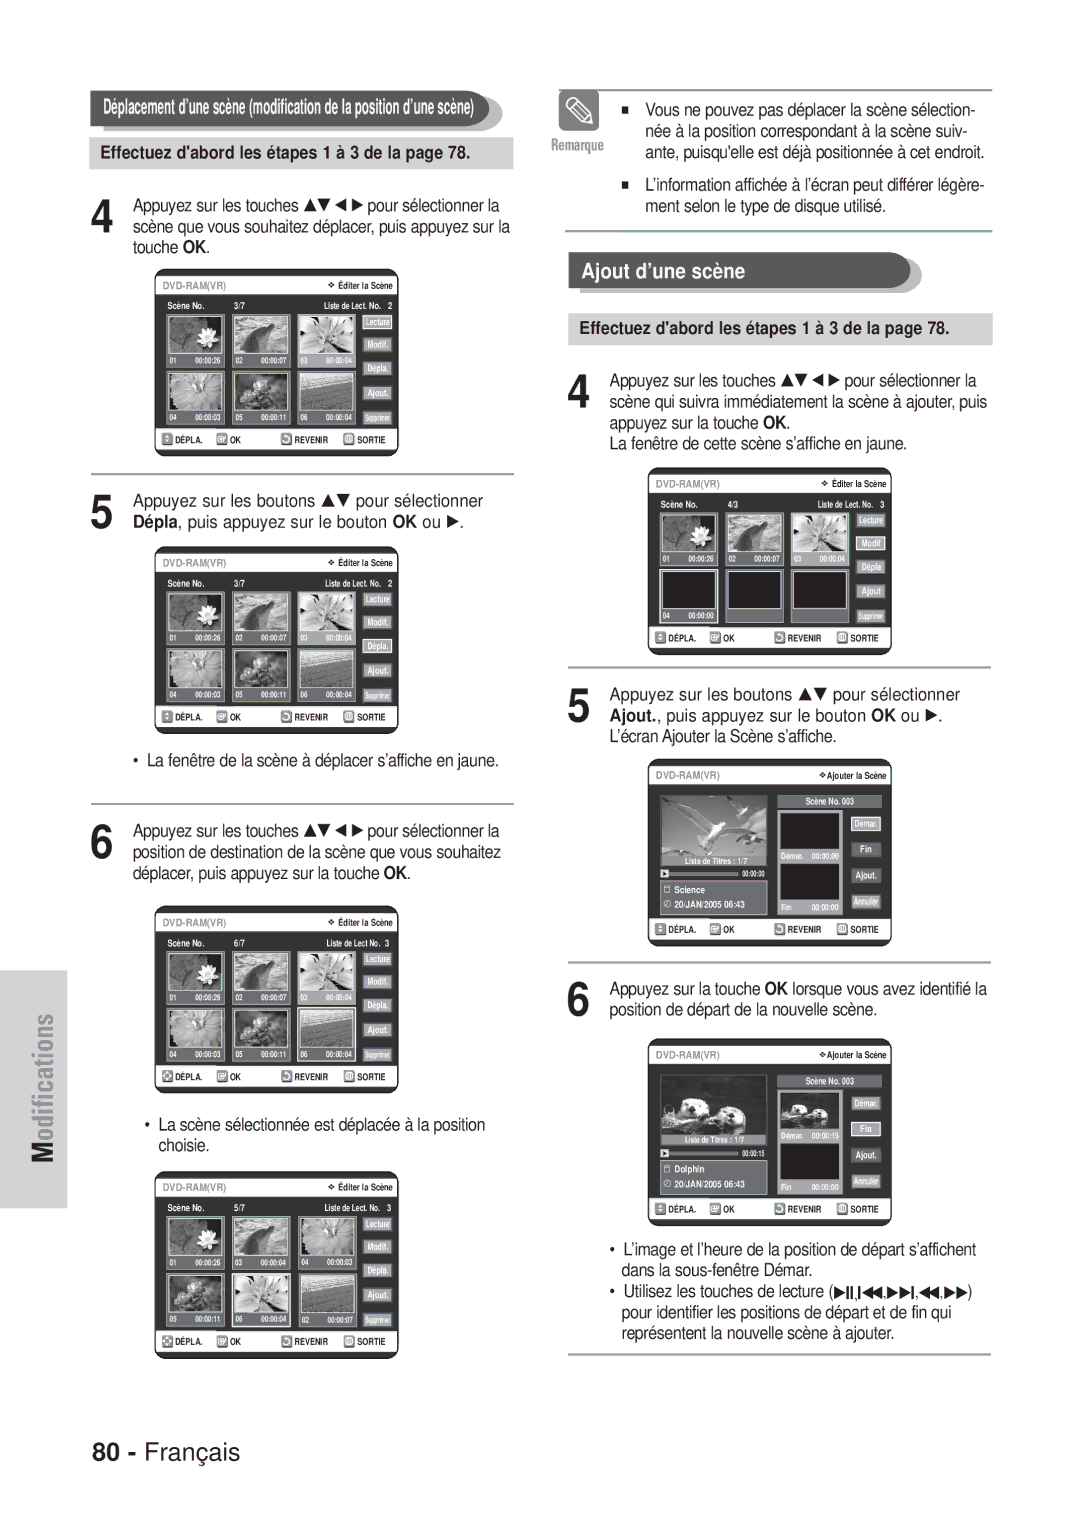
Édition d’une scène pour la Liste de Lecture
Effectuez dabord les étapes 1 à 3 de la
Nouvelle position de fin de la scène
’écran Modifier une Scène s’affiche
Chang., puis appuyez sur le bouton OK ou √
Touche OK
Appuyez sur la touche OK
Dépla , puis appuyez sur le bouton OK ou √
La fenêtre de cette scène s’affiche en jaune
Suppr., puis appuyez sur le bouton OK ou √
Copie d’un titre de la Liste de Lecture sur une bande vidéo
Ajout., puis appuyez sur le bouton OK ou √
Suppression d’un titre de la Liste de Lecture
’aide des touches …†, puis appuyez sur OK ou sur
Oui, puis appuyez sur le bouton OK
Liste de Lecture à la fin de cette opération
Modification du Nom du Disque
Touche Menu
Protection du Disque
Formatage du disque
DVD-mode VR
Finalisation du disque
Le disque est ensuite formaté
Annulation d’une finalisation de disque modes V et VR
Suppression de toutes les Listes de Titres
La touche Menu
Toutes les Listes de Titres sont supprimées
Appuyez sur le bouton OK ou √
Outils de référence
Dépannage DVD-VIDEO/DVD-RAM/-RW/-R
Configurés dans le
Pas Le disque est arrêté La télécommande ne
’icône Est
Affichée à l’écran
Problème Cause possible et solution
Entrée
Sortie
France
Paris Nord 66, rue des Vanesses BP 50116 Villepinte
Samsung Electronics France
Cet appareil est distribué par
AK68-00671F-00