DVD-Recorder

Edit Scene

DVD-RAM(VR)


Scene No. 2 / 7

Playlist No. 3

Play

Modify

01

00:00:05

02

00:00:06

03

00:00:07

Move


Add


Delete

04

00:00:08


05

00:00:10


06

00:00:11


MOVE ENTER RETURN EXIT

DVD-Recorder


Modify Scene

DVD-RAM(VR)


Scene No. 001


Start

End


Title List : 1/31

00:00:25

00:00:00


00:00:25

Start

End

Change


Cancel

MOVE

ENTER

RETURN

EXIT

DVD-Recorder


Modify Scene

DVD-RAM(VR)


Scene No. 001


Start

End


Title List : 1/31

00:00:04

00:00:10

II


00:00:10

Start

End

Change


Cancel

MOVE

ENTER

RETURN

EXIT

DVD-Recorder


Edit Scene

DVD-RAM(VR)


Scene No.

2 / 7


Playlist No. 3


Play


Modify

01

00:00:05


02

00:00:42

03

00:00:04

Move


Add

04

00:00:03

05

00:00:11

06 00:00:04

Delete


MOVE ENTER RETURN EXIT

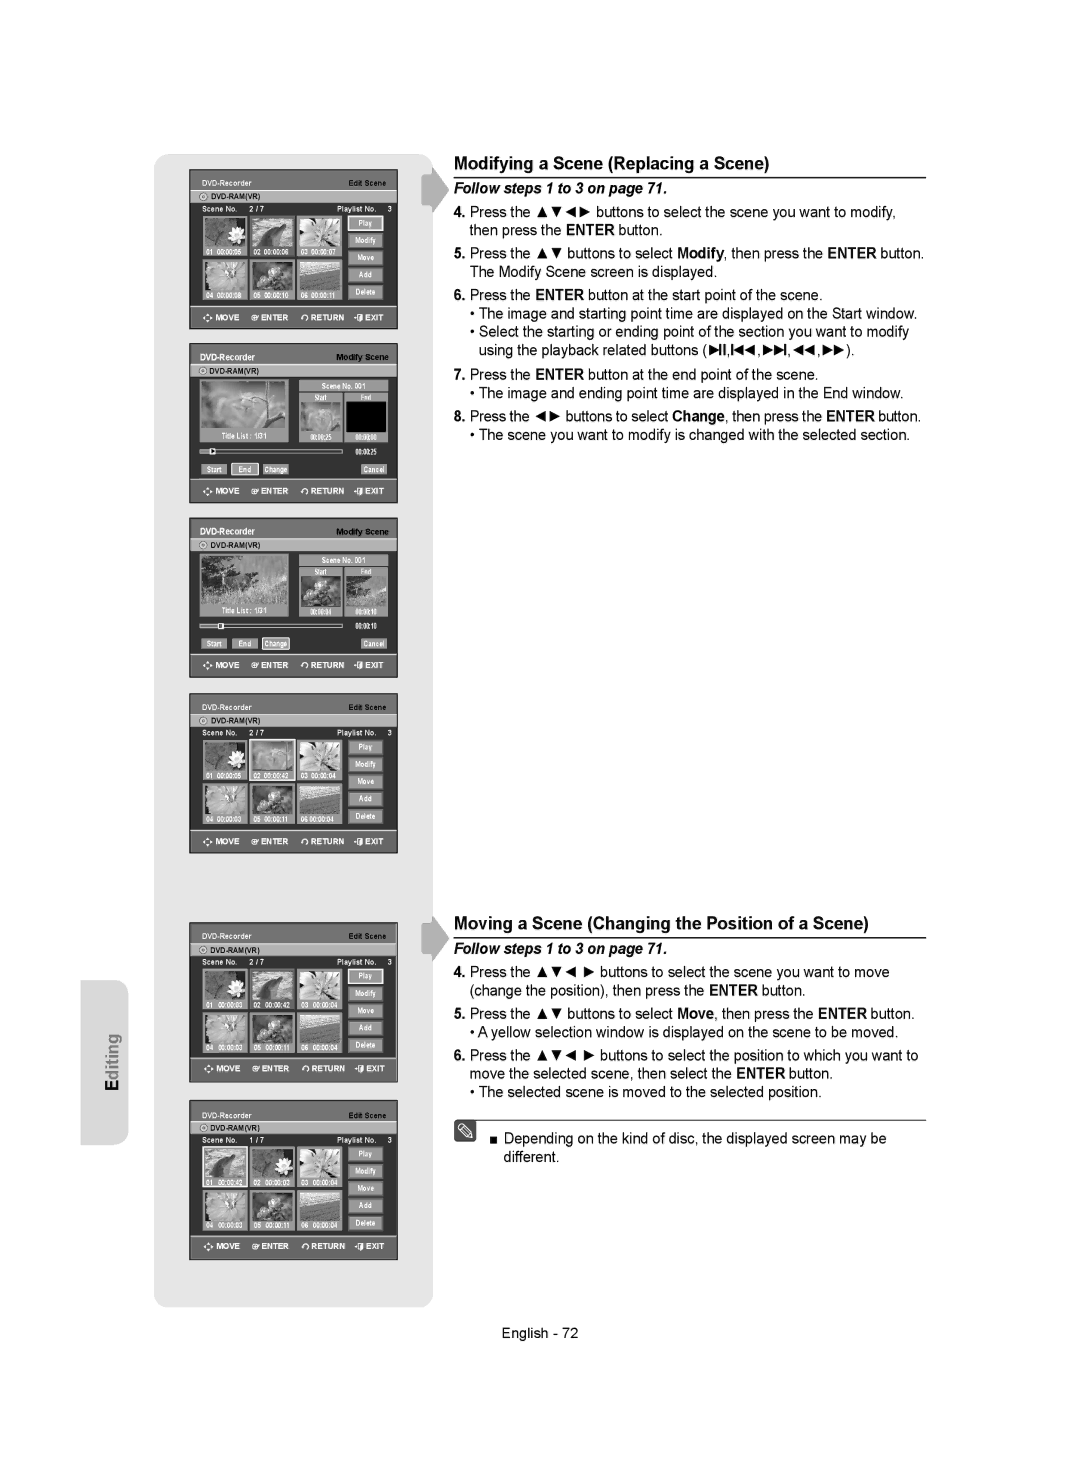
Modifying a Scene (Replacing a Scene)

Follow steps 1 to 3 on page 71.

4.Press the ▲▼◄► buttons to select the scene you want to modify, then press the ENTER button.

5.Press the ▲▼ buttons to select Modify, then press the ENTER button. The Modify Scene screen is displayed.

6.Press the ENTER button at the start point of the scene.

The image and starting point time are displayed on the Start window.

Select the starting or ending point of the section you want to modify using the playback related buttons (►II,I◄◄,►►I,◄◄,►►).

7.Press the ENTER button at the end point of the scene.

The image and ending point time are displayed in the End window.

8.Press the ◄► buttons to select Change, then press the ENTER button.

The scene you want to modify is changed with the selected section.

Editing

DVD-Recorder


Edit Scene


DVD-RAM(VR)


Scene No.

2 / 7


Playlist No.

3


Play


Modify


01

00:00:03

02

00:00:42

03

00:00:04


Move


Add


Delete


04

00:00:03

05

00:00:11

06

00:00:04


MOVE

ENTER


RETURN

EXIT


DVD-Recorder


Edit Scene


DVD-RAM(VR)


Scene No.

1 / 7


Playlist No.

3


Play


Modify

01

00:00:42

02

00:00:03

03

00:00:04

Move


Add

04

00:00:03

05

00:00:11

06

00:00:04

Delete


MOVE


ENTER


RETURN

EXIT

Moving a Scene (Changing the Position of a Scene)

Follow steps 1 to 3 on page 71.

4.Press the ▲▼◄ ► buttons to select the scene you want to move (change the position), then press the ENTER button.

5.Press the ▲▼ buttons to select Move, then press the ENTER button.

A yellow selection window is displayed on the scene to be moved.

6.Press the ▲▼◄ ► buttons to select the position to which you want to move the selected scene, then select the ENTER button.

The selected scene is moved to the selected position.

■ Depending on the kind of disc, the displayed screen may be different.

English - 72

Page 72
Image 72
Samsung DVD-VR357 instruction manual Modifying a Scene Replacing a Scene, Moving a Scene Changing the Position of a Scene

DVD-VR357 specifications

The Samsung DVD-VR357 is a versatile and modern combination DVD recorder and VCR that integrates the best of both worlds for consumers who still value VHS tapes while transitioning to DVD technology. This device reflects Samsung's commitment to innovation, offering a user-friendly platform with a host of features that appeal to home entertainment enthusiasts.

One of the standout features of the DVD-VR357 is its ability to record directly from a broadcast signal onto DVD. It supports both DVD-R and DVD-RW formats, allowing users to create their own DVD compilations of their favorite shows or home videos. Additionally, the unit incorporates a built-in high-quality tuner, which facilitates recording directly from cable or antenna sources, ensuring users can capture their preferred programming effortlessly.

Another notable feature is the ease of dubbing from VHS to DVD. The integrated VCR makes it convenient for users to transfer their cherished VHS collections to a more durable and accessible format. This function is especially valuable for those who want to preserve family memories or rare recordings, ensuring they last for years to come.

The Samsung DVD-VR357 also showcases progressive scan technology, enhancing the playback quality of DVDs. This technology reduces motion blur during fast-paced scenes, providing a smoother and more enjoyable viewing experience. With multiple audio options, including Dolby Digital output, the device ensures users enjoy rich, high-fidelity sound.

Connectivity options are abundant with the DVD-VR357. The unit features composite video outputs as well as S-Video and audio jacks, enabling users to connect it easily to various televisions and home theater systems. Furthermore, the inclusion of a built-in timer and programming features allows for scheduled recordings, providing convenience for users with busy lifestyles.

User-friendliness is a key characteristic of the Samsung DVD-VR357. Its intuitive on-screen menus and control layout ensure that even those who are less tech-savvy can navigate its functionalities with ease. The lightweight design, combined with a compact form factor, makes it easy to integrate into any entertainment setup.

In conclusion, the Samsung DVD-VR357 is an ideal choice for anyone looking to embrace the DVD format while still utilizing existing VHS tapes. With its recording capabilities, superior playback quality, and ease of use, it bridges the gap between old and new technology, making it a worthwhile addition to any home entertainment system.