User’s Manual
Instructions
Contents
Dpof
Dpof Cancel
FAQ
Dpof Standard
Getting to know your camera
About the icons
《6》
An FCC warning
AC cord
System chart
Pouch Camera strap
SBC-N1 SBC-L1
Computer
See p.95
Front & Top
Identification of features
Shutter button Flash Self-timer lamp Strap eyelet Lens
Back & Bottom
Side / 5-function button
Mode button
Battery chamber cover
Memory card slot
Auto Program
Play
Night Portrait Landscape
Instructions on how to use the power source
CR-V3 type Lithium Ion battery
Arrow
Connecting to a Power Source
Polarity +
Insert the batteries taking note of the polarity +
Instructions on how to use the memory card
Information
Super Fine
Inserting the memory card
Removing the memory card
LCD monitor indicator
⑨ ⑩
Starting the recording mode
Press the shutter button to capture an image
Starting the recording mode
《21》
Things to watch out for when taking pictures
Normal focus mode
Using the camera buttons to adjust the camera
To use the camera again, press any of the camera buttons
Wide Zoom Digital zoom Wide
Zoom W/T button
Bar
Stops digital zooming
Voice memo / UP button
Down button
Flash / Left button
Flash range Focus type
Automatically
Flash mode indicator Icon Description
Available flash mode, by recording mode
Eye reduction function
Self-timer / Right button
MENU/ OK button
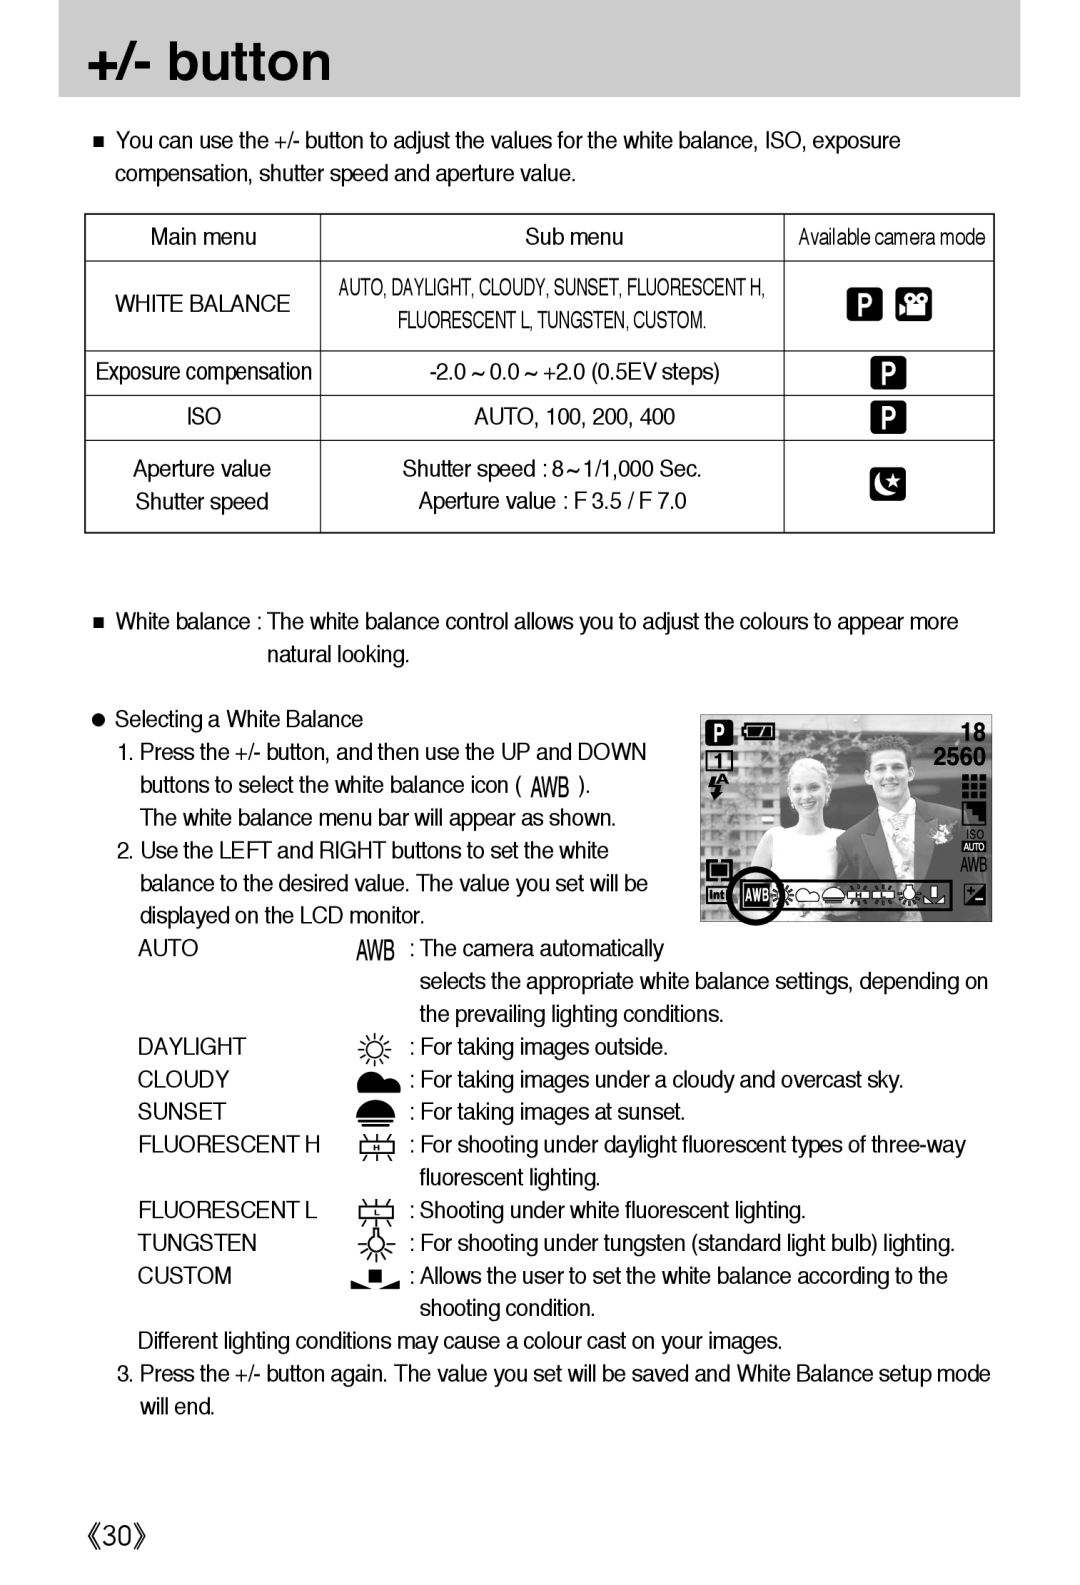
+/- button
100, 200
Exposure compensation
Scene menu and press the Right button
LCD button
Using the LCD monitor to adjust the camera settings
OFF
Single
Effect
Load
How to use the menu
Mode
Size
2560 2048 1600 1024 640 320
Jpeg
Still Image mode Movie Clip mode
Quality
Avi
Spot
Metering
General use
Regardless of back lighting
Fine Normal
Continuous shot
Effect
Sepia
Photo Frame
Available photo frames are as follows
Sharpness
Soft
Vivid
Press the right button
Slot number to load
Saved in the Myset slot
Flash is used
2560X1920 Size F3.5 Aperture value Shutter speed
Flash OFF
Date
Starting play mode
Connect the camera to your PC
Images is the same as the method of playing back voice files
Thumbnail / Enlargement button
100-0009
Voice memo/ Up button
Cancel
Cancels trimming
Trim
Voice memo/ Up button
Play & Pause / Down button
Voice memos can’t be recorded onto movie clip files
LEFT/ RIGHT/ MENU/ OK button
Delete button
Resize
Setting up the play back function using the LCD monitor
Slide Repeat
Protect ONE PIC
Menu tab Main menu Sub menu Secondary menu
Print
Dpof Print
Reset
Custom SET
※ Menus are subject to change without prior notice
Press the OK button to save the configuration
Starting the slide show
Loading time depends on the image size and quality
Rotating an image
Horizontal
Vertical
Logo
Resize
Image Resize Types 2048X 1600X 1024X 640X
1536 1200 768 480
Unprotected
Protecting images
ALL Pics
Lock
ALL menu tab
Selecting no Cancels Delete All
Deleting all images
Button and press the OK button
Current picture only
Press the OK button to confirm the setting
Press the LEFT/ Right button and select the Dpof menu tab
Recordings
Select a desired sub menu by pressing the UP/ Down
Setting the Print Size
Select the Cancel menu by pressing the UP/ Down
If Index is selected
Cancels Copy to Card
LEFT/ Right button
YES All images saved in the internal memory are
Printer Setup
PictBridge
Images
PictBridge Picture Selection
PictBridge Printing
Standard
Print the pictures stored in the memory
AUTO, DRAFT, NORMAL, Fine
PictBridge Print Setting
Auto SET
AUTO, OFF, on
PictBridge Reset
Setup menu
3SEC
File name
USB Computer Printer
Press the Menu button
Auto power off
File name
Button and press the OK button Language sub menu
Language
Select the Language menu by pressing the UP
Indonisia and Arabic
Formatting a memory card
Button and press the OK button If no is selected
Select the Date menu by pressing the UP/ Down
Setting up the Date
Setting up the Time
Select the Time menu by pressing the UP/ Down
Imprint type, and then press the OK button
Date type
Imprinting the recording date
Date & Time will not be imprinted on the image file
Beep
Selecting an External Device USB
Quick view function can’t be activated
InitializationRESET ALL
Quick view
1, 3 SEC
Start up image
Setting up the Mycam menu
Turned on Setting a Startup Image
Beep OFF
Start up sound
Select the S.BEEP menu by pressing the UP/ Down
Important notes
《80》
《81》
Before contacting a service centre
ㆍThere is low battery capacity → Insert fresh batteries
Please check the following
Before contacting a service centre
ㆍAn Incorrect focus mode is selected
→ Reset the date and time correctly
ㆍExposure is excessive → Reset exposure compensation
ㆍCable connection is incorrect
Specifications
LCD
Dimensions WxHxD
Primary battery 2xAA alkaline, Lithium, Ni-Mn
Rechargeable battery 2xAA Ni-MH
2560 2560x1920 2048 Image Size
Software Notes
System Requirements
About the software
Setting up the application software
About the application program
Frame 8 may not appear according to System requirements
Select Components window will appear. Click Next button
《93》
《94》
Starting PC mode
Camera driver must be installed before using PC mode
Cut
《97》
Removing the USB Driver for Windows 98SE
Removable Disk
Removing the removable disk
Setting up the USB Driver for MAC
Using the USB Driver for MAC
Digimax Viewer
Property
Etc
Using PhotoImpression
FAQ
→ Device Manager → Universal Serial Bus controllers
Manager → Universal Serial Bus controllers
Win
Win XP
《106》
《107》
6806-2751