Samsung EC-L100ZSFA/AS manual Primo utilizzo della fotocamera, Impostazione della lingua, Destra

Models: EC-L100ZPBA/E1 EC-L100ZUHB/AS EC-L100ZPFA/AS EC-L100ZUBA/CA EC-L100ZBBA/MX EC-L100ZPDA/AS EC-L100ZPBA/GB EC-L100ZPFC/E1 EC-L100ZSBA/GB EC-L100ZRFA/E1 EC-L100ZSBB/E1 EC-L100ZRFB/IT EC-L100ZPBB/E1 EC-L100ZSBA/E2 EC-L100ZBFA/FR EC-L100ZRFA/LV EC-L100ZSHA/E3 EC-L100ZPFA/VN EC-L100ZSAA EC-L100ZBFA/AS EC-L100ZBBA/AR EC-L100ZUBA/GB EC-L100ZSDB/AS EC-L100ZGBA/US EC-L100ZRFA/AS EC-L100ZBFB/AS EC-L100ZBBA/CA EC-L100ZRBA/AR EC-L100ZRBA/RU EC-L100ZSBB/MX EC-L100ZBFA/E1 EC-L100ZSFB/E1 EC-L100ZRBA/E1 EC-L100ZBBA/E1 EC-L100ZSBA/FR EC-L100ZUDA/E3 EC-L100ZUFA/VN EC-L100ZUBA/AR EC-L100ZSBA/AR EC-L100ZBBA/US EC-L100ZUHA/AS EC-L100ZUBC/E1 EC-L100ZRBA/CA EC-L100ZBBC/E1 EC-L100ZBDC/AS EC-L100ZSBA/IN EC-L100ZUAA EC-L100ZPBA/TR EC-L100ZBBA/GB EC-L100ZRFE/ZA EC-L100ZRBA/IT EC-L100ZRBB/E1 EC-L100ZUBB/E1 EC-L100ZUFA/IT EC-L100ZPFA/IT EC-L100ZBBA/E2 EC-L100ZRFA/FR EC-L100ZRDA/E3 EC-L100ZBFA/VN EC-L100ZUFA/AS EC-L100ZRBC/E1 EC-L100ZRBB/AS EC-L100ZSDC/AS EC-L100ZBYA/CA EC-L100ZUBA/TW EC-L100ZRYA/CA EC-L100ZSBA/MX EC-L100ZSBA/AS EC-L100ZUFB/IT EC-L100ZBFA/RU EC-L100ZUHA/E3 EC-L100ZBBA/VN EC-L100ZRFA/VE EC-L100ZPHA/AS EC-L100ZRAA EC-L100ZRBA/TR EC-L100ZPYA/CA EC-L100ZRHA/AS EC-L100ZPBB/AU EC-L100ZSFA/AS EC-L100ZBFE/ZA EC-L100ZRFA/IT EC-L100ZSFB/IT EC-L100ZBFA/IT EC-L100ZPBA/E2 EC-L100ZPDA/E3 EC-L100ZUFA/FR EC-L100ZBBA/FR EC-L100ZUFA/LV EC-L100ZRFA/RU EC-L100ZSFA/VN EC-L100ZUDB/AS EC-L100ZSHB/AS EC-L100ZSDA/HK EC-L100ZBDA/AS EC-L100ZUYA/CA EC-L100ZUBA/TR EC-L100ZSDA/DE EC-L100ZSDA/AS EC-L100ZSBA/TR EC-L100ZPDB/AS EC-L100ZPBA/AU EC-L100ZBDA/DE EC-L100ZPBC/E1 EC-L100ZUBA/IT EC-L100ZBFA/LV EC-L100ZUBA/VN EC-L100ZRBA/VN EC-L100ZSBA/TW EC-L100ZRBA/TW EC-L100ZPBC/BN EC-L100ZSBA/US EC-L100ZUDC/AS EC-L100ZUBA/BN EC-L100ZPBB/MX EC-L100ZSBA/AU EC-L100ZPFB/AS EC-L100ZPBA/MX EC-L100ZUBA/MX EC-L100ZSBA/IT EC-L100ZSFA/LV EC-L100ZPHA/E3 EC-L100ZUDA/DE EC-L100ZUBA/US EC-L100ZUBA/AS EC-L100ZSBA/RU EC-L100ZRDC/AS EC-L100ZUBA/RU EC-L100ZRBA/AU EC-L100ZBBA/AS EC-L100ZUBA/E1 EC-L100ZRBA/FR EC-L100ZUBA/FR EC-L100ZUBA/E2 EC-L100ZSFA/E2 EC-L100ZBHA/E3 EC-L100ZSBA/VN EC-L100ZSHA/AS EC-L100ZBBB/MX EC-L100ZBBA/RU EC-L100ZBBA/IN EC-L100ZSBA/CA EC-L100ZBBA/TR EC-L100ZBDB/AS EC-L100ZRHB/AS EC-L100ZRDA/AS EC-L100ZPBA/RU EC-L100ZUBA/AU EC-L100ZRBA/MX EC-L100ZRBA/AS EC-L100ZBBA/IT EC-L100ZSBA/E1 EC-L100ZSFA/FR EC-L100ZSFA/RU EC-L100ZUFA/RU EC-L100ZPFA/LV EC-L100ZBFA/E2 EC-L100ZRFA/E2 EC-L100ZRBB/AU EC-L100ZRBA/IN EC-L100ZUBA/IN EC-L100ZPDC/AS EC-L100ZUFB/AS EC-L100ZUBB/MX EC-L100ZSYA/CA EC-L100ZRDB/AS EC-L100ZSFA/IT EC-L100ZBFB/IT EC-L100ZBBB/E1 EC-L100ZPFA/FR EC-L100ZSBB/AS EC-L100ZBBA/AU EC-L100ZSBB/AU EC-L100ZPBA/TW EC-L100ZBHB/AS EC-L100ZPBA/IN EC-L100ZRBA/US EC-L100ZBBA/TW EC-L100ZRDA/DE EC-L100ZPBB/AS EC-L100ZPBA/AR EC-L100ZUFA/E1 EC-L100ZSFE/ZA EC-L100ZUFE/ZA EC-L100ZSBC/E1 EC-L100ZPFE/ZA EC-L100ZPFB/IT EC-L100ZPBA/FR EC-L100ZPFA/RU EC-L100ZPAA EC-L100ZBBB/AU EC-L100ZPDA/DE EC-L100ZUDA/AS EC-L100ZSFB/AS EC-L100ZRBA/GB EC-L100ZRFB/AS EC-L100ZSFC/E1 EC-L100ZUBB/IT EC-L100ZSDA/E3 EC-L100ZBDA/E3 EC-L100ZPBA/AS EC-L100ZPHB/AS EC-L100ZBAA EC-L100ZUBB/AS EC-L100ZRHA/E3 EC-L100ZPBA/IT EC-L100ZPBA/VN EC-L100ZPBA/CA EC-L100ZRBA/BN EC-L100ZBBB/AS EC-L100ZSBB/BN EC-L100ZPBA/US EC-L100ZRBB/MX EC-L100ZRBA/E2

1 114
Download 114 pages 36.61 Kb
Page 71
Image 71

Primo utilizzo della fotocamera

Ricaricare completamente la batteria prima di utilizzare la fotocamera per la prima volta.

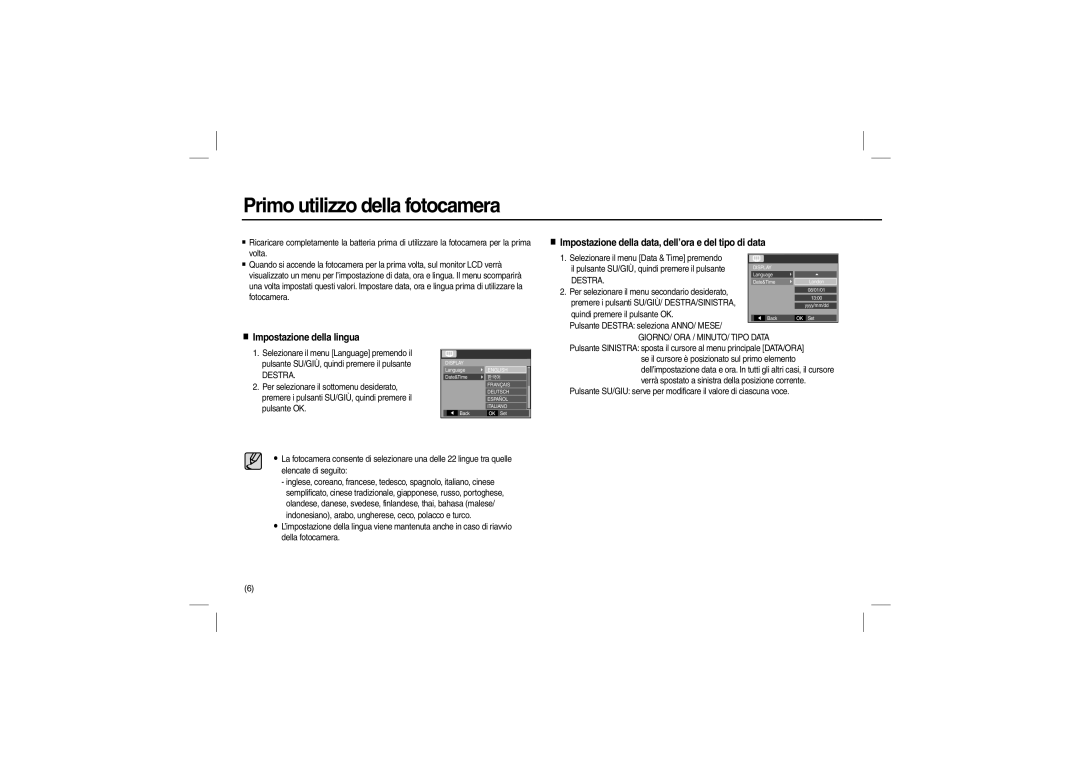
Quando si accende la fotocamera per la prima volta, sul monitor LCD verrà visualizzato un menu per l’impostazione di data, ora e lingua. Il menu scomparirà una volta impostati questi valori. Impostare data, ora e lingua prima di utilizzare la fotocamera.

Impostazione della data, dell’ora e del tipo di data


1. Selezionare il menu [Data & Time] premendo


il pulsante SU/GIÙ, quindi premere il pulsante

DISPLAY


DESTRA.

Language


Date&Time

London

2. Per selezionare il menu secondario desiderato,


08/01/01

premere i pulsanti SU/GIÙ/ DESTRA/SINISTRA,


13:00


yyyy/mm/dd

quindi premere il pulsante OK.

Back

Set

Pulsante DESTRA: seleziona ANNO/ MESE/


Impostazione della lingua

1.Selezionare il menu [Language] premendo il pulsante SU/GIÙ, quindi premere il pulsante

DESTRA.

2.Per selezionare il sottomenu desiderato, premere i pulsanti SU/GIÙ, quindi premere il pulsante OK.

DISPLAY

Language

Date&Time

Back

ENGLISH

FRANÇAIS

DEUTSCH

ESPAÑOL ITALIANO

Set

GIORNO/ ORA / MINUTO/ TIPO DATA Pulsante SINISTRA: sposta il cursore al menu principale [DATA/ORA]

se il cursore è posizionato sul primo elemento dell’impostazione data e ora. In tutti gli altri casi, il cursore verrà spostato a sinistra della posizione corrente.

Pulsante SU/GIU: serve per modificare il valore di ciascuna voce.

La fotocamera consente di selezionare una delle 22 lingue tra quelle elencate di seguito:

-inglese, coreano, francese, tedesco, spagnolo, italiano, cinese semplificato, cinese tradizionale, giapponese, russo, portoghese, olandese, danese, svedese, finlandese, thai, bahasa (malese/ indonesiano), arabo, ungherese, ceco, polacco e turco.

L’impostazione della lingua viene mantenuta anche in caso di riavvio della fotocamera.

(6)

Page 71
Image 71
Samsung EC-L100ZSFA/AS, EC-L100ZUDA/E3, EC-L100ZSFA/FR Primo utilizzo della fotocamera, Impostazione della lingua, Destra

EC-L100ZPBA/E1, EC-L100ZUHB/AS, EC-L100ZPFA/AS, EC-L100ZUBA/CA, EC-L100ZBBA/MX specifications

The Samsung EC-L100ZBBA/RU and EC-L100ZSBA/RU are compact digital cameras that cater to photography enthusiasts seeking versatility and quality in a small package. Among their key features is a 12-megapixel CCD sensor, which captures images with remarkable clarity and detail. This allows photographers to enlarge their shots without a significant loss in quality, making the cameras suitable for print and digital use alike.

Both models are equipped with a 3x optical zoom lens, enabling users to get closer to their subjects without compromising image quality. The cameras also feature a 2.7-inch LCD display that provides a clear view of the captured images and simplifies navigation through the camera's settings and menu. This screen is also helpful for framing shots and ensures users can easily assess their compositions.

One of the standout technologies in the Samsung EC-L100 series is its Smart Auto mode, which intelligently selects the appropriate scene mode for the user's environment. This feature helps less experienced photographers achieve great results without needing to manually adjust settings. The cameras automatically detect various conditions, such as landscapes, portraits, and night scenes, optimizing the settings for each scenario.

Additionally, both the EC-L100ZBBA/RU and EC-L100ZSBA/RU come with a range of scene modes including sunset, candlelight, and beach, allowing users to maximize their creativity by selecting settings that best suit their shooting environment. For those who like to experiment with their photography, the cameras offer features like face detection and smile shot, which automatically captures images when the subject smiles.

The EC-L100 series also supports video recording, enabling users to shoot high-quality videos alongside their still photography. With video resolution capabilities, these cameras cater to those who wish to document events and moments in motion.

In terms of design, the Samsung EC-L100 cameras are sleek and lightweight, making them easily portable for everyday use or travel. They boast a user-friendly interface, complete with an intuitive menu system that simplifies access to various functionalities.

These cameras are an excellent choice for anyone looking for an easy-to-use yet feature-rich option for everyday photography. With their blend of advanced technology, compact design, and multiple shooting capabilities, the Samsung EC-L100ZBBA/RU and EC-L100ZSBA/RU make it easy to capture life's moments with style and ease.