PictBridge: selección de imágenes

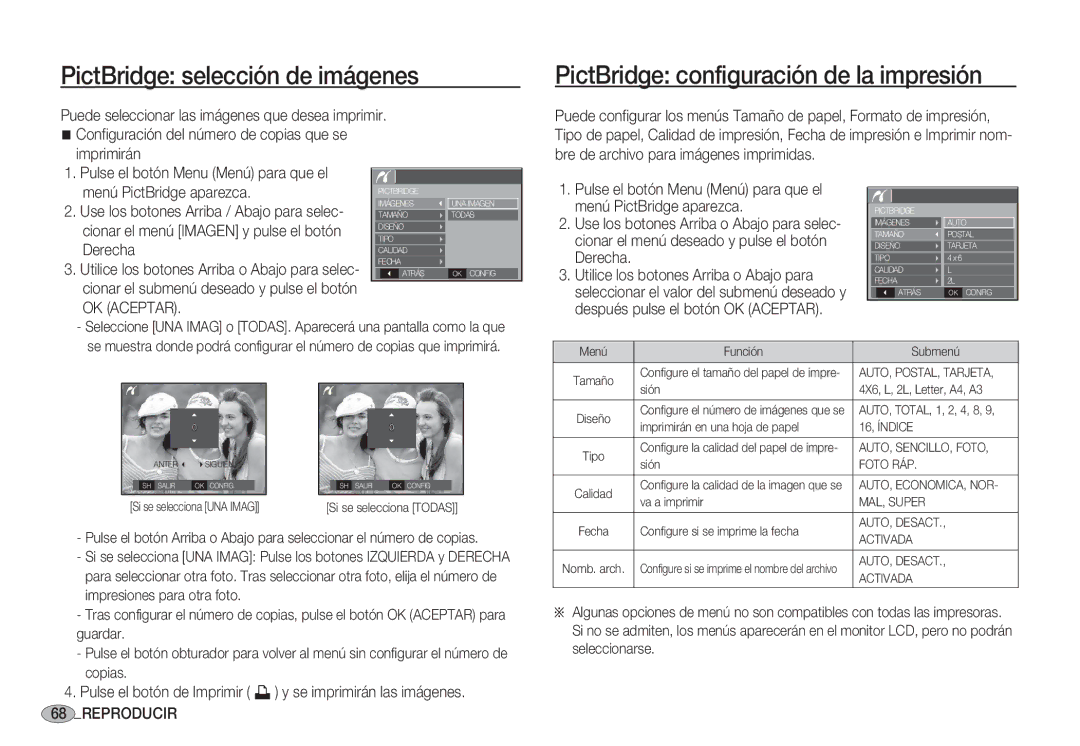
Puede seleccionar las imágenes que desea imprimir. Configuración del número de copias que se imprimirán

PictBridge: configuración de la impresión

Puede configurar los menús Tamaño de papel, Formato de impresión, Tipo de papel, Calidad de impresión, Fecha de impresión e Imprimir nom- bre de archivo para imágenes imprimidas.

1.

Pulse el botón Menu (Menú) para que el


menú PictBridge aparezca.


PICTBRIDGE


2.

Use los botones Arriba / Abajo para selec-


IMÁGENES


UNA IMAGEN


TAMAÑO


TODAS


cionar el menú [IMAGEN] y pulse el botón


DISEÑO


TIPO


Derecha


CALIDAD


3.

Utilice los botones Arriba o Abajo para selec-


FECHA


ATRÁS


OK CONFIG


cionar el submenú deseado y pulse el botón OK (ACEPTAR).

1.Pulse el botón Menu (Menú) para que el menú PictBridge aparezca.

2.Use los botones Arriba o Abajo para selec- cionar el menú deseado y pulse el botón Derecha.

3.Utilice los botones Arriba o Abajo para seleccionar el valor del submenú deseado y después pulse el botón OK (ACEPTAR).

PICTBRIDGE IMÁGENES TAMAÑO DISEÑO TIPO CALIDAD FECHA

ATRÁS

AUTO

POSTAL TARJETA 4 x 6

L 2L

OK CONFIG

-Seleccione [UNA IMAG] o [TODAS]. Aparecerá una pantalla como la que se muestra donde podrá configurar el número de copias que imprimirá.

Menú

Función

Submenú

Tamaño

Configure el tamaño del papel de impre-

AUTO, POSTAL, TARJETA,

sión

4X6, L, 2L, Letter, A4, A3


Diseño

Configure el número de imágenes que se

AUTO, TOTAL, 1, 2, 4, 8, 9,


0

ANTER SIGUIEN

SH SALIR

OK CONFIG

[Si se selecciona [UNA IMAG]]

0

SH SALIR

OK CONFIG

[Si se selecciona [TODAS]]


imprimirán en una hoja de papel

16, ÍNDICE

Tipo

Configure la calidad del papel de impre-

AUTO, SENCILLO, FOTO,

sión

FOTO RÁP.


Calidad

Configure la calidad de la imagen que se

AUTO, ECONOMICA, NOR-

va a imprimir

MAL, SUPER


Fecha

Configure si se imprime la fecha

AUTO, DESACT.,


-Pulse el botón Arriba o Abajo para seleccionar el número de copias.

-Si se selecciona [UNA IMAG]: Pulse los botones IZQUIERDA y DERECHA para seleccionar otra foto. Tras seleccionar otra foto, elija el número de impresiones para otra foto.

-Tras configurar el número de copias, pulse el botón OK (ACEPTAR) para guardar.

-Pulse el botón obturador para volver al menú sin configurar el número de copias.


ACTIVADA

Nomb. arch.

Configure si se imprime el nombre del archivo

AUTO, DESACT.,

ACTIVADA


ÄAlgunas opciones de menú no son compatibles con todas las impresoras. Si no se admiten, los menús aparecerán en el monitor LCD, pero no podrán seleccionarse.

4.Pulse el botón de Imprimir ( ») y se imprimirán las imágenes. 68 _REPRODUCIR

Page 69
Image 69
Samsung EC-S1050SBA/E1, EC-S1060BDA/E3 PictBridge selección de imágenes, PictBridge configuración de la impresión, Derecha

EC-S1050BDA/DE, EC-S1060BBB/E1, EC-S1060BDA/E3, EC-S1060SBB/E1, EC-S1060SBA/E1 specifications

The Samsung EC-S1050 series, including models EC-S1050SBA/E1, EC-S1050BDB/AS, EC-S1050SBC/AS, EC-S1050BBA/E1, and EC-S1050SDA/DE, represents a range of compact digital cameras designed for both casual and photography enthusiasts. These models are part of Samsung's commitment to providing user-friendly cameras that incorporate advanced technologies to enhance the photographic experience.

One of the standout features of the EC-S1050 series is its 10.0-megapixel sensor, which captures high-resolution images with remarkable clarity and detail. This resolution is ideal for both everyday snapshots and more artistic endeavors. The cameras also come equipped with a powerful 5x optical zoom lens, enabling users to get closer to the subject without sacrificing image quality. This feature is particularly useful for capturing distant landscapes, candid shots, or wildlife photography.

The EC-S1050 series is built with a compact and stylish design, making it a portable option suitable for users on the go. The lightweight build ensures that it can easily fit into a bag or pocket, allowing photographers to take it along for travel or events. Additionally, the intuitive user interface includes a large LCD screen that makes framing shots and reviewing images effortless.

Samsung has integrated several technologies to enhance image quality. The Smart Auto mode intelligently analyzes the shooting environment and automatically adjusts settings for optimal results. This feature is particularly beneficial for novice photographers who may not be familiar with all the intricacies of manual settings. Furthermore, the cameras often include image stabilization technology to reduce the effects of camera shake, ensuring sharper images even in challenging lighting conditions.

Additional features of the EC-S1050 models include various scene modes, such as portrait, landscape, and night, which help users achieve the desired effect in different situations. A built-in flash also assists in low-light scenarios, ensuring that users can take quality photos regardless of lighting conditions.

Overall, the Samsung EC-S1050 series stands out as an excellent option for those seeking a compact and easy-to-use digital camera. With its combination of high-resolution imaging, optical zoom capabilities, and advanced technologies, it fulfills the needs of both casual users and budding photographers alike. Whether capturing everyday moments or special events, these cameras offer versatility and quality in a sleek design.