ST95
Health and safety information
Health and safety information
Health and safety information
111
105
Abbreviations used in this manual
Icons used in this manual
Icon Function
Abbreviation Definition
Subject
Expressions used in this manual
Basic troubleshooting
Capturing photos at night or in the dark
Quick reference
Contents
Contents
100
Basic functions
Unpacking
Camera layout
Lens
Tripod mount
Steady When the camera is connecting to a
Shooting mode Zoom in or out
Camera layout
Zoom button
Insert the battery with the Samsung logo facing down
Inserting the battery and memory card
Battery
Removing the battery and memory card
Charging the battery
Charging the battery and turning on your camera
Turning on your camera in Playback mode
Turning on your camera
Touch Language
Performing the initial setup
Zone
Touch o to save
Touch o to save settings
Performing the initial setup
Set the date
Touch , and then set the time
Icon Description
Image Adjust
Current time Fully charged Aperture value
Zoom ratio
Touching
Using the touch screen
Flicking
Dragging
Selecting an option
Using the touch screen
Setting the touch screen and sound
Setting the display type for the touch screen
Setting the sound
Using the Home screen
Accessing the Home screen
Icons on the Home screen
Rearranging icons
Using the Home screen
Touch and hold an icon
Drag it to a new location
Capturing photos
Align your subject in the frame Half-press Shutter to focus
Press Shutter to capture a photo
Zooming
Capturing photos
Digital zoom
Setting Intelli zoom
Intelli range Zoom indicator Optical range
Intelli zoom
Reducing camera shake DIS
Shooting mode, touch m Touch the setting button next to DIS
Holding your camera correctly Reducing camera shake
When h is displayed
Half-pressing the shutter button
Ensure nothing is
Preventing your subject from being out of focus
Extended functions
Using shooting modes
Using the Smart Auto mode
On the Home screen, touch Align your subject in the frame
Using shooting modes
Using the Simple Shot mode
Drag the sliders or touch the sample photos to adjust
Press Shutter to capture the photo
Using the Close Up mode
Using the Scene mode
On the Home screen, touch Touch a scene
Shutter to focus
Using the Beauty Shot mode
Using the Night Shot mode
Below to adjust shutter speed and aperture value
Face Tone and Face Retouch
Setting My screen
Using the Program mode
Options, refer to
Touch m, and then set desired options. For a list
Drag the icon into a desired box on the left
Using the Movie mode
Using the Smart Movie mode
Pause recording
Landscapes
Press Shutter again or touch to stop recording
Using the Object Highlight mode
Using effect modes
Displayed on the screen
Blur and Tone
Using the Photo Filter mode
Using the Magic Frame Shot mode
Using effect modes
On the Home screen, touch Select a desired frame
Vignetting
Miniature
Strong vignette effect of Lomo cameras
Soft-Focus
Press Shutter or touch to start recording
Using the Movie Filter mode
Press Shutter again or touch to stop recording
Sketch Apply a pen sketch effect Fish-eye
To view the photo with the vignetting effect, touch After
Using the Vignetting mode
Red color
Using the Palette Effect mode
Soft blue tone
Apply a soft brown tone
Recording a voice memo
Recording voice memos
Recording voice memos
Adding a voice memo to a photo
Memo
Align your subject in the frame, and then capture a photo
Shooting options
Selecting a resolution and quality
Selecting a resolution
Setting a photo resolution
Setting a video resolution
Selecting a resolution and quality
Setting a photo quality
Selecting image quality
Setting a video quality
Press Shutter to start the timer
Using the timer
Learn how to set the timer to delay shooting
Icon
Using the flash
Shooting in the dark
Preventing red-eye
Shooting in the dark
Adjusting the ISO sensitivity
Using macro
Changing the camera’s focus
Zoom
Changing the camera’s focus
Using smart touch focus
Adjusting the focus area
Using one touch shooting
Icon Description
Detecting faces
Using face detection
When you hear a quick beep, press Shutter
Using face detection
Capturing a self portrait shot
Capturing a smile shot
Detecting eye blinking
Using Smart Face Recognition
Registering faces as your favorites My Star
Viewing your favorite faces
Touch when the face list appears
Adjusting the exposure manually EV
Adjusting brightness and color
Shooting mode, touch m “ EV
Darker Neutral Brighter +
Shooting mode, touch m Touch the setting button next to ACB
Adjusting brightness and color
Compensating for backlighting ACB
Changing the metering option
Suitable for a subject with backlighting Center-weighted
Selecting a light source White balance
Auto WB Daylight Cloudy
Defining your own White Balance
Use a tripod to prevent blurry photos
Using burst modes
Applying effects/Adjusting images
Applying Smart Filter effects
Select a filter, and then touch o
Applying effects/Adjusting images
Defining your own RGB tone
Touch o to save your changes
Sharpness Description
Adjusting your photos
Editing the photos on your computer
Contrast
Setting zoom sound
Available shooting options by shooting mode
Smart Auto Simple Shot Scene Close Up Night Shot
Program Movie
Available shooting options by shooting mode
Smart Movie Object
Photo Filter Movie Filter Vignetting
Playback/Editing
Starting Playback mode
Viewing photos or videos in Playback mode
Press Playback
Drag the image left or right to move to another file
Viewing files with motion recognition
Viewing photos or videos in Playback mode
Playback mode, touch m “ Face List
Display in Playback mode
Ranking your favorite faces
File Location
Viewing files in Smart album as thumbnails
On the Home screen, touch Touch “ a category option
Touch a theme
file
Or next file
Viewing files in 3D view
Viewing files as thumbnails
Protecting files
Thumbnail view, touch
Deleting files
Protect your files to prevent accidental deletion
Playback mode, touch m “ Delete
Viewing photos
Playback mode, touch m
Copying files to a memory card
Touch o Touch m, and then set a slide show effect
Include in the slide show
Playing a slide show
Touch , and then select photos that you want to
Touch to start the slide show
Playing a video
One Play*, Repeat
Scan backward
End
Touch When the pop-up message appears, touch Yes
Want to capture an image
Trimming a video
Playing a voice memo
Listening to a voice memo
Playing voice memos that are attached to photos
Learn how to edit photos
Editing a photo
Resizing photos
Using Smart Crop
Rotating a photo
Editing a photo
Adjusting brightness, contrast, or saturation
Touch “ a photo Touch m “ an adjusting option
Touch “ a photo Touch m “ Smart Filter Select a filter
Touch s to save your changes
Touch “ a photo Touch m “ ACB
Adjusting dark subjects ACB
Touch “ a photo Touch m “ Face Retouch
Skin tone
Touch “ a photo
Creating a print order Dpof
Removing red-eye
Touch m “ Red-eye Fix
On the Home screen, touch Touch Connectivity “ Video Out
Viewing files on a TV
Turn off your camera and TV
Turn on your camera
Transferring files to your Windows computer
Requirements
Requirements
Transferring files with Intelli-studio
Touching the setting button
Transferring files to your Windows computer
Turn off the camera
Using Intelli-studio
Open menus
Connect the camera to your computer as a removable disk
Touch Connectivity, and then turn off PC Software by
Turn on the camera
Disconnecting the camera for Windows XP
Transferring files to your Mac computer
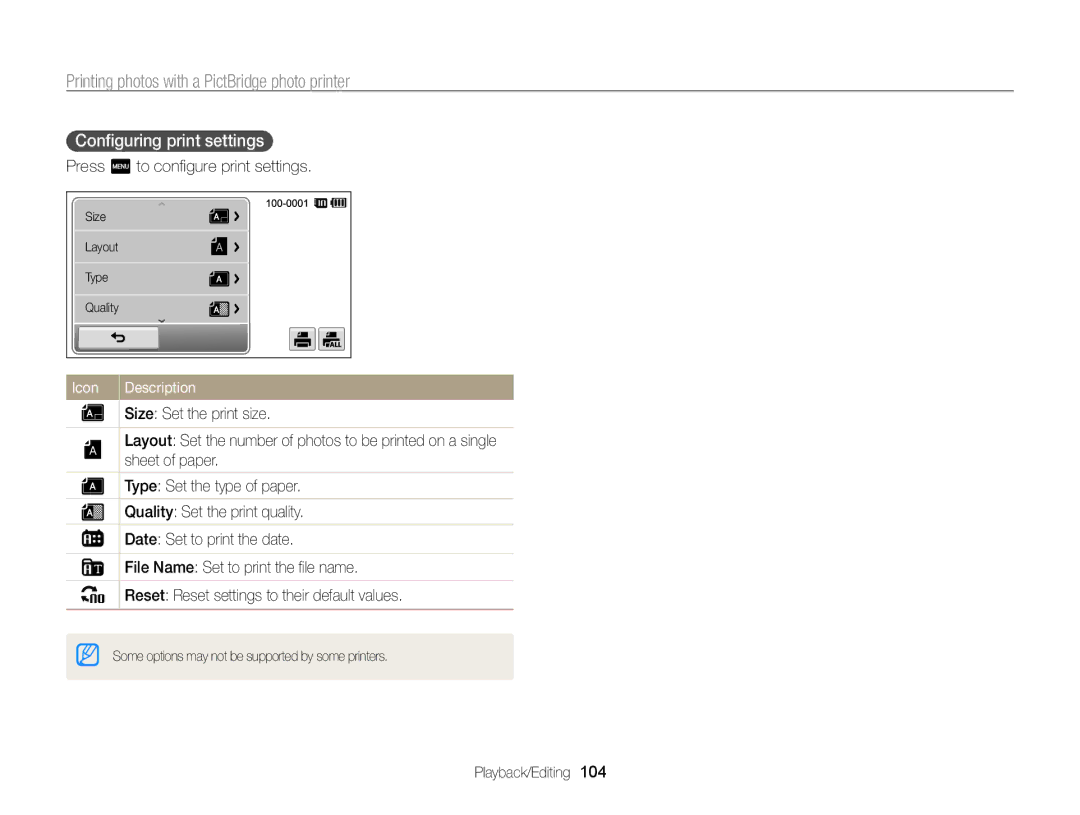
Printing photos with a PictBridge photo printer
Configuring print settings
Press m to configure print settings
Printing photos with a PictBridge photo printer
Refer to options to configure your camera’s settings
Settings
Accessing the settings menu
Settings menu
On the Home screen, touch Touch a menu
Touch an item
Settings menu
Sound
Display
Connectivity
General
Specify how to name files
Reset
Auto Power Off
Reset. Yes, No
Calibration Properly recognize your inputs Settings
Appendixes
Error message Suggested remedies
Error messages
Cleaning your camera
Camera maintenance
Camera lens and touch screen
Camera body
Camera maintenance
Using or storing the camera
About memory cards
Other cautions
Supported memory cards
Memory card capacity
Size
Fine Normal 30 FPS 15 FPS
Battery specifications
About the battery
Battery life
Specification Description
Low battery message
Handling and disposing of batteries and chargers with care
Camera maintenance
Before contacting a service center
Situation Suggested remedies
Situation
Before contacting a service center
Not recognize your
TV does not
Operating system
Your computer
Camera specifications
Camera specifications
Guaranteed
Image Adjust Face Retouch, Brightness
Filter, Palette Effect Shot
Smart Movie
Battery
Interface Digital output USB Connector
Image size
Video output
AF Auto Focus
Glossary
Composition
Dpof Digital Print Order Format
Glossary
ISO sensitivity
Shutter speed
Correct Disposal of This Product
Model No Samsung ST95 Responsible Party
FCC notice
Address
Telephone No Samsung
Index
Index
Center-weighted Multi Spot
Red-eye 95 saturation
Sharpness
flicking 21 scrolling 21 touching Appendixes
Playing Shooting
Using the zoom
flip effect
Slide show Zoom button Smart Album