LFD Display
Table of contents
Sound Adjustment
Support
Before Using the Product
Copyright
Symbols
Safety Precautions
Cleaning
Power off the product and computer
Electricity and Safety
Storage
Installation
Install the product in a kitchen or near a kitchen counter
Sloped surface, etc
Product or cause a fire
Operation
Output ports, etc
Product failure, an electric shock or fire may result
Page
Checking the Contents
Preparations
Removing the Packagingfor ED55C models only
Images
Components
Quick setup guide Warranty card SUB cable P.38
Checking the Components
Items sold separately
Port Description
Parts
Reverse Side
Remote Sensor
Anti-theft Lock
To lock an anti-theft locking device
Remote Control
Adjust the volume
Return to the previous menu
To place batteries in the remote control
Quickly select frequently used functions
It sets safe lock function
ButtonsDescription
Adjusting the OSD with the Remote Control
Remote Control Reception Range
Open the OSD menu
Installation on a Perpendicular Wall
Tilting Angle and Rotation
Ventilation
Plane view
Dimensions
Installation on an Indented Wall
Model name
Installing the Wall Mount
Installing the Wall Mount Kit
Wall mount on your own
Wall Mount Kit Specifications Vesa
ED55C
Cable Connection
Remote Control RS232C
Pin Signal
RS232C Cable
RS232C cable Connector 9-Pin D-Sub to Stereo Cable
Female
Gnd
Connection
Connection
Command
Viewing control state Get control command
Controlling Set control command
Command type Value range
Power control
Volume control
Setting the input source Set Input Source
Input source control
Input Source An input source code to be set on a product
Screen mode control
Auto adjustment control PC and BNC only
PIP On/Off control
Video Wall Mode Control
Safety Lock
Full Natural
WallOn Same as above Nak
Video Wall On
Set Video Wall On/Off
Set Video Wall
10x10 Video Wall Model
Off
10x10 Video Wall Model 1 ~
Set Number
Connecting and Using a Source Device
Before Connecting
Pre-connection Checkpoints
Connecting to a PC
Connection using the D-SUB cable Analog type
Connection Using an HDMI-DVI Cable
Connection Using an Hdmi Cable
Changing the Resolution
Changing the Resolution on Windows XP
Changing the Resolution on Windows Vista
Changing the Resolution on Windows
Connecting to a Video Device
Using an Hdmi cable or Hdmi to DVI Cable up to 1080p
Hdmi
Connecting to an Audio System
Source
Changing the Input source
Source
Menu m Applications Source List Enter
Using MDC
Configuring Settings for Multi Control
Configuring settings for Multi Control
MDC Program Installation/Uninstallation
Uninstallation
What is MDC?
Connecting to MDC
Using MDC via RS-232C serial data communications standards
Connection Management
User Login
Launching the program displays the user login window
Auto Set ID
Cloning
Command Retry
Getting Started with MDC
Main Screen Layout Menus
Volume
Alert
Screen Adjustment
Custom
Adjust the Hdmi Black Level for the selected display device
Adjust the colors for the selected display device
Adjust the tint for the selected display device
Color
Controls the LED backlight to maximize picture clarity
Size
Reduces Mpeg noise to provide improved picture quality
You can view details of the selected screen size
Advanced features
Adjust the colour temperature for a more natural picture
Adjust the screen contrast
Adjust the primary color intensity
Adjust each color red, green, blue darkness
Adjust the bass for the selected display
Sound Adjustment
System Setup
Adjust the treble for the selected display
Select a PIP input source
Select the format to display the split screen
View the PIP Size of the current display
Channel can be changed if PIP Source is TV
Select a method to configure the fan speed
General Fan & Temperature
Set the product to automatically power on
Configure the fan speed
Security OSD Display
Lock the on-screen menus
Lock the buttons on the display device
On Time Set the time to power on the selected display device
Time
Screen Burn Protection
Start Time Set start time to display screen saver
End Time Set end time to display screen saver
Manually adjust the backlight for the selected display
Device for an extended period of time
LFDs in the same serial chain
Enable or disable Ticker
Enter a message to display on the screen
Tool Settings
Security Reset
Edit Column
Options Edit Column
Monitor Window Information
View the program information
Other Functions
Resizing a Window
Group Management
Create groups and manage the list of sets on a group basis
Deleting Groups
Creating Schedules
Schedule Management
Renaming Groups
Edit Group window displayed, click Rename
To modify a schedule, select the schedule and click Edit
Schedule Modification
Deleting a Schedule
To delete a schedule, select the schedule and click Delete
Remote control does not work
Troubleshooting Guide
IssueSolution
Following message appears
Page
If the input source is PC, Hdmipc
Screen Adjustment
Picture Mode
If the input source is Hdmiav
Input source Picture Mode Adjustable options
Menu m Picture Enter
Picture Size
Picture Size
Picture Size
Picture Sizes available by Input Source
Position
Resolution Select
Available resolutions Off / 1024x768 / 1280x768 / 1360x768
Picture Size 169
PC Screen Adjustment
Auto Adjustment
PC Screen Adjustment
Fine Position Image Reset
PIP Settings
Main picture Sub picture
Menu m System PIP Enter
Advanced Settings
Motion Lighting
White Balance
Gamma
Gamma Motion Lighting Off
Hdmi Black Level Normal Film Mode Off
Input source Picture Mode Picture Options
Color Temp 10000K Digital Clean View Off
Picture Options
Color Temp
Digital Clean View
Color Tone
Mpeg Noise Filter
Hdmi Black Level
Film Mode
Film Mode Off Dynamic Backlight
Dynamic Backlight
Picture Off
Reset Picture
Reset Picture
Picture Off
Sound Effect Speaker Settings Reset Sound
Sound Adjustment
Sound Mode
Menu m Sound Sound Mode Enter
Sound Mode
Speaker Settings Reset Sound
Sound Effect
Sound Effect Speaker Settings
Speaker Settings
Reset Sound
Sound Effect
Refresh
Applications
Source List
Edit Name
System
System
Menu Language
Menu m System Menu Language Enter
Time Eco Solution Screen Burn Protection Ticker
Multi Control
Menu Language
Time
Sleep Timer
Sleep Timer
Clock Set
100
On Timer
Off Timer
Holiday Management
Selected On Timer and Off Timer will not activate
Off Timer
On Timer
101
102
Eco Solution
Auto Power Off
Energy Saving
103
Available Pixel Shift Settings and Optimum Settings
Screen Burn Protection
Pixel Shift
Pixel Shift Off
Timer
104
Immediate Display Off Side Gray
Immediate Display
Pixel Shift Off Timer
105
Side Gray
106
Video Wall Source AutoSwitch Settings
Ticker
Menu m System Ticker Enter
Video Wall
Video Wall
107
Format
Screen Position
108
Vertical
Video Wall · Format Full · Horizontal
Source AutoSwitch Settings
109
General
110
Standby Control
111
Button Lock
Lamp Schedule
Power On Adjustment Sec Temperature Control
Power On Adjustment
Temperature Control
112
Menu m System Change PIN Enter
Change PIN
113
Change PIN screen will appear
Anynet+ HDMI-CEC
Anynet+ HDMI-CEC
114
Anynet+ HDMI-CEC
Auto Turn Off
Switching between Anynet+ Devices
115
Anynet+ HDMI-CEC
Troubleshooting for Anynet+
Problem Possible Solution
116
Problem
117
Connected device is not displayed
118
Reset System
Magic Clone
Magic Clone
Reset All
Menu m System Reset All Enter
119
Support
Software Update
Menu m Support Software Update Enter
120
Contact Samsung
121
Menu m Support Contact Samsung Enter
Checking the Resolution and Frequency
Troubleshooting Guide
Testing the Product
122
Not Optimum Mode is displayed
Installation issue PC mode
Screen issue
123
Sound issue
Adjust Brightness and Contrast
124
Remote control issue
Source device issue
125
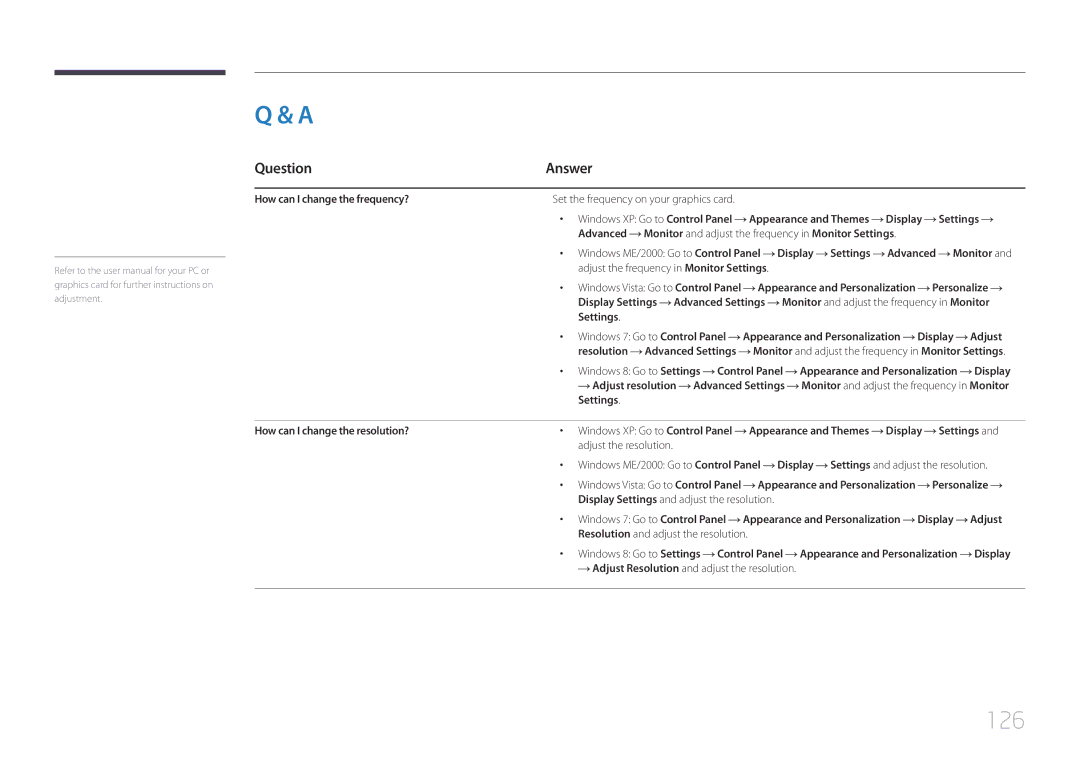
How can I change the frequency?
126
Question Answer
Monitor
Settings or Bios Setup on the PC
How do I set powersaving mode?
Screen Saver Settings or Bios Setup on the PC
127
Specifications
128
129
130
PowerSaver
PowerSaver Normal Operation Power saving Power off Mode
Rating Typical Max
131
Preset Timing Modes
Resolution
Vertical Frequency Pixel Clock Sync Polarity KHz MHz
132
Appendix
Contact Samsung World Wide
133
134
135
136
137
138
139
140
0800 300
141
0685 88 99
211350370
142
Responsibility for the Pay Service Cost to Customers
Product damage caused by customers fault
Not a product defect
Correct disposal of batteries in this product
Correct Disposal
143
Applicable in countries with separate collection systems
Optimum Picture Quality and Afterimage Burn-in Prevention
144
Optimum Picture Quality
Switch between 2 colors every 30 minutes as shown above
What is afterimage burn-in?
Powering Off, Screen Saver and Power Saving Mode
145
146
Move and change text every 30 minutes as shown below
License
147
Terminology
148