Appendixes Index
Settings
Health and safety information
Health and safety information
Health and safety information
Do not use the camera if the screen is damaged
Data transference and your responsibilities
148
126
154
Icon Function
Indicators used in this manual
Shooting mode Indicator
Icons used in this manual
Subject
Expressions used in this manual
Basic troubleshooting
Capturing photos of people
Quick reference
Contents
Contents
102
148
Tips for getting a clearer photo ……………
Learning icons ……………………………… Using the Mode screen ……………………
Setting the display and sound ……………
Capturing photos …………………………
Unpacking
Camera layout
Accessory shoe Zoom button Shooting mode Zoom in or out
Accessory shoe cover Flash release Status lamp
Camera layout
Icon
Button Description
Setting a Smart Link button option
Using the Smart Link button
Icon Description
Attach a strap to carry your camera conveniently
Using the screen
Attaching a lens cap
Removing the battery and memory card
Inserting the battery and memory card
Insert the battery with Samsung logo facing down
Slide the lock down to release the battery
Turning on your camera
Charging the battery and turning on your camera
Charging the battery
Turning on your camera in Playback mode
To set daylight-savings time, press D
Performing the initial setup
Press c to select Date/Time Set, and then press t or o
Press F/t to select a time zone, and then press o
Performing the initial setup
Learning icons
Selecting a Mode Screen
Using the Mode screen
Icons on the Mode screen
MobileLink Send photos or videos to a smart phone. p
Using the Mode screen
Going back to the previous menu
Using Menu
Selecting options or menus
Press m again to go back to the previous menu
Selecting options or menus
Rotate the mode dial to p Press m
Press o to save your settings
Press m to return to Shooting mode
Rotate the navigation button or press D/c/F/t To scroll to
Using Fn
Rotate the mode dial to p Press f
Rotate the front wheel to adjust a White Balance option
About histograms
Setting the display and sound
Setting the display type
Mode Display type
Press o repeatedly
Setting the sound
Setting the display and sound
Setting the option display view
Capturing photos
Press P to return to Shooting mode
To delete the photo, press l, and then select Yes
Capturing photos
Zooming
Digital zoom p a h M g
Shooting mode, press m Select a “ Smart Zoom
Setting Smart zoom
Smart zoom p a h M
Reducing camera shake p a h M g
Is displayed
Holding your camera correctly
Half-pressing the shutter button When
Reducing camera shake
Preventing your subject from being out of focus
Using the Movie mode ……………………
Using the Magic Plus mode ………………
Shutter Priority, or Manual mode …………
Rotate the mode dial to T Align your subject in the frame
Using the Smart Auto mode
Icons are listed below
Using the Smart Auto mode
Rotate the mode dial to p Set the desired options
Using the Program mode
For a list of options, refer to Shooting options. p
Fast shutter speed
Set options
Using the Aperture Priority mode
See page 44 for more information about the aperture value
See page 44 for more information about the shutter speed
Using the Shutter Priority mode
Using the Manual mode
Using the Scene mode
Using the Magic Plus mode
Rotate the mode dial to g Select Select a scene
Using the Magic Plus mode
Using the Beauty Shot mode
Select Face Retouch
3D Photo mode, you can capture scenes with a 3D effect
Using the 3D Photo mode
Using the 2D or 3D Panorama mode
Camera captures 2 photos in both Jpeg and MPO file formats
Press and hold Shutter to start shooting
When you are finished, release Shutter
Using the Action Panorama mode
Rotate the mode dial to g Select Select an option
Using the Magic Frame mode
Camera automatically combines the shots into one photo
Rotate the mode dial to g Select Select a split style
Using the Split Shot mode
To recapture a background photo, press m
Using the Picture-in-Picture mode
Rotate the mode dial to g Select
Press o to set the photo as the background image
Rotate the mode dial to g Select Select a filter
Using the Artistic Brush mode
Apply a watercolor painting effect
Effect
Using the HDR mode
You must select at least 2 files
Using the Creative Movie Maker mode
Rotate the mode dial to g Select Select + Movie Creation
Select Select, and then select files
View a movie made in Creative Movie Maker mode
Press m to cancel the video rendering
For a list of options, refer toShooting options. p
Using the Movie mode
Rotate the mode dial to Set desired options
Press Video recording to start recording
Recording a video
Using the Movie mode
Pause recording
Capturing still images while recording a video
Recording high-speed videos
Rotate the mode dial to
Rotate the drive mode dial
You can record a high-speed video only in v mode
Press
Using the Smart Scene Detection mode
Using burst modes …………………………
Using the timer ………………………………
Using Face Detection ………………………
Adjusting brightness and color ……………
Setting the video resolution T p a h M g
Selecting a resolution and quality
Selecting a resolution
Setting the photo resolution T p a h M g
What are RAW files?
Setting the photo quality p a h M g
Selecting a resolution and quality
Shooting mode, press m Select a “ Quality Select an option
Learn how to set the timer to delay shooting
Using the timer T p a h M g
Rotate the drive mode dial to or
Press Shutter to start the timer
Shooting in the dark
Preventing red-eye p g How to use the flash
Press down gently to close Shooting options
Advanced software analysis
Using the flash T p a h M g
Shooting in the dark
Background is dark
Adjusting the flash intensity
Extending the ISO sensitivity
Adjusting the ISO sensitivity p a h M
Shooting mode, press m Select a “ ISO Select an option
Shooting mode, press m Select a “ ISO Expansion “ On
Changing the camera’s focus
Using macro p a h M g Using auto focus p a h M g
Shooting mode, press c
Focus distance
Adjusting the focus distance manually
Changing the camera’s focus
Shooting mode, press c Scroll to Manual Focus Press D
Press o to change the focus area
Press o Press Shutter to capture the photo
Using tracking auto focus p a h M g
Adjusting the focus area p a h M g
Shooting mode, press m
Using Face Detection p a h M g
Detecting faces
Capturing a self portrait shot
Compose your shot
Using Face Detection
When you hear a quick beep, press Shutter
Capturing a smile shot
Detecting eye blinking
Using Smart Face Recognition
Faces that the camera has automatically registered
Press o to register the face
Registering faces as your favorites My Star
Your favorite faces are indicated with a on the face list
Deleting a favorite face
Tips for detecting faces
Photo will be brighter as the exposure value increases
Adjusting brightness and color
Adjusting the exposure manually EV
Select a or V “ EV Select a value to adjust the exposure
Locking the exposure value p a h
Adjusting brightness and color
Adjust the exposure manually. p Press L
Adjusting the exposure using the front wheel
Auto WB Daylight Cloudy
Selecting a White Balance setting
Suitable for a subject with backlighting Center-weighted
Changing the metering option
FluorescentL For shooting under white fluorescent light
Customizing preset White Balance options
Green Amber Magenta Blue
Customizing your own White Balance
Adjusting color temperature
Burst
Capturing photos in the High-speed burst mode
Single Capture a single photo. Single is not a
High-speed burst option
Using burst modes
Capturing photos in the Precapture mode
Capturing bracketed photos
Selecting a bracketing option
Applying Smart Filter effects p a h M v g
Applying Smart Filter effects
Applying the ND filter effect T p a h M g
Editing the photos on your computer
Contrast Sharpness Saturation
Contrast
Sharpness Description
Shooting mode, press m Select v “ Voice Select an option
Reducing the sound of the zoom p a h M g
Mute Do not record sounds
Editing a photo ……………………………
Viewing photos or videos Playback mode ……………………………
Press and hold F/t to scroll through files quickly
Viewing photos or videos in Playback mode
Starting Playback mode
Press P
Video file information
Viewing photos or videos in Playback mode
Select a face from the list, and then press o
Ranking of the face, and then press f
You can delete your favorite faces
Press o to return to Playback mode
Deleting favorite faces
Viewing files as a folder
Up to 20 people
Viewing files by category in Smart Album
View files by category, such as date, face, or file type
Face
Protecting files
Playback mode, press m Select O “ Protect “ Select
Scroll to the file you want to protect, and then press o
Viewing files as thumbnails
Deleting files
Press l When the pop-up message appears, select Yes
Select files to delete in Playback mode
Scroll to each file you want to delete, and then press o
Enlarge part of a photo or view photos as a slide show
Viewing photos
All unprotected files are deleted
Enlarging a photo
Entire panoramic photo appears on the screen
Press m to return to Playback mode
Press o
Viewing panoramic photos
Select Repeat to loop the slide show
Select Start “ Play
View the slide show
Playing a slide show
Trimming a video
Playing a video
Capturing an image from video
Rotating a photo
Learn how to edit photos
Editing a photo
Resizing photos
Cartoon Apply a cartoon painting effect Cross Filter
Applying Smart Filter effects
Editing a photo
Apply special effects to your photos
As the number increases, the skin tone becomes brighter
Adjusting your photos
Removing red-eye
Retouching faces
Adding noise to the photo
Adjusting brightness, contrast, or saturation
Creating a print order Dpof
Playback mode, press m Select O “ Dpof “ Standard “ Select
Print photos as thumbnails to check all the photos at once
Press m Select O “ Dpof “ Size “ Select
Select All to choose the print size for all photos
Printing photos as thumbnails
Viewing files on a TV, HDTV, or 3D TV
View photos or play videos using the camera buttons
Viewing files on an Hdtv
Viewing files on a TV, HDTV, or 3D TV
Viewing files on a 3D TV
Press c to switch to 3D TV Mode
Press c again to switch to 2D TV Mode
Turn on your TVs 3D function
Transferring files to your Windows OS computer
Transferring files to your computer
Transferring files to your computer
Transferring files to your Mac OS computer
Programs contained on the CD
Using programs on the computer
Installing CD-provided programs
ILauncher PC Auto Backup
Mac OS requirements
Using iLauncher
Using programs on the computer
Windows OS requirements
File name
Using Multimedia Viewer
Viewing photos
No. Description
Viewing videos
Opening Samsung RAW Converter
Using Samsung RAW Converter
Downloading the PC Auto Backup program
Updating the firmware
Using the Samsung RAW Converter Interface
From the editing tools, select
Adjust the exposure with the scroll bar
Select File “ Open file and open a file
Editing RAW format files
Shutter Speed 1/15 sec ISO=100 Playback/Editing
Adjust the tone with the scroll bar
To adjust the tone of an image
Mode, Aperture f=8
Saving RAW files as JPEG/TIFF formats
About the Wake on LAN WOL
Using Auto Backup to send photos or
Sending photos or videos to a
Viewing photos or videos on a
Select an AP
Connecting to a Wlan and configuring network settings
Connecting to a Wlan
Instructions until the AP Setting screen appears
Manually setting the IP address
Connecting to a Wlan and configuring network settings
AP Setting screen, move to an AP, and then
Setting network options
Network connection tips
Using the login browser
Button
Entering text
Enter a space
Switch to ABC mode
Done Save the displayed text View the entering text guide
Camera will send the files
Sending photos or videos to a smart phone
Smart phone can connect to only one camera at a time
Remote Viewfinder mode supports the and photo sizes only
Using a smart phone as a remote shutter release
On the smart phone, set the following shooting options
Focus is automatically set to multi-AF
Using a smart phone as a remote shutter release
On the smart phone, touch and hold to focus
Release to capture the photo
Accessing a website
Using photo or video sharing websites
Uploading photos or videos
Using photo or video sharing websites
Sending photos or videos via email
Changing email settings
Rotate the mode dial to w Select
To delete your information, select Reset
Changing the email password
Press m Select Setting Password “ On
Setting an email password
To deactivate the password, select Off
Select Next Scroll to files to send, and then press o
Sending photos or videos via email
Login with your ID and password
Rotate the mode dial to w Select Select SkyDrive
Uploading photos to a cloud server
Sending photos or videos to a PC
Using Auto Backup to send photos or videos
Installing the program for Auto Backup on your PC
Press o to start the backup
Using Auto Backup to send photos or videos
Connect your TV to a wireless network via an AP device
Viewing photos or videos on a TV Link-enabled TV
Viewing photos or videos on a TV Link-enabled TV
On the device, allow the camera to connect to the device
Sending photos using Wi-Fi Direct
On the device, turn on the Wi-Fi Direct option
Press m, and then select
Setting the PC to wake up from sleep mode
About the Wake on LAN WOL feature
Bios setting menu will appear
About the Wake on LAN WOL feature
Turn on the PC, and then press F2 while the PC is booting
Setting the PC to turn on
Refer to options to configure your camera’s settings
Settings
Press m to return to the previous screen
Settings menu
Accessing the settings menu
Shooting or Playback mode, press m Select n “ an item
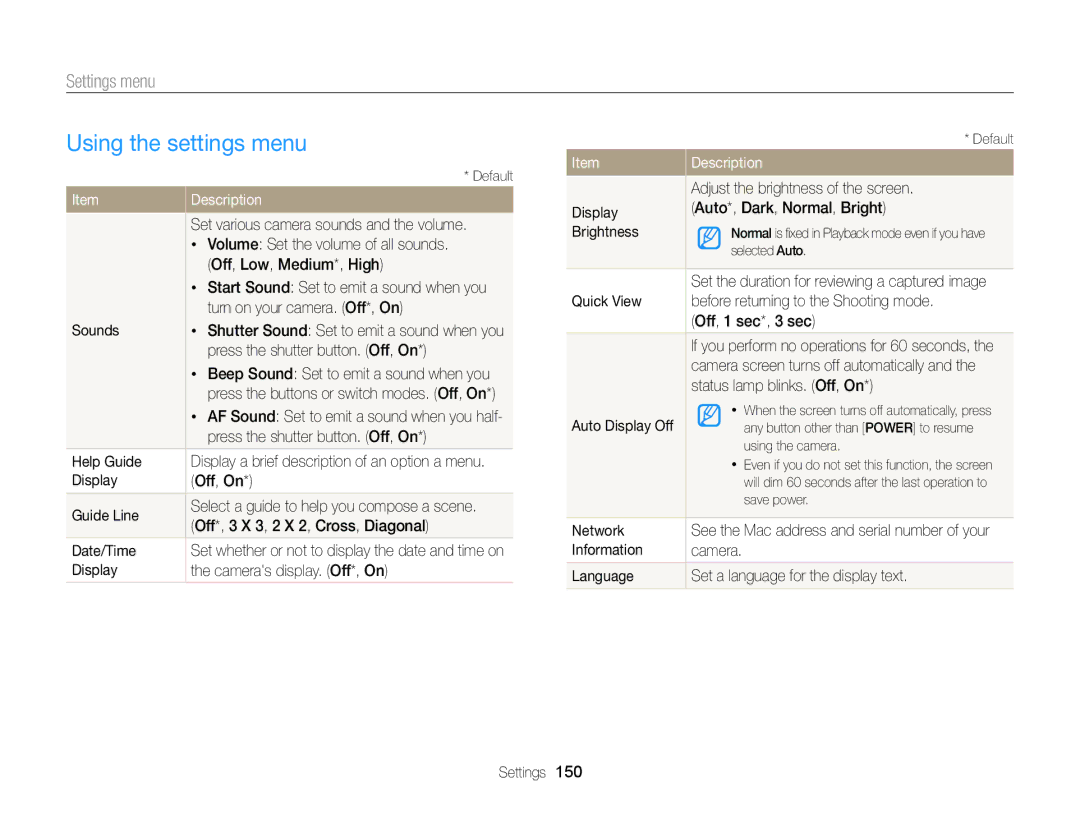
Settings menu
Using the settings menu
Date and Time
Specify how to name files
Reset. Yes, No
Auto Power Off
Smart Link Wi-Fi t. MobileLink*, Remote Viewfinder
Reset
Video Out
Set the video signal output for your region
PAL 1080i*, 720p, 576p Hdmi Size
Mexico, etc
Declaration sentence in official languages …………
Camera maintenance …………………………………
Error message Suggested remedies
Error messages
Error messages
Camera body
Camera maintenance
Cleaning your camera
Camera lens and display
Inappropriate places to use or store the camera
Using or storing the camera
Camera maintenance
Using on beaches or shores
Other cautions
Using the camera with caution in humid environments
Size Super Fine Normal
About memory cards
Supported memory cards
Memory card capacity
Approx
Size
Video
Size 480fps 240fps 120fps 30fps
Manufacturer is not responsible for any loss of data
Battery specifications
About the battery
Battery life
Low battery message
Handling and disposing of batteries and chargers with care
Camera maintenance
Using optional flash units
Using optional accessories
Using an optional optical viewfinder
Using the microphone
Using the shutter release
Using optional accessories
Using a conversion lens
Situation Suggested remedies
Before contacting a service center
Situation
Before contacting a service center
Not recognize your
Connecting the camera to the device
Make sure that the USB cable is
Your computer does Connected correctly
Camera specifications
Camera specifications
Shooting
Precapture, Bracket WB, AE, Timer
Timer 10 Sec, 2 Sec
Sdxc card up to 64 GB guaranteed
RAW
Image size For 2 GB SD Number of photos
Camera specifications
Composition
Glossary
AEB Auto Exposure Bracket
AF Auto Focus
Glossary
ISO sensitivity
Glossary
Correct Disposal of This Product
Address
FCC notice
Declaration of Conformity Trade Name
Model No Samsung EX2F Responsible Party
IC 649E-EX2F
For the following
Declaration of Conformity
Declaration sentence in official languages
Declaration sentence in official languages
Index
Index
Beauty Shot mode
Using the zoom 35 Zoom button 17 Zoom sound settings
Timer lamp
Auto Backup Thumbnails Mac Windows
Accessing