Samsung SGH-a187
Headquarters
Intellectual Property
Page
Open Source Software
Http//opensource.samsung.com
Table of Contents
Tools
Changing Your Settings
Accessibility
My Stuff
103
100
101
102
Activating Your Phone
Removing the Battery
Installing the SIM Card
Getting Started
Removing the SIM Card
Gently press down to secure the battery
Installing the Memory Card
Installing the Battery
Charging a Battery
Replacing the Battery Cover
Low Battery Indicator
Idle mode, press Menu Messaging
Powering On or Off the Phone
Key until the power-off image displays
Setting Up Your Voicemail
Refilling Your Account
Features of Your Phone
Understanding Your Phone
Front View of Your Phone
Keys
Special Function keys In Idle mode, press and hold
Backlight
Internal Display Layout
Appears when Silent Profile Mode is active
Displays when signed on to AIM IM service
Displays when signed on to Yahoo IM service
Left
Displays when Bluetooth is activated
Selecting Functions and Options
Enter the code and press the OK soft key or the key
Some functions of the Right soft key are
Command Keys
Key
Some functions of the Left soft key are
Send Key
Key, or the key to make your selection
Accessing Menus
Menu Navigation
Or the key
Idle mode, press Menu Settings Phone Shortcuts
To assign a Go to application
Go to
Press Options Settings Default View by
Menu Navigation Notation
Idle mode, press Menu My Stuff Tools Calendar
Making a Call
Call Functions
Idle mode, press Menu My Stuff Tools Recent Calls
Adjusting the Call Volume
Answering a Call
Recent Calls
Last Call Time shows the length of time for the last call
All Deletes all missed call entries
Following options are available
Press the Back soft key or the key to end
Silent Profile Mode
Data Call Time
Options During a Call
Putting a Call on Hold
To put a call on hold
Press the key to dial the second call
Pressing the key
Press the Options soft key to access the following options
Key to select the contact
You can search for a number in Address Book during a call
To answer a call while you have a call in progress
To end the current call, press the key
Call Waiting
Special Keys
Using the Qwerty Keypad
To activate or deactivate the T9 mode
Entering Text
Enter Press to start a new line
Text Input Mode
Changing Text Input Mode
Indicator displays
Adding a New Word to the T9 Dictionary
Using T9 Predictive Text Mode
Entering a Word in T9 Mode
Continue until you have finished your message
Using Alphabet Mode
Entering Numbers, Punctuation Marks, and Symbols
Using Emoticon Mode
Entering Text in an Edit Field
Creating and Sending New Text Messages
Messaging
Types of Messages
Your phone provides the following message types
Creating and Sending New Multimedia Messages
Soft key or the key to insert it into your message
Messaging
For additional message options, see Creating
Using Message Options
Message icon displays when you receive a new text
Key or the key to insert it into your message
More
Forward allows you to forward the message
Idle mode, press Menu Messaging Delete by Folders
Using Instant Messaging IM
Agree to the terms and conditions of use for this service
Using Message Templates
Messaging Settings
Following messaging settings are available
Scroll down to view the Used Space for various items
Used Space
Signing into Your Mobile Email
Using Mobile Email
To sign into your Mobile Email, follow these steps
Follow on-screen instructions to complete the process
Address Book entry options
Using Contact List
Understanding Your Address Book
Idle mode, press Menu Address Book Contact List
Other assigns another number for the contact entry
Adding a New Contact
Use the following steps to add a new Contact
Idle mode, press Menu Address Book Add New Contact
Select one of the following options and press the Select
Call dials the selected contact number
Press Options Copy to SIM Card
Soft key or the key
Idle mode, press Menu Address Book Speed Dial List
Speed Dial List
List
Press Options Assign Speed Dial
Confirmation screen displays Added
Reject List
Highlight the entry you want to edit
Key or the key to store the changed number
FDN List
Service Numbers SIM-dependent
Address Book Settings
FDN Contacts
Copy an entry to the Phone
SIM Management
Check the All box to copy all entries
Copying an Entry to the SIM Card
Deleting SIM Card Entries
Press the OK to return to the SIM Management screen
Sound Profile
Changing Your Settings
Quick Tips
AT&T Quick Tips web page displays
Other Available Profiles
Sound Settings
Display
Idle mode, press Menu Settings Display
Press the key to access the following menus
Key or the key to save your setting
Dialing Display
Light Settings
Shortcuts Toolbar
Menu Style
Press the Save soft key or the key to save your selection
Press the Save soft key to save your settings
Time & Date
Phone
Own Number
Idle mode, press Menu Settings Phone Security
Shortcuts
Auto Key Lock
All Messaging Recent Calls Audio Pictures Address Book
Using this menu, you can lock the following categories
Enter your 4- to 8-digit phone password and press the OK
To unlock an application, follow these steps
Idle mode, press Menu Settings Phone Reset Phone
Enter your PIN2 password and press the OK soft key or
Reset Phone
Idle mode, press Menu Settings Phone Restore Phone
Idle mode, press Menu Settings Phone Network Selection
If you select Manual, go to step
Set by Network Show Number Hide Number
Calls
This menu shows the following options
Or the key to make your selection
Call Barring SIM Dependent
To set your call forwarding options
Select one of the following options
Call Forwarding
Idle mode, press Menu Settings Bluetooth
Idle mode, press Menu Settings Calls Voice Call Auto Redial
Press the key to assign the new setting
Bluetooth
If Bluetooth is deactivated, you must activate Bluetooth
Idle mode, press Menu Settings Bluetooth My Devices
Press the key to erase the previous Device Name
Idle mode, press Menu Settings Bluetooth My Bluetooth Info
Applications Settings
This option allows you to search for new Bluetooth devices
Browser Settings
You can set up various options for using Browser services
Audio
My Stuff
Applications
Select an application and follow the on-screen instructions
From the Audio Tones menu, select Downloaded Tones
From the Audio Tones menu, select Default Tones
Press Select soft key or the key
Play allows you to listen to the tone
Recorded Audio
Idle mode, Menu My Stuff Audio Answer Tones
Your downloaded music files are displayed
Music
Idle mode, press Menu My Stuff Games Shop Games
Press the key Press Options Play soft key
Pause key Press the Play key to resume play
Games
Use the Left and Right Navigation keys to view the images
To access the Pictures menu option, use the following steps
Pictures
View allows you view the currently selected image
Idle mode, press Menu My Stuff Other Files Memory Card
Tools
For more information, refer to Tools on
Other Files
Idle mode, press the Menu My Stuff Used Space
Scroll down to view the Used Space for various items
Idle mode, press Go to Camera
To access the Camera and take a photo
Tools
Camera
600, 640 x 480, 320 x 240, or 220 x
Tools
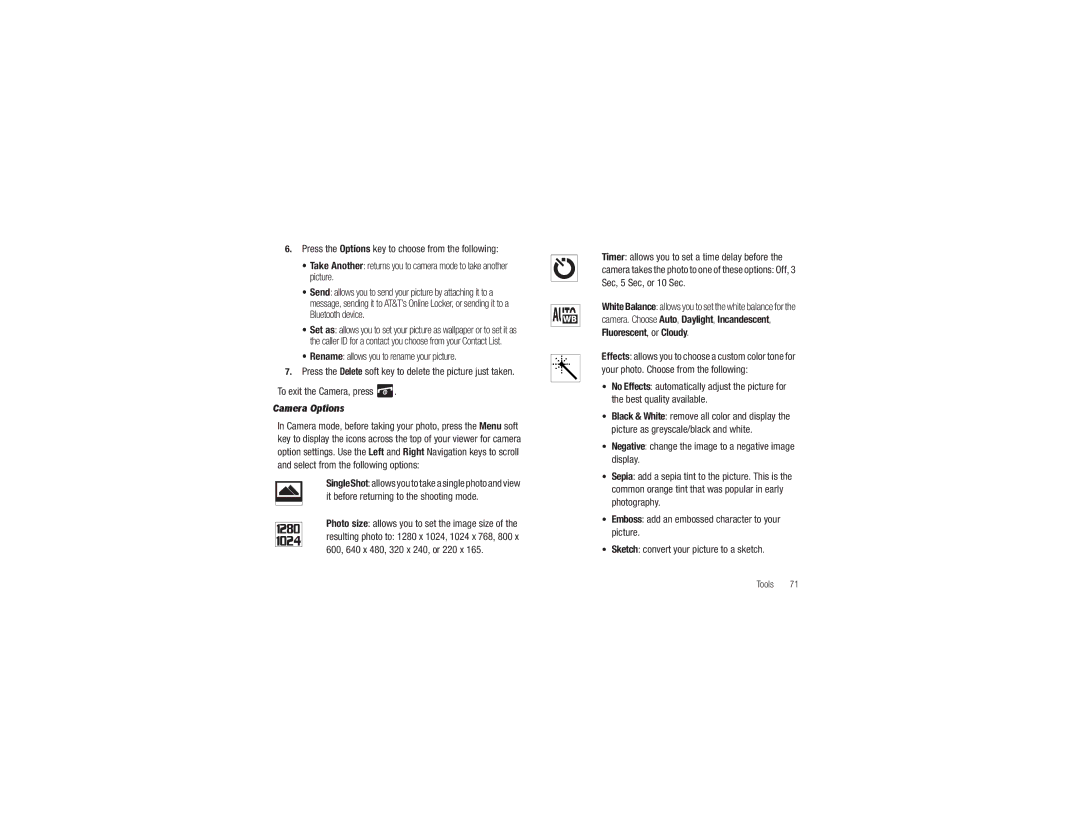
Camera Options
Effects
Settings allows you to customize your camera settings
General Settings
Camera Settings
Using Playlists
Idle mode, press Menu My Stuff Tools Music Player
Creating a Playlist
Music Player Functions
Idle mode, press Menu My Stuff Tools Music Player Playlists
Adding and Removing Songs
Playing Music
Press Options Record and press the Select soft key or
More information, see Downloading Multimedia Files on
Record Audio
Record Audio screen displays Press the Record key
Other Options are also available for Recorded Audio files
To view and change audio recording settings
Press Options Play
To exit, press the Back soft key or press
Press the Save soft key or the key to save these changes
Alarms
Memo
Press the Options soft key to access the following
Calendar
Go to allows you to go to Today or Date
Key twice
Enter the first number using the numeric keys
Calculator
Tip Calculator
World Clock
Converter
Function and press the Select soft key or the key
Use the keypad to enter the number of units to be
Idle mode, press Menu My Stuff Tools Timer
Timer
Key to stop the timer
Press the Reset soft key to erase all times recorded
Navigating the WAP Browser
Access a WAP Site
WAP
Launching the WAP Browser
Entering Text in the WAP Browser
Selecting and Using Menu Options
Press the Up and Down Navigation keys to move through
WAP
Select a bookmark item on the Favorites list
Using Favorites
Idle mode, press Menu Mobile Web
Press Options View Favorites
Press Options Browser Settings
Downloading Multimedia Files
Clearing the Cache
Page
Accessibility
Accessibility
TTY Mode
Use the following steps to enable TTY Mode
Specific Absorption Rate SAR Certification Information
Health and Safety Information
Health and Safety Information
Exposure to Radio Frequency RF Signals
Head 0.64 W/Kg Body-worn 0.93 W/Kg
Head 0.73 W/Kg Body-worn 1.05 W/Kg
UL Certified Travel Adapter
Consumer Information on Wireless Phones
What kinds of phones are the subject of this update?
Samsung Mobile Products and Recycling
What is FDAs role concerning the safety of wireless phones?
Do wireless phones pose a health hazard?
What are the results of the research done already?
Health and Safety Information
What about children using wireless phones?
Health and Safety Information
Road Safety
Responsible Listening
American Academy of Audiology
Using Your Phone Near Other Electronic Devices
Operating Environment
Implantable Medical Devices
Should not carry the phone in a breast pocket
Persons who have such devices
For more information see
Potentially Explosive Environments
FCC Notice
Restricting Childrens access to your Phone
Emergency Calls
FCC Notice and Cautions
Product Performance
Batterymarch Park Quincy, Massachusetts USA
Other Important Safety Information
Getting the Most Out of Your Signal Reception
Understanding How Your Phone Operates
Availability of Various Features/Ring Tones
Understanding the Power Save Feature
Speak directly into the phones receiver
Battery Precautions
Battery Standby and Talk Time
Care and Maintenance
106
Standard Limited Warranty
Warranty Information
108
109
110
End User License Agreement for Software
111
112
113
Precautions for Transfer and Disposal
Customer Care Center Klein Rd Plano, TX
Richardson, Texas Phone 1-800-SAMSUNG
114
Camera Options
Accessing a Menu Function Address Book
Audio Auto Redial Backspace key Battery
Call Time Call Waiting 26 Calls
Memory Card Installation Menu Navigation Menu Style
Data Call Time Data Volume Dialing a Number
Left soft key Light Settings
Lock Phone Low battery indicator Making a Call
Music File Extensions
Numeric mode Open Options
Phone Safety Picturess PIN Code
Mobile Care Mobile Email
Symbol key Symbols mode T9 mode
Replacing Battery Cover Right soft key
Service Number SIM-dependent Settings
Standard Limited Warranty Storing a Number
119
Setup
Voicemail Wallpaper
Changing the number