Thank you for purchasing this Samsung product
1CH Blu-ray Home Cinema System
Hdmi
Player Features
Playback of many disc types, plus an FM Tuner
1280 x 720 HD For High-Definition Playback
BLU-RAY Disc Features
HD video resolutions are also available
1920 x 1080 HD
IPod Dock
WHAT’S Included
Important Notice
Safety information
Safety Warnings
Class 1 Laser Product
Precautions
Contents
DivX, MKV, MP4 Playback
Audio Setup 37 Setting up the Speaker Options
BD-LIVE
Using AN iPod
About the use of this user’s manual
Getting started
Before Reading the USER’S Manual
Icons that will be used in manual
Logos of Discs that can be played
Disc Type and Characteristics
Disc types that can be played
DVD-RAM
Discs that cannot be played
Region code
Blu-ray Disc Compatibility
Disc Format
Disc Types
Front Panel
Description
Rear Panel
Tour of the Remote Control
Remote control
Remote Control
Installing batteries in the Remote Control
Operation Range of the Remote Control
Setting the Remote Control
Brand Code
TV Brand Code List
Rear of the Subwoofer
Connecting the Wireless Subwoofer
Connections
Connections
Installing the Cradle Stand
Installing the Wall Mount
Method 1 Hdmi Best
Connecting the Video OUT to Your TV
Method 2 Composite Video Good
Hdmi Auto Detection Function
Connecting AN iPod
IPod models that can be used with the HT-BD8200
Optical Cable
Connecting Audio from External Components
Optical Connecting an External Digital Component
Small
AUX Connecting an External Analogue Component
Connecting using a router DSL
Connecting to the Network
Case 1 Connecting a Direct LAN Cable to your Modem
Case 2 Connecting to a Wireless IP sharer
This unit does not receive AM broadcasts
Connecting the FM Antenna
Cooling FAN
FM Antenna Supplied
Basic Functions
Before Playing
MKV
HD DVD DVD+RW DVD-ROM DVD-RAM CDV CD-ROM CVD
Playing a Disc
ON-SCREEN Menu Navigation
Searching through a Chapter or Track
Setting the Sound
Using the Search and Skip Functions
Setting the Power On / Off Melody Sound
Step Motion Play
Slow Motion PLAY/STEP Motion Play
Slow Motion Play
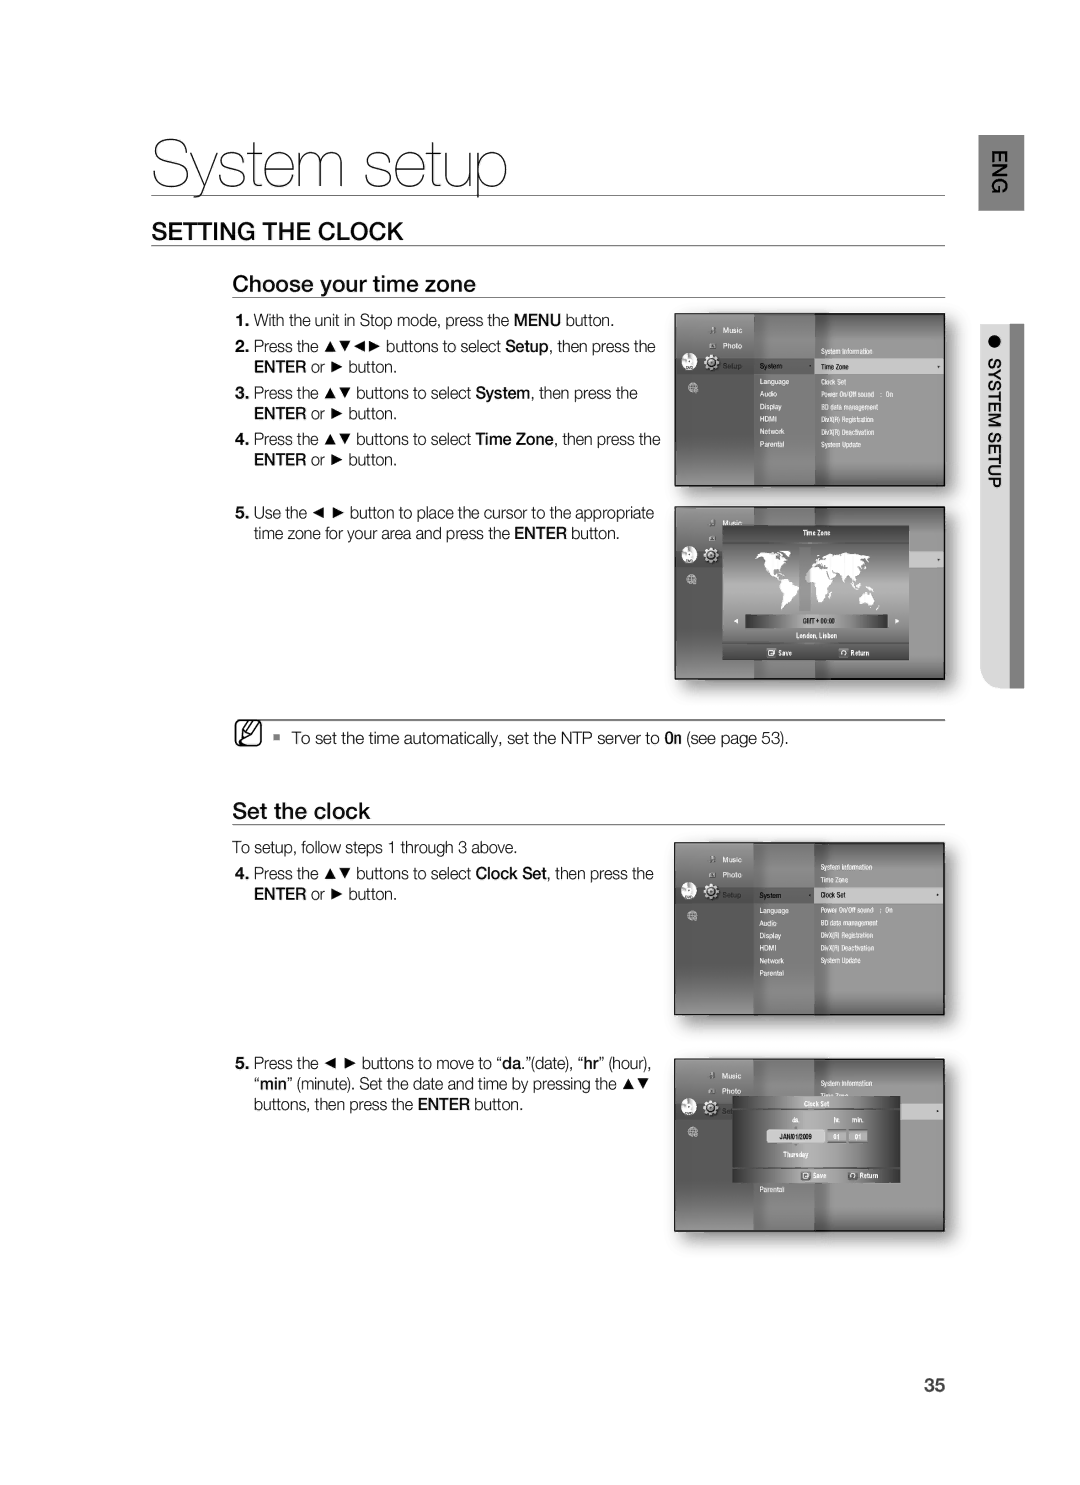
Set the clock
System setup
Setting the Clock
Choose your time zone
Cyrillic
Language setup
Setting UP the Language Options
Central
Audio Setup
Audio setup
Setting UP the Speaker Options
Setting the Test Tone
Press the Return button to return to the previous menu
Setting the Speaker Distance
Setting the Sound Edit
Sound on V.SOUND OFF
Smart Sound Audio Upscaling Power Bass DSP Mode OFF
Sound Virtual Sound
DSP Function
Pan-Scan
Display setup
Setting UP the Display Options
TV Aspect
Movie Frame 24 Fs
Resolution
Hdmi Composite
Setting UP the Video DISPLAY/OUTPUT Options
Resolution according to the output mode
Blu-ray Disc playback
Screen Message
Progressive Mode
Display Setup
Frame & Field bar
Samsung products only
Hdmi setup
Setting UP the Hdmi Setup Options
Anynet+ HDMI-CEC
Hdmi Format
Hdmi Setup
Your TV speakers only
Hdmi Audio
Hdmi connection cable, and audio is output through
Parental Setup
Parental setup
Setting UP the Parental Lock
Changing the Password
If you forgot your password
Setting the Rating Level
Cable Network
Setting UP the Network Setup Options
Network Setup
Network Selection
Yes Select Return
Network setup
Wireless Network
Setup available
It may take several seconds to search
Server Port User Password
Proxy Setting
On the player automatically connects to the Internet
To setup, follow steps 1~3 on
Server in order to adjust the time setting
Network Connection Test
Select Return
BD data management
System Device Management
BD Data Management
StartCancel
System upgrade
Firmware Upgrade
Upgrade
When the system upgrade is done, check
All settings will revert to the factory settings. The next
Selecting Yes will end the upgrade process,
Selecting No will continue the upgrade process
Divxr Deactivation
Firmware Upgrade Notification
System Information
Divxr Registration
Info menu for the PIP section
Using the Display Function
Watching a movie
Watching
Using the Disc Menu & POPUP/TITLE Menu
Using the Disc Menu
Using the Title Menu
Repeat the current chapter or title
Using the A-B Repeat function
Repeat Play
Repeat playback
Selecting the Subtitle Language
Using the Audio button
Using the Subtitle button
Selecting the Audio Language
Move
Using the Angle function
Changing the Camera Angle
BD-LIVE
PIP Picture in Picture Settings
Using the PIP button
Using the BD-LIVE Disc
Audio Display
DIVX, MKV, MP4 Playback
Skip Forward/Back
Fast Playback
AVI
DivXDigital internet video express
Repeat Audio CDCD-DA & MP3
Listening to music
Displays the media type Current track song
Playing AN Audio CDCD-DA/MP3
Audio CDCD-DA/MP3 Screen Elements
Listening to Music
Select the desired slide show speed
Playlist
MP3 & Jpeg Simultaneous playback
To go to the Music List, press the Return button
Rotate
Viewing a picture
Viewing a Picture
Slide SHOW/SPEED
To stop the Zoom
Zoom
GO to Photo List
To move the area
Safe USB Removal
Using the USB function
Playing Media Files Using the USB Host Feature
Supported file Formats
USB Host Specification
USB Devices that can be used with the Home Cinema
Main Unit
Presetting Stations
Radio
Listening to Radio
My love 186 000011
Using an iPod
Listening to Music
IPod Playback Screen Elements
IPod Music categories
Watching a Movie
PC Streaming Function
PC streaming function
Enter the PC’s user name in the window
Press the button to select a desired folder
Using the e-contents
Log
Country Setup
Searching a video
Using the E-CONTENTS
Playing a video
Saving a video
My Favorites
Player Library
Using the E
Contents
Convenient function
Sleep Timer Function
Adjusting Display Brightness
To confi rm the sleep timer setting, press the Sleep button
Troubleshooting
Hdcp High-bandwidth Digital Content Protection
Press the Power button
Feature is not available at the moment
Resolution Abnormal Hdmi output screen
Handling and Storing Discs
Appendix
Handling discs
Disc Storage
Power Consumption
Specifications
Power Consumption 70 W Weight
Dimensions W x H x D
Region Country Customer Care Centre Web Site
Contact Samsung World Wide
Code No. AH68-02244F
Correct disposal of batteries in this product

