![]()
![]()
![]()
![]()
![]()
![]()
![]()
![]()
![]()
![]()
![]()
![]()
![]()
![]()
![]()
![]()
![]() Connecting
Connecting![]() the FM and
the FM and ![]()
![]()
![]()
![]()
![]()
![]()
![]()
![]()
![]()
![]()
![]()
![]()
![]()
![]()
![]()
![]()
![]()
![]()
![]()
![]()
![]()
![]()
![]()
![]()
![]()
![]()
![]()
![]()
![]()
![]()
![]()
![]()
![]()
![]()
![]()
![]() AM(MW) Antennas
AM(MW) Antennas


 Setting
 the Clock
For each step, you have a few seconds to set the required options.
If you exceed this time, you must start again.
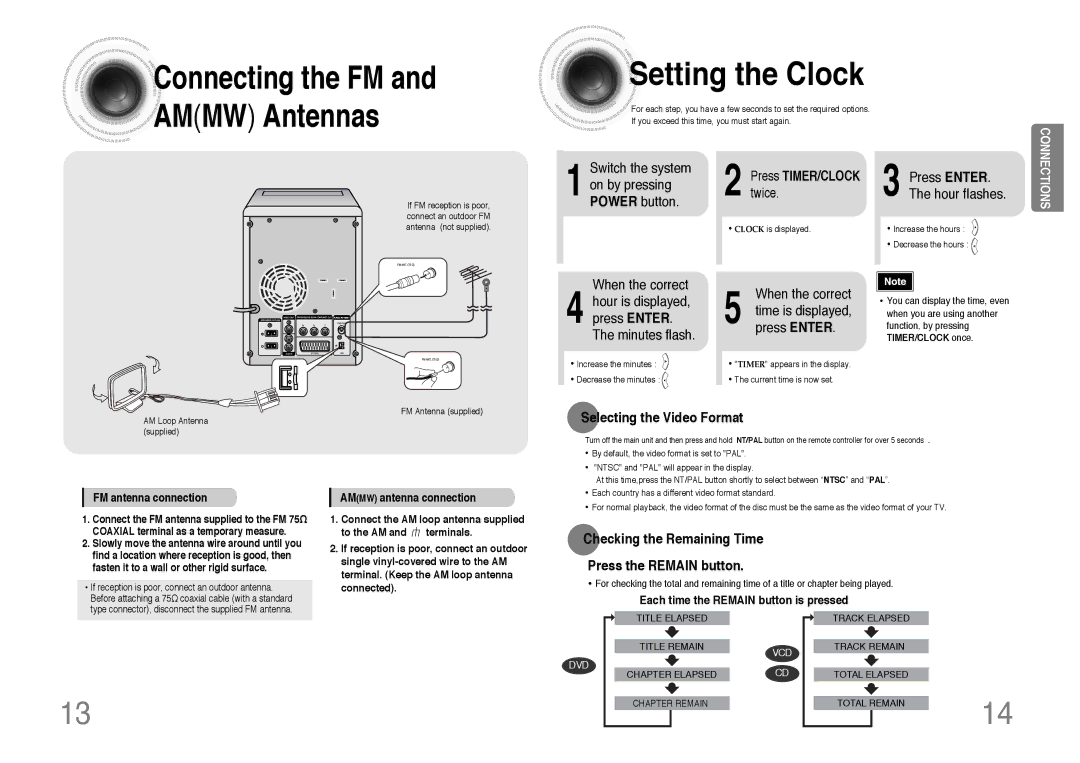
If FM reception is poor, connect an outdoor FM antenna (not supplied).
CONNECTIONS
RADIO ANTENNA
AM Loop Antenna (supplied)
FM antenna connection
1.Connect the FM antenna supplied to the FM 75Ω COAXIAL terminal as a temporary measure.
2.Slowly move the antenna wire around until you find a location where reception is good, then fasten it to a wall or other rigid surface.
•If reception is poor, connect an outdoor antenna. Before attaching a 75Ω coaxial cable (with a standard type connector), disconnect the supplied FM antenna.
FM Antenna (supplied)
AM(MW) antenna connection
1.Connect the AM loop antenna supplied to the AM and ![]() terminals.
terminals.
2.If reception is poor, connect an outdoor single
1Switch the system on by pressing POWER button.
When the correct
4hour is displayed, press ENTER. The minutes flash.
•Increase the minutes : ![]()
•Decrease the minutes : ![]()
2Presstwice. TIMER/CLOCK
•CLOCK is displayed.
When the correct
5 time is displayed, press ENTER.
•"TIMER" appears in the display.
•The current time is now set.
3Press ENTER. The hour flashes.
• Increase the hours : |
• Decrease the hours : |
Note |
• You can display the time, even |
when you are using another |
function, by pressing |
TIMER/CLOCK once. |
Selecting the Video Format
Turn off the main unit and then press and hold NT/PAL button on the remote controller for over 5 seconds .
•By default, the video format is set to "PAL".
•"NTSC" and "PAL" will appear in the display.
At this time,press the NT/PAL button shortly to select between “NTSC” and “PAL”.
•Each country has a different video format standard.
•For normal playback, the video format of the disc must be the same as the video format of your TV.
Checking the Remaining Time
Press the REMAIN button.
•For checking the total and remaining time of a title or chapter being played.
Each time the REMAIN button is pressed
DVD
TITLE ELAPSED
TITLE REMAIN
VCD
CHAPTER ELAPSED | CD |
TRACK ELAPSED
TRACK REMAIN
TOTAL ELAPSED
13
CHAPTER REMAIN
TOTAL REMAIN | 14 |
|