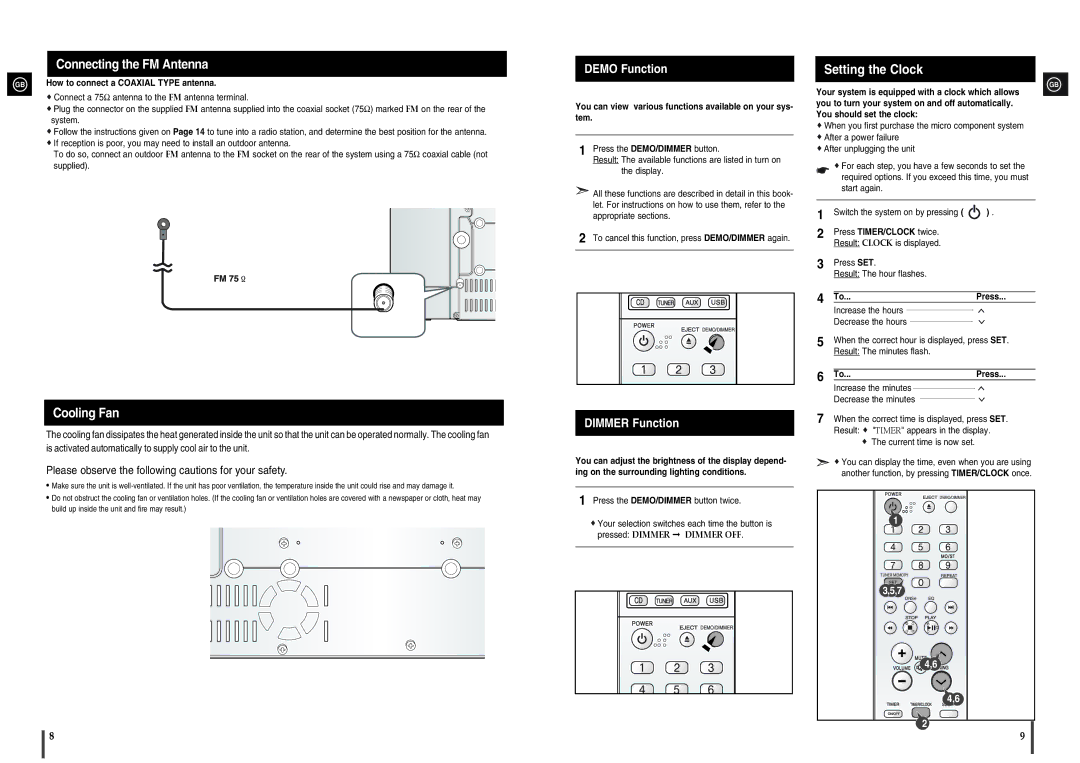
Connecting the FM Antenna
GB How to connect a COAXIAL TYPE antenna.
![]() Connect a 75Ω antenna to the FM antenna terminal.
Connect a 75Ω antenna to the FM antenna terminal.
![]() Plug the connector on the supplied FM antenna supplied into the coaxial socket (75Ω) marked FM on the rear of the system.
Plug the connector on the supplied FM antenna supplied into the coaxial socket (75Ω) marked FM on the rear of the system.
![]() Follow the instructions given on Page 14 to tune into a radio station, and determine the best position for the antenna.
Follow the instructions given on Page 14 to tune into a radio station, and determine the best position for the antenna.
![]() If reception is poor, you may need to install an outdoor antenna.
If reception is poor, you may need to install an outdoor antenna.
To do so, connect an outdoor FM antenna to the FM socket on the rear of the system using a 75Ω coaxial cable (not supplied).
Cooling Fan
The cooling fan dissipates the heat generated inside the unit so that the unit can be operated normally. The cooling fan is activated automatically to supply cool air to the unit.
Please observe the following cautions for your safety.
•Make sure the unit is
•Do not obstruct the cooling fan or ventilation holes. (If the cooling fan or ventilation holes are covered with a newspaper or cloth, heat may build up inside the unit and fire may result.)
DEMO Function
You can view various functions available on your sys- tem.
1Press the DEMO/DIMMER button.
Result: The available functions are listed in turn on the display.
![]() All these functions are described in detail in this book- let. For instructions on how to use them, refer to the appropriate sections.
All these functions are described in detail in this book- let. For instructions on how to use them, refer to the appropriate sections.
2To cancel this function, press DEMO/DIMMER again.
DEMO/DIMMER
DIMMER Function
You can adjust the brightness of the display depend- ing on the surrounding lighting conditions.
1Press the DEMO/DIMMER button twice.
![]() Your selection switches each time the button is pressed: DIMMER ➞ DIMMER OFF.
Your selection switches each time the button is pressed: DIMMER ➞ DIMMER OFF.
DEMO/DIMMER
Setting the Clock
GB
Your system is equipped with a clock which allows you to turn your system on and off automatically. You should set the clock:
![]() When you first purchase the micro component system
When you first purchase the micro component system
![]() After a power failure
After a power failure ![]() After unplugging the unit
After unplugging the unit
![]() For each step, you have a few seconds to set the required options. If you exceed this time, you must start again.
For each step, you have a few seconds to set the required options. If you exceed this time, you must start again.
1Switch the system on by pressing ( ![]() ) .
) .
2Press TIMER/CLOCK twice. Result: CLOCK is displayed.
3Press SET.
Result: The hour flashes.
4To...Press...
Increase the hours ![]()
![]()
![]() Decrease the hours
Decrease the hours ![]()
![]()
![]()
5When the correct hour is displayed, press SET. Result: The minutes flash.
6To...Press...
Increase the minutes ![]()
![]()
![]() Decrease the minutes
Decrease the minutes ![]()
![]()
![]()
7When the correct time is displayed, press SET. Result: ![]() "TIMER" appears in the display.
"TIMER" appears in the display.
 The current time is now set.
![]() You can display the time, even when you are using another function, by pressing TIMER/CLOCK once.
You can display the time, even when you are using another function, by pressing TIMER/CLOCK once.
DEMO/DIMMER
1
TUNER MEMORY | REPEAT |
SET
3,5,72
DNSe EQ
![]()
![]() 4,6
4,6![]()
4,6
2
8 | 9 |