installation
Safety instructions for the installation
This oven may be installed only by an approved electrician. The installer is responsible for connecting the appliance to the main supply, while observing the relevant safety regulations.
•Ensure protection from live parts when installing the oven.
Power connection
If the appliance is not connected to the mains with a plug, a |
|
|
| ||
switch (with at least 3 mm contact spacing) must be provided in order to satisfy |
|
|
| ||
safety regulations. The power cable (H05 |
|
|
| ||
must be of sufficient | length to be connected to the oven, even if the oven stands |
|
|
| |
on the floor in front of its |
|
|
| ||
the oven with a screwdriver and loosen the screws of the cable clamp before |
|
|
| ||
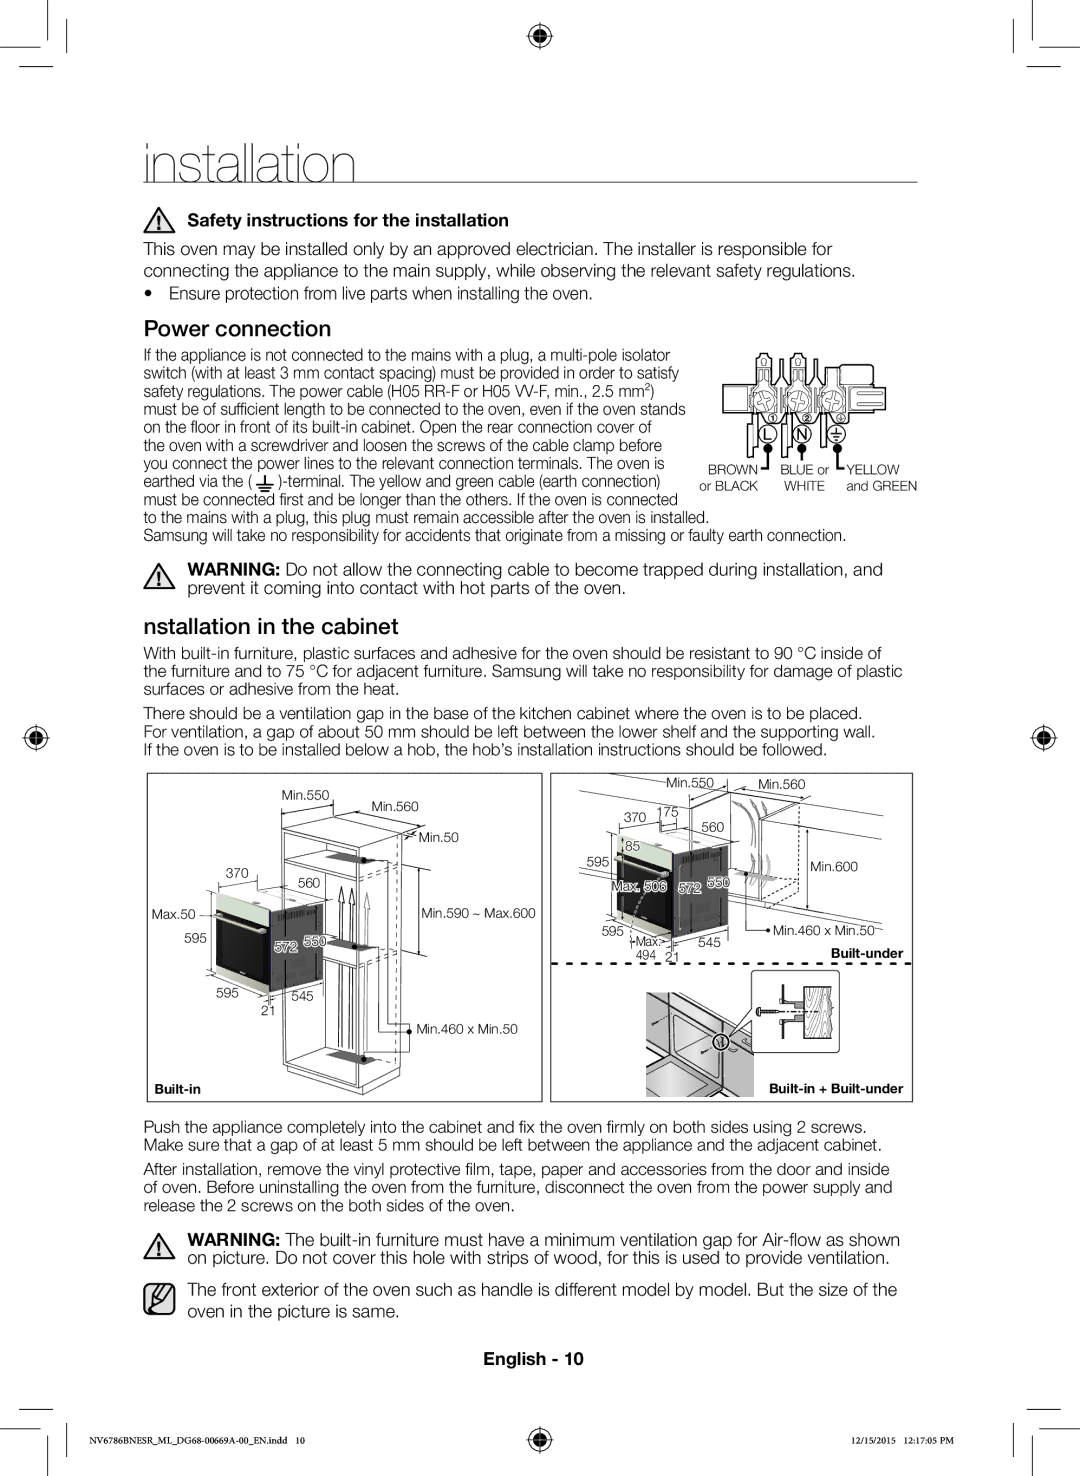
you connect the power lines to the relevant connection terminals. The oven is | BROWN | BLUE or | YELLOW | ||
earthed via the ( |
| ||||
or BLACK | WHITE | and GREEN | |||
must be connected first and be longer than the others. If the oven is connected |
|
|
| ||
to the mains with a plug, this plug must remain accessible after the oven is installed.
Samsung will take no responsibility for accidents that originate from a missing or faulty earth connection.
WARNING: Do not allow the connecting cable to become trapped during installation, and prevent it coming into contact with hot parts of the oven.
nstallation in the cabinet
With
There should be a ventilation gap in the base of the kitchen cabinet where the oven is to be placed. For ventilation, a gap of about 50 mm should be left between the lower shelf and the supporting wall. If the oven is to be installed below a hob, the hob’s installation instructions should be followed.
| Min.550 | Min.560 |
|
| |
|
| Min.50 |
370 | 560 |
|
|
| |
Max.50 |
| Min.590 ~ Max.600 |
595 | 572 550 |
|
|
| |
595 | 545 |
|
| 21 |
|
|
| Min.460 x Min.50 |
|
|
|
|
| Min.550 | Min.560 | |
370 | 175 | 560 |
| ||
|
|
|
|
| |
595 | 85 |
|
|
|
|
|
|
|
| Min.600 | |
|
|
|
| 572 550 | |
Max. 506 |
| ||||
595 | Max. |
| 545 | Min.460 x Min.50 | |
| 494 |
| 21 | ||
|
|
|
|
| |
Push the appliance completely into the cabinet and fix the oven firmly on both sides using 2 screws. Make sure that a gap of at least 5 mm should be left between the appliance and the adjacent cabinet.
After installation, remove the vinyl protective film, tape, paper and accessories from the door and inside of oven. Before uninstalling the oven from the furniture, disconnect the oven from the power supply and release the 2 screws on the both sides of the oven.
WARNING: The
The front exterior of the oven such as handle is different model by model. But the size of the oven in the picture is same.
English - 10
12/15/2015 12:17:05 PM