USER MANUAL
Copyright information
Google Play Store is a registered trademark of Google, Inc
Do not use your camera near flammable or explosive gases and liquids
Health and safety information
Do not disassemble or attempt to repair your camera
Do not handle your camera with wet hands
turn off your camera when directed by airline personnel
Use only Samsung-approved batteries, chargers, cables and accessories
Use the battery only for its intended purpose
Misusing the battery may cause a fire or electric shock
Do not drop or subject the camera to strong impacts
Never use a damaged battery, or memory card
Do not touch the flash while it fires
Do not place the camera in or near magnetic fields
You must plug the small end of the USB cable into your camera
If the camera overheats, remove the battery and allow it to cool down
Check that the camera is operating properly before use
Do not expose the lens to direct sunlight
Indications used in this manual
Icons used in this manual
Mode indications
My Camera
Contents
Concepts in Photography
Tips
Using E
Contents
Accessories
Using i-Function in P/A/S/M modes
White Balance
Shooting Functions
Size and Resolution
Picture Wizard photo styles
Wireless network
Playback/Editing
Viewing files
Camera settings menu
Connecting to external devices
on an
Appendix
Error messages
Maintaining the camera
Standing photography
Shooting postures
Holding the camera
Concepts in Photography
tilt the display up to 90 upwards or 45 downwards
Using the display
a straight posture
Crouching photography
High-angle shot
looking up the subject
looking down on the subject
Low-angle shot
Aperture
Aperture sizes
Aperture value and the depth of field
Shutter speed
Shutter Speed
ISO sensitivity
value
Shutter speed
Aperture
ISO sensitivity
Correlation between focal length, angle, and perspective
Short focal length
Long focal length
Depth of field
DOF depends on aperture value
What controls out-of-focus effects?
A photo captured with a 100 mm telescope lens
DOF depends on focal length
DOF depends on the distance between the subject and the camera
A photo captured close to the subject
Composition
Optical preview
Rule of Thirds
Using the rule of thirds will create photos with stable and compelling
Guide number = Flash to Subject Distance X Aperture value
Flash
Flash guide number
Aperture value = Guide number / Flash to Subject Distance
Bounce Photography
Chapter
My Camera
Check your product box for the following items
Getting started
Unpacking
My Camera
Camera layout
My Camera Camera layout
Press DIRECT LINK again to return to the previous mode
Setting the DIRECT LINK button
Using the DIRECT LINK button
To set a DIRECT LINK option
Learn how to insert the battery and an optional memory card into the
Inserting the battery and memory card
Using the memory card adapter
camera
Set the Power switch to ON
Charging the battery and turning on your camera
Charging the battery
To turn your camera off, set the Power switch to OFF
1 Press I to select Time Zone, and then press F or o
Performing the initial setup
10 Press m to finish the initial setup
2 Press D/I to select a time zone, and then press o
Selecting by touch
Selecting functions options
Selecting with buttons
Touching Touch an icon to select a menu or an option
Flicking Gently flick your finger across the screen
Using m
My Camera Selecting functions options
E.g. Selecting the photo size in P mode
E.g. Adjust the exposure value in P mode
Using the Smart panel
6 Press m or touch Back to switch to Shooting mode
1 Rotate the mode dial to P 2 Press f or touch
3 Press D/I/C/F to move to EV, and then press o
You can also select an option by touching it
Capturing photos
Display icons
In Shooting mode
1. Shooting information
My Camera Display icons
Recording videos
About the level gauge
In Playback mode
Viewing photos
Playing videos
Changing the information displayed
Press D repeatedly to change the display type
Lenses
Lens layout
SAMSUNG 18-55 mm F3.5-5.6 OIS III lens example
Locking or unlocking the lens
SAMSUNG 20-50 mm F3.5-5.6 ED II lens example
My Camera Lenses
SAMSUNG 16 mm F2.4 lens example
1 i-Function button p 2 Lens mount index 3 Focus ring p 4 Lens
5 Lens contacts
Lens markings
Find out what the numbers on the lens signify
SAMSUNG 18-200 mm F3.5-6.3 ED OIS lens example
Accessories
External flash layout
SEF8A example
2 Mount the flash by sliding it into the hot-shoe
Connecting the external flash
1 Remove the hot-shoe cover from the camera
Lift up the flash for use
8 TELE/WIDE mode switch 9 Hot-shoe connection
SEF220A example optional
4 Flash release button 5 POWER button 6 Battery cover 7 Bulb
1 Display icons 2 READY lamp/Test button 3 MODE button
GPS module layout optional
Attaching the GPS module
2 Mount the GPS module by sliding it into the hot-shoe
Press the power button of the GPS module
t Smart Auto mode p P Program mode p A Aperture Priority mode p
Shooting modes
s Smart mode p B Wi-Fi features p
S Shutter Priority mode p M Manual mode p i Lens Priority mode p
Recognizable scenes
tSmart Auto mode
My Camera Shooting modes
1 Rotate the mode dial to t 2 Align your subject in the frame
4 Press Shutter to capture the photo
P Program mode
1 Rotate the mode dial to P 2 Set the desired options
Program Shift
1 Rotate the mode dial to A
2 Scroll the jog dial to adjust the aperture value
A Aperture Priority mode
3 Set the desired options
2 Scroll the jog dial to adjust the shutter speed
S Shutter Priority mode
1 Rotate the mode dial to S
4 Set the desired options
M Manual mode
1 Rotate the mode dial to M
Framing mode
You can adjust the depth of field to blur or sharpen the background
Using the Bulb function
Using E
i Lens Priority mode
2 Press i-Function on the lens to select a setting
3 Adjust the focus ring to select a value
Using i-Function in P/A/S/M modes
You can also scroll the jog dial to adjust the value
Aperture
3 Adjust the focus ring to select an option
Available options
Shutter Speed
Photo resolution varies according to the zoom ratio if you use the Z
Using Z
3 Adjust the focus ring to select a zoom ratio
1 Rotate the mode dial to P, A, S, M, or
s Smart mode
1 Rotate the mode dial to s 2 Select a scene
3 Half-press Shutter to focus, and then press Shutter to capture
3 Press Shutter to capture the photo
Using the Best Face mode
1 Rotate the mode dial to s, and then select Best Face
4 Touch a face to replace
1 Rotate the mode dial to s, and then select Panorama
When you are finished, release Shutter
Capturing panoramic photos
2 Press m → 1 → Panorama → Live Panorama or 3D
The resolution varies depending on the panoramic photo you captured
1 Rotate the mode dial to t, P, A, S, M, i, or s
This feature may not work in some modes
Recording a video
2 Set the desired options 3 Press Video recording to start recording
3D mode
You can capture 3D photos or videos with an optional 3D lens
SAMSUNG 45 mm F1.8 T6 2D/3D lens example
To use auto 3D options that enable the camera to set shooting options
Available functions by shooting mode
For details about shooting functions, see Chapter
Press a shortcut for each function
Shooting Functions
Size and Resolution
Photo size
Quality
The camera saves photos in either the JPEG or RAW format
ISO sensitivity
Examples
Balance
White Balance
To set the White
Icon Description
Shooting Functions White Balance
Customizing preset White Balance options
You can also customize preset White Balance options
the light source. Color temperature is a measurement in degrees
Daylight
Auto WB
Fluorescent Daylight
Tungsten
Picture Wizard photo styles
To set a photo style
To set the auto
Learn how to adjust the camera’s focus according to the subjects
AF mode
focus mode
Continuous AF
Single AF is appropriate for shooting a still subject. When you press
Single AF
Shooting Functions AF mode
Manual focus
AF area
Selection AF
The AF area function changes the positions of the focus area
Multi AF
Face detection AF
The camera focuses on human faces preferentially. Faces of up to
Self-Portrait AF
Touch AF
Touch AF
Tracking AF
Focus on the subject or capture a photo by touching on the screen
One touch shot
Shooting Functions Touch AF
Focus assist
MF Assist
Focus Peaking
Optical Image Stabilization OIS
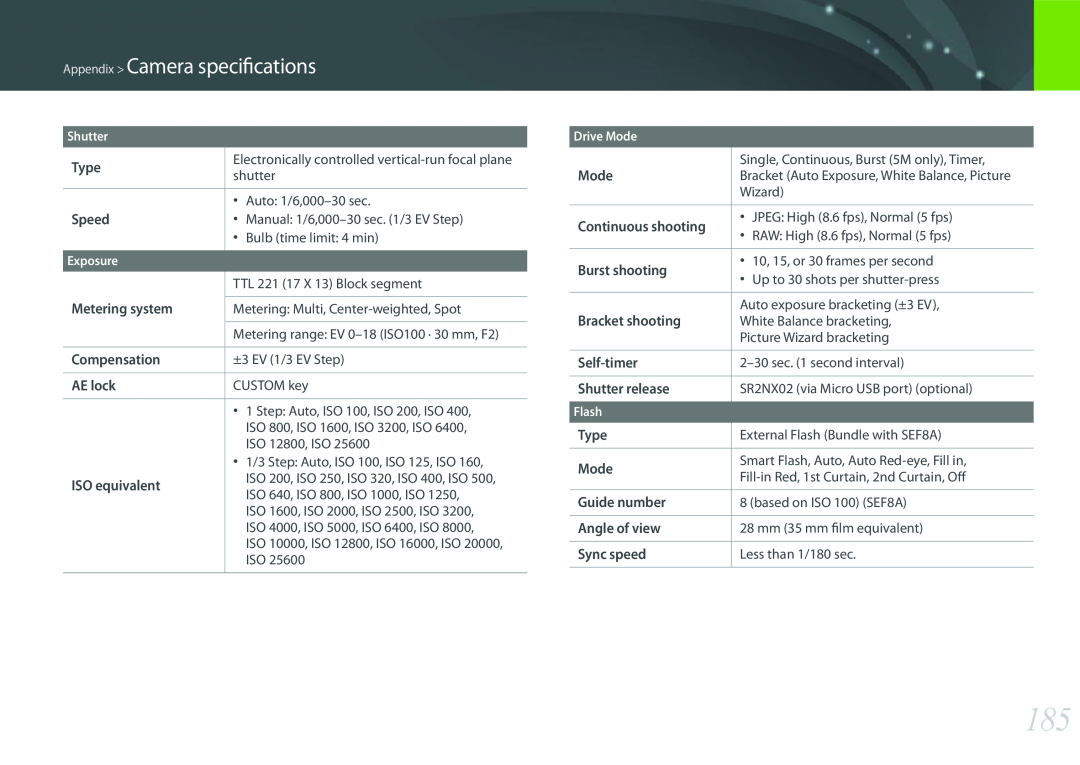
Drive shooting method
Single
Continuous
Timer
Burst
Shooting Functions Drive shooting method
Exposure +2
Auto Exposure Bracketing AE Bracket
White Balance Bracketing WB Bracket
WB+2
Bracketing setting
Picture Wizard Bracketing P Wiz Bracket
option
Flash
To set flash options
Adjusting the flash intensity
When the flash is on, adjust the flash intensity +/-2 levels
Reducing the red-eye effect
You can also drag the slider or touch +/- to adjust the intensity
Metering
Multi
Center-weighted
Spot
Shooting Functions Metering
Measuring the exposure value of the focus area
In Shooting mode, press m → 1 → Link AE to AF Point → an option
Dynamic Range
To set Smart Range options
Miniature
Smart Filter
Vignetting
Colored Pencil
indicator
Exposure compensation
selecting EV
Exposure lock
Shutter
Movie quality
Video functions
Movie size
The functions available for video are explained below
Multi Motion
Fader
Set the playing speed of a video
Voice
Wind cut
To reduce wind sound
Learn about how to play back and edit photos and videos
Playback/Editing
Refer to chapter 6 for editing files on a PC
1 Press y
Viewing image thumbnails
Viewing photos
2 Press C/F to scroll through files
Playback/Editing Searching and managing files
Viewing files by category
Viewing files as a folder
1 In the thumbnail view, press m → z → Filter → a category
2 Press C/F to select a file, and then press o 3 Press f
Protecting files
1 In Playback mode, press m → z → Protect → Select
Lock/Unlock all files
Deleting files
2 When the pop-up message appears, select Yes
3 Press n 4 When the pop-up message appears, select Yes
Deleting a single file
1 In Playback mode, press m 2 Select z → Delete → All
3 When the pop-up message appears, select Yes
Deleting all files
You can delete all files on the memory card at once
Viewing a slide show
Viewing photos
Enlarging a photo
1 In Playback mode, press m
Creating a print order DPOF
Press D/I to adjust the volume level
Auto rotating
4 Press m
Playing videos
3 Press o or touch at the point where you want the trimming to begin
6 Press o or touch at the point where you want the trimming to end
Trimming a video during playback
7 Press f or touch End Point 8 Press f or touch Trim to trim a video
9 When the pop-up message appears, select Yes
Capturing an image during playback
2 Press f or touch Capture
Cropping a photo
2 Drag the corners of the box to adjust the size of the area
Editing photos
1 Touch →
1 Touch → 2 Touch an option
Rotating a photo
Resizing photos
3 Touch OK 4 Touch to save
3 Press C/F to adjust the option
Adjusting your photos
1 Touch 2 Touch an adjusting option
You can also drag the slider or touch +/- to adjust the option
Retouching faces
1 Touch → 2 Press C/F to adjust the option
To cancel correction, touch
Reducing red-eye
2 Touch OK 3 Touch to save
Applying Smart Filter effects
1 Touch , and then touch an option
Apply special effects to your photos
Wireless network
3 Press m, and then select Wi-Fi Setting
Connecting to a WLAN and configuring network settings
Connecting to a WLAN
When a login page appears, refer to Using the login browser. p
2 Select IP Setting → Manual
Setting network options
Manually setting the IP address
2 Select each option, and then enter the required information
Move to the previous page
Using the login browser
Close the login browser
Move to the next page
Before you connect to a network, ensure your battery is fully charged
You must insert a memory card to use the Wi-Fi features
Do not access a network that you are not authorized to use
Network connection tips
Entering text
change the case, etc. Touch a key to enter it
5 On the camera, allow the smart phone to connect to your camera
Saving files to a smart phone automatically
3 On the smart phone, turn on Samsung SMART CAMERA App
1 On the camera, in Shooting mode, press m
3 On the camera, select a sending option
Sending photos or videos to a smart phone
1 On the camera, rotate the mode dial to B 2 On the camera, select
4 On the smart phone, turn on Samsung SMART CAMERA App
Wireless network Sending photos or videos to a smart phone
6 On the camera, allow the smart phone to connect to your camera
Using a smart phone as a remote shutter release
6 On the smart phone, set the following shooting options
Wireless network Using a smart phone as a remote shutter release
when shooting in and to 1920X1080 when shooting in resolution
7 On the smart phone, touch and hold to focus
1 Install i-Launcher on the PC. p
Using Auto Backup to send photos or videos
Installing the program for Auto Backup on your PC
3 When the Auto Backup program icon appears, click it
If you have performed a backup before, move to step
Wireless network Using Auto Backup to send photos or videos
3 Select a backup PC
To cancel sending, select Cancel
To delete your information, select Reset
Changing email settings
4 Select Sender Setting
Sending photos or videos via email
4 Select Setting Password → On
Wireless network Sending photos or videos via email
Setting an email password
5 When the pop-up appears, select OK
5 Enter your current 4-digit password 6 Enter a new 4-digit password
Changing the email password
4 Select Change Password
7 Enter the new password again 8 When the pop-up appears, select OK
7 Select Next
4 Select the Receiver box, enter an email address, and then touch
5 Select Next 6 Select files to send
8 Select the comment box, enter your comments, and then touch
If you connected to SkyDrive, refer to Using the login browser. p
Accessing a website
4 Enter your ID and password to log in
1 Rotate the mode dial to B 2 Select 3 Select a website
Uploading photos or videos
Wireless network Using photo or video sharing websites
1 Access the website with your camera 2 Select files to upload
3 Select Upload
1 Rotate the mode dial to B
3 Enter your ID and password, and then select Login → OK
Uploading photos to online storage
2 Select → Web storage
2 Select → Nearby devices
Wireless network Using AllShare Play to send files
Viewing photos or videos on devices that support AllShare Play
5 On the AllShare Play device, select a camera to connect
Wireless network Using AllShare Play to send files
3 Press m, and then select ShareWi-Fi → Wi-Fi Direct
Sending photos using Wi-Fi Direct
1 On the device, turn on the Wi-Fi Direct option
When in the single image view, you can send only one photo at a time
Camera settings menu
ISO Customizing
User settings
You can set the user environment with these settings
Noise Reduction
AE Bracket Set
Bracket Set
DMF Direct Manual Focus
+2.7 EV, -/+3 EV
to define the color space created by IEC International
Color space
sRGB Standard RGB is an international specification
Adobe RGB is used for commercial printing and has a
User Display
Distortion Correct
iFn Customizing
You can add or remove shooting information from the display
Histogram
Key Mapping
Backup, Email, SNS & Cloud, AllShare Play
About histogram
Grid Line
AF Lamp
Setting
Learn to configure your cameras settings
Set to display help text about menus and functions. Off, On
sRGB files - MMDDXXXX.JPG. For example, for a photo
Side by Side* Displays two images next to each other
Frame Packing Displays the images for the left and right
captured on Jan. 01, the file name would be
Information
Format
Device
Dual-band
cap to the lens when not using it
Reset the setup menu and shooting options to the factory
defaults. Date, time, language, and video output settings
can get dust on it when you change lenses. This can lead
Connecting to external devices
Viewing files on an HDTV
6 View photos or play videos using the camera buttons
Viewing files on an HDTV or 3D TV
2 Turn off your camera and HDTV
Viewing files on a 3D TV
7 Move to a 3D file, and then press I to switch to 3D mode
9 View 3D photos or play 3D videos using the camera buttons
2 Select 3D HDMI Output → an option. p
Transferring files to your Windows OS computer
Connecting the camera as a removable disk
Transferring files to your computer
1 Turn off the camera
Transferring files to your Mac OS
Connecting to external devices Transferring files to your computer
Disconnecting the camera for Windows XP
2 Click on the tool bar at the bottom right of your computer screen
Open the removable disk
Transfer photos or videos to the Mac OS computer
Using i-Launcher
Using programs on a PC
Installing programs from the provided CD
1 Insert the installation CD into your PC 2 Select a language
→ i-Launcher on your Mac OS computer
Requirements for Mac OS
Opening i-Launcher
Connecting to external devices Using programs on a PC
Using Multimedia Viewer
Viewing photos
Downloading the PC Auto Backup program
Viewing videos
refer to page
From the Samsung i-Launcher screen, click Firmware Upgrade
1 Insert Adobe Photoshop Lightroom DVD-ROM into your PC
Installing Adobe Photoshop Lightroom
Using Adobe Photoshop Lightroom
2 Select a language 3 Follow the on-screen instructions
Appendix
Error messages
When the following error messages appear, try these remedies
Camera lens and display
Cleaning the camera
Maintaining the camera
Image sensor
Do not store the camera where there are mothballs
Using or storing the camera
Using on beaches or shores
Appendix Maintaining the camera
Other cautions
Using the camera with caution in humid environments
Turn off the camera when not using it
Your camera consists of delicate parts. Avoid impacts to the camera
About memory card
Supported memory card
Super Fine
Memory card capacity
Quality
Fine
Video
Avoid using or storing memory cards near strong magnetic fields
Cautions when using memory cards
Turn off the camera when you insert or remove the memory card
Avoid memory cards to very cold or very hot temperatures below
Use only Samsung-approved batteries
About the battery
Battery specifications
Charging time When the battery
Notes about using the battery
Battery life
Low battery message
Avoid exposing batteries to very cold or very hot temperatures below
Cautions about using the battery
Notes about charging the battery
Protect batteries, chargers, and memory cards from damage
Use only the provided USB cable The battery may not charge when
Notes about charging with a computer connected
Handle and dispose of batteries and chargers with care
Before contacting a service center
not recognize an SDXC
Appendix Before contacting a service center
The memory card has
or UHS-1 memory card
Videos may not play on some video player
Camera specifications
Appendix Camera specifications
2-+2 EV 0.5 EV Step
Playback
Video
x0.25 640X480, 320X240 only, x0.5
Single image, Thumbnails 15/28, Slide show
Power Source
Wireless network
MobileLink, Remote Viewfinder, Auto Backup
Dimensions W X H X D
AEL/AFL Auto Exposure Lock/Auto Focus Lock
AP Access Point
Glossary
Ad-Hoc network
Color space
Camera shake Blur
Cloud Computing
Color temperature
EV Compensation
EV Exposure Value
Flash
Exif Exchangeable Image File Format
ISO sensitivity
Image sensor
IP Internet protocol address
JPEG Joint Photographic Experts Group
Noise
PAL Phase Alternate Line
Resolution
NFC Near Field Communication
WPS is a technology that secures wireless home networks
Wi-Fi
WPS Wi-Fi Protected Setup
Shutter speed
Optional accessories
Lens
External flash
Battery charger
Appendix Optional accessories
Rechargeable battery
Camera bag
Index
Page
Applicable in countries with separate collection systems
Correct Disposal of This Product
Waste Electrical & Electronic Equipment
Correct disposal of batteries in this product
FCC notice
Declaration of Conformity
In France, this equipment may only be used indoors
1 This device may not cause harmful interference, and
IC 649E-NX300 This equipment may be operated in all EU countries
Complies with IDA Standards DA100790
Please refer to the warranty that came with your product