00355A(01)
Installing the Camera
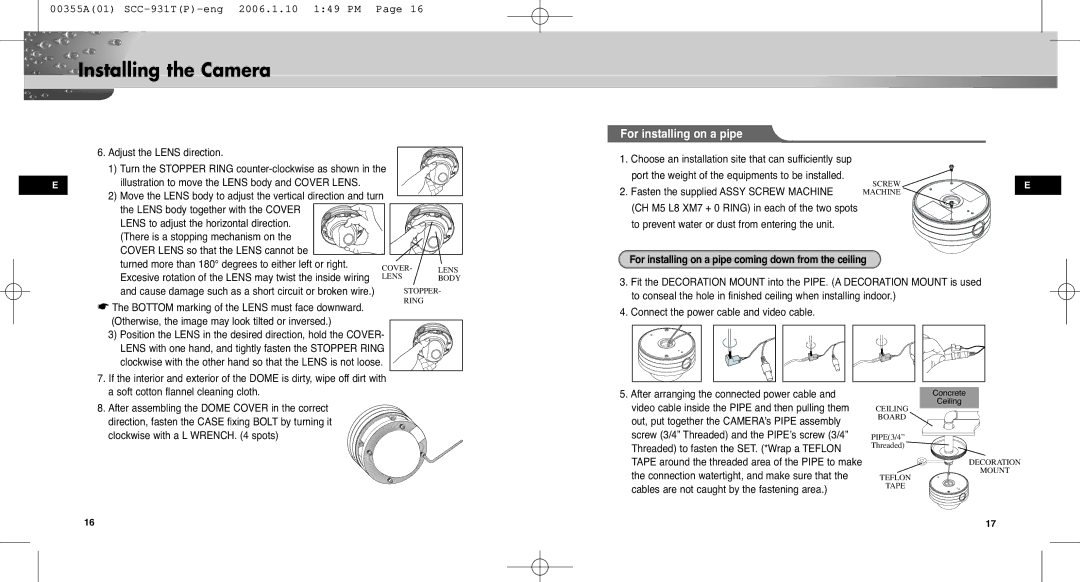
6. Adjust the LENS direction.
1) Turn the STOPPER RING
Eillustration to move the LENS body and COVER LENS.
2)Move the LENS body to adjust the vertical direction and turn the LENS body together with the COVER
LENS to adjust the horizontal direction. (There is a stopping mechanism on the COVER LENS so that the LENS cannot be
turned more than 180° degrees to either left or right. Excesive rotation of the LENS may twist the inside wiring and cause damage such as a short circuit or broken wire.)
☛The BOTTOM marking of the LENS must face downward. (Otherwise, the image may look tilted or inversed.)
3)Position the LENS in the desired direction, hold the COVER- LENS with one hand, and tightly fasten the STOPPER RING clockwise with the other hand so that the LENS is not loose.
LENS
BODY
STOPPER-
RING
For installing on a pipe
1.Choose an installation site that can sufficiently sup port the weight of the equipments to be installed.
2. Fasten the supplied ASSY SCREW MACHINE | SCREW | E |
MACHINE |
|
(CH M5 L8 XM7 + 0 RING) in each of the two spots
to prevent water or dust from entering the unit.
For installing on a pipe coming down from the ceiling
3.Fit the DECORATION MOUNT into the PIPE. (A DECORATION MOUNT is used to conseal the hole in finished ceiling when installing indoor.)
4.Connect the power cable and video cable.
7.If the interior and exterior of the DOME is dirty, wipe off dirt with a soft cotton flannel cleaning cloth.
8.After assembling the DOME COVER in the correct
direction, fasten the CASE fixing BOLT by turning it clockwise with a L WRENCH. (4 spots)
5.After arranging the connected power cable and video cable inside the PIPE and then pulling them out, put together the CAMERA’s PIPE assembly screw (3/4” Threaded) and the PIPE’s screw (3/4” Threaded) to fasten the SET. (*Wrap a TEFLON TAPE around the threaded area of the PIPE to make the connection watertight, and make sure that the cables are not caught by the fastening area.)
Concrete
Ceiling
CEILING
BOARD
PIPE(3/4”
Threaded)
DECORATION
MOUNT
TEFLON TAPE
16 | 17 |
