Picture Control
Using Automatic Picture Settings
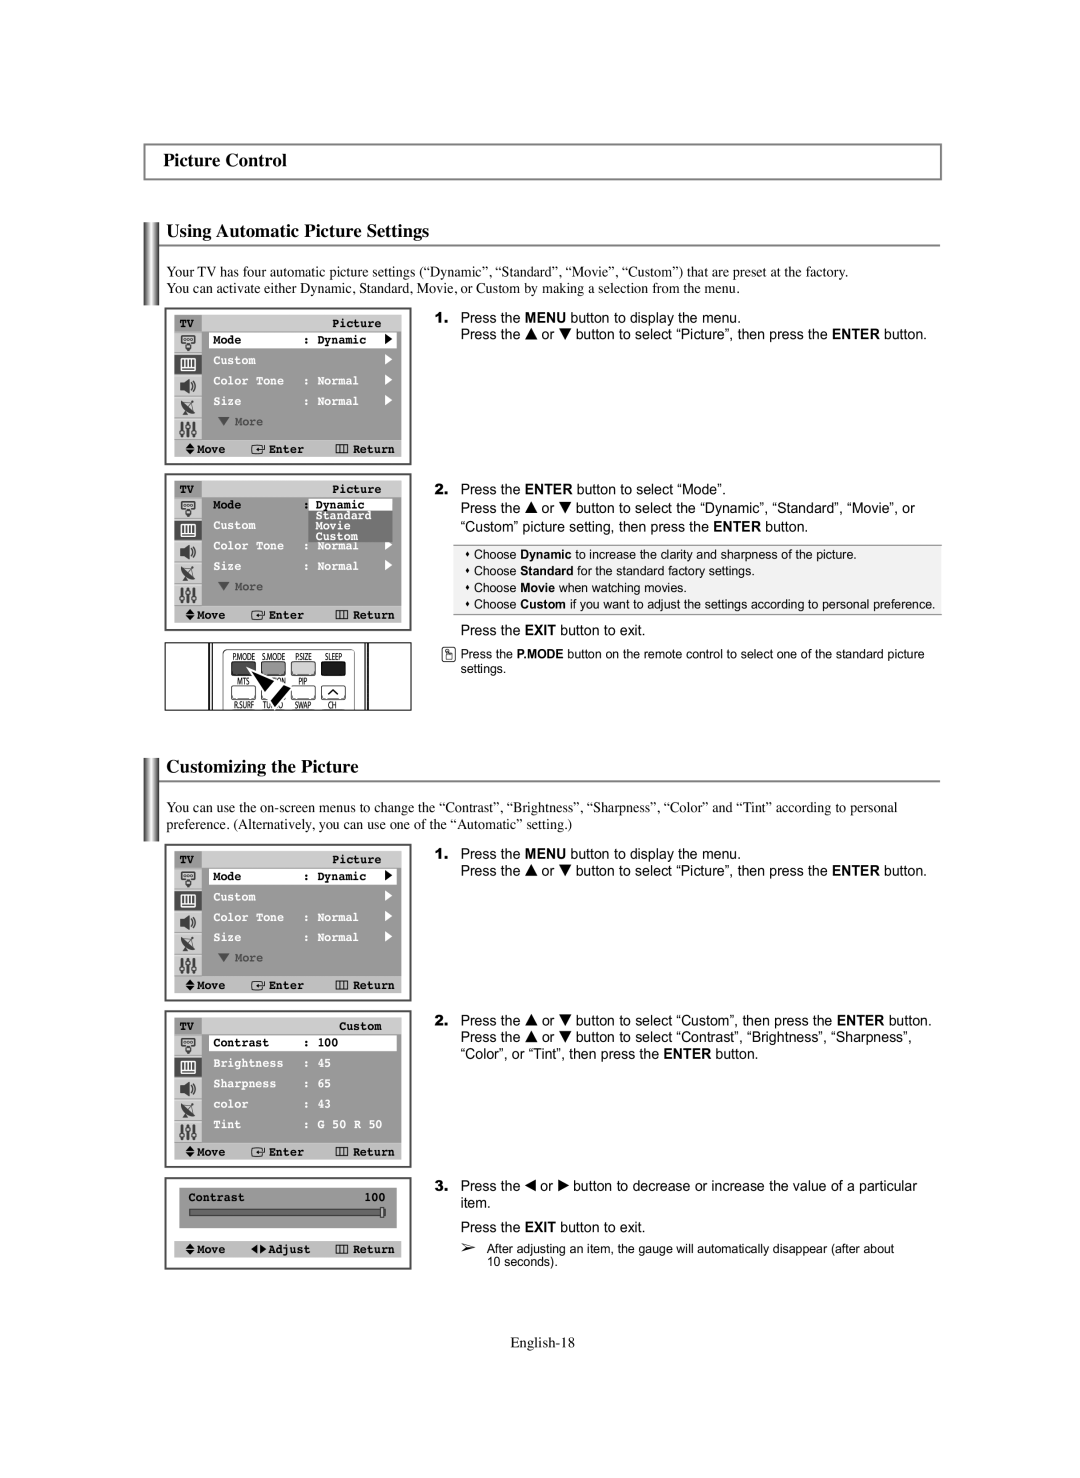
Your TV has four automatic picture settings (“Dynamic”, “Standard”, “Movie”, “Custom”) that are preset at the factory. You can activate either Dynamic, Standard, Movie, or Custom by making a selection from the menu.
TVPicture
Mode | : Dynamic | √ | |
Custom |
|
| √ |
Color | Tone : Normal | √ | |
Size | : Normal | √ | |
† More |
|
| |
Move | Enter | Return | |
1.Press the MENU button to display the menu.
Press the … or † button to select “Picture”, then press the ENTER button.
TVPicture
Mode | : Dynamic | √ | |
Custom |
| Standard | √ |
| Movie | ||
Color |
| Custom | √ |
Tone : Normal | |||
Size | : Normal | √ | |
† More |
|
| |
Move | Enter | Return | |
2.Press the ENTER button to select “Mode”.
Press the … or † button to select the “Dynamic”, “Standard”, “Movie”, or “Custom” picture setting, then press the ENTER button.
Choose Dynamic to increase the clarity and sharpness of the picture. Choose Standard for the standard factory settings.
Choose Movie when watching movies.
Choose Custom if you want to adjust the settings according to personal preference.
Press the EXIT button to exit.
![]() Press the P.MODE button on the remote control to select one of the standard picture settings.
Press the P.MODE button on the remote control to select one of the standard picture settings.
Customizing the Picture
You can use the
TVPicture
|
|
|
| Mode |
|
|
| : | Dynamic |
| √ |
|
|
|
|
|
| Custom |
|
|
| √ |
|
| |||
|
|
|
| Color | Tone | : Normal |
| √ |
|
| |||
|
|
|
|
|
| ||||||||
|
|
|
| Size |
|
|
| : Normal |
| √ |
|
| |
|
|
|
|
|
|
|
|
| |||||
|
|
|
| † More |
|
|
|
|
|
| |||
|
|
|
|
|
|
|
|
|
| ||||
|
|
|
|
|
|
|
|
|
|
| |||
|
| Move |
|
| Enter | Return |
|
| |||||
|
|
|
|
| |||||||||
|
|
|
|
|
|
|
|
|
|
|
|
|
|
|
|
|
|
|
|
|
|
|
|
|
|
|
|
| TV |
|
|
|
|
|
| Custom |
|
| |||
|
|
|
| Contrast | : | 100 |
|
|
|
| |||
|
|
|
| Brightness | : | 45 |
|
|
|
| |||
|
|
|
| Sharpness | : | 65 |
|
|
|
| |||
|
|
|
|
|
|
|
| ||||||
|
|
|
| color |
|
|
| : | 43 |
|
|
|
|
|
|
|
|
|
|
|
|
|
| ||||
|
|
|
| Tint |
|
|
| : | G 50 R | 50 |
|
|
|
|
|
|
|
|
|
|
| ||||||
|
|
|
|
|
|
|
|
|
|
|
| ||
|
| Move |
|
| Enter | Return |
|
| |||||
|
|
|
|
| |||||||||
|
|
|
|
|
|
|
|
|
|
|
| ||
|
|
|
|
|
|
|
|
|
|
| |||
|
|
|
|
|
|
|
|
|
|
| |||
| Contrast |
|
|
|
| 100 |
|
|
| ||||
|
|
|
|
|
|
|
|
|
|
|
|
|
|
|
|
|
|
|
|
|
|
|
|
|
|
|
|
|
|
|
|
|
|
|
| ||||||
|
| Move | œ √ Adjust | Return |
|
| |||||||
|
|
|
|
|
|
|
|
|
|
|
|
|
|
1.Press the MENU button to display the menu.
Press the … or † button to select “Picture”, then press the ENTER button.
2.Press the … or † button to select “Custom”, then press the ENTER button. Press the … or † button to select “Contrast”, “Brightness”, “Sharpness”, “Color”, or “Tint”, then press the ENTER button.
3.Press the œ or √ button to decrease or increase the value of a particular item.
Press the EXIT button to exit.
➢After adjusting an item, the gauge will automatically disappear (after about 10 seconds).
