Getting Started
Accessories
• Remote Control | • | Owner’s Instructions | ||
• | Power Cord | |||
| Batteries (AAA x 2) | |||
• Warranty Card / Safety Guide | • | Wire Holder Stand | ||
Input Cables (Sold Separately) | ||||
• | RS232 | • | Component | |
• | Audio | • | Composite (AV) | |
• | HDMI | • | Coaxial (RF) | |
• |
|
| ||
✎✎ Check the cable before |
|
| ||
| Cable |
| Ports | |
| HDMI |
|
| |
| USB |
|
| |
| Optical |
|
| |
Do not plug cable upside down.
Be sure to check before
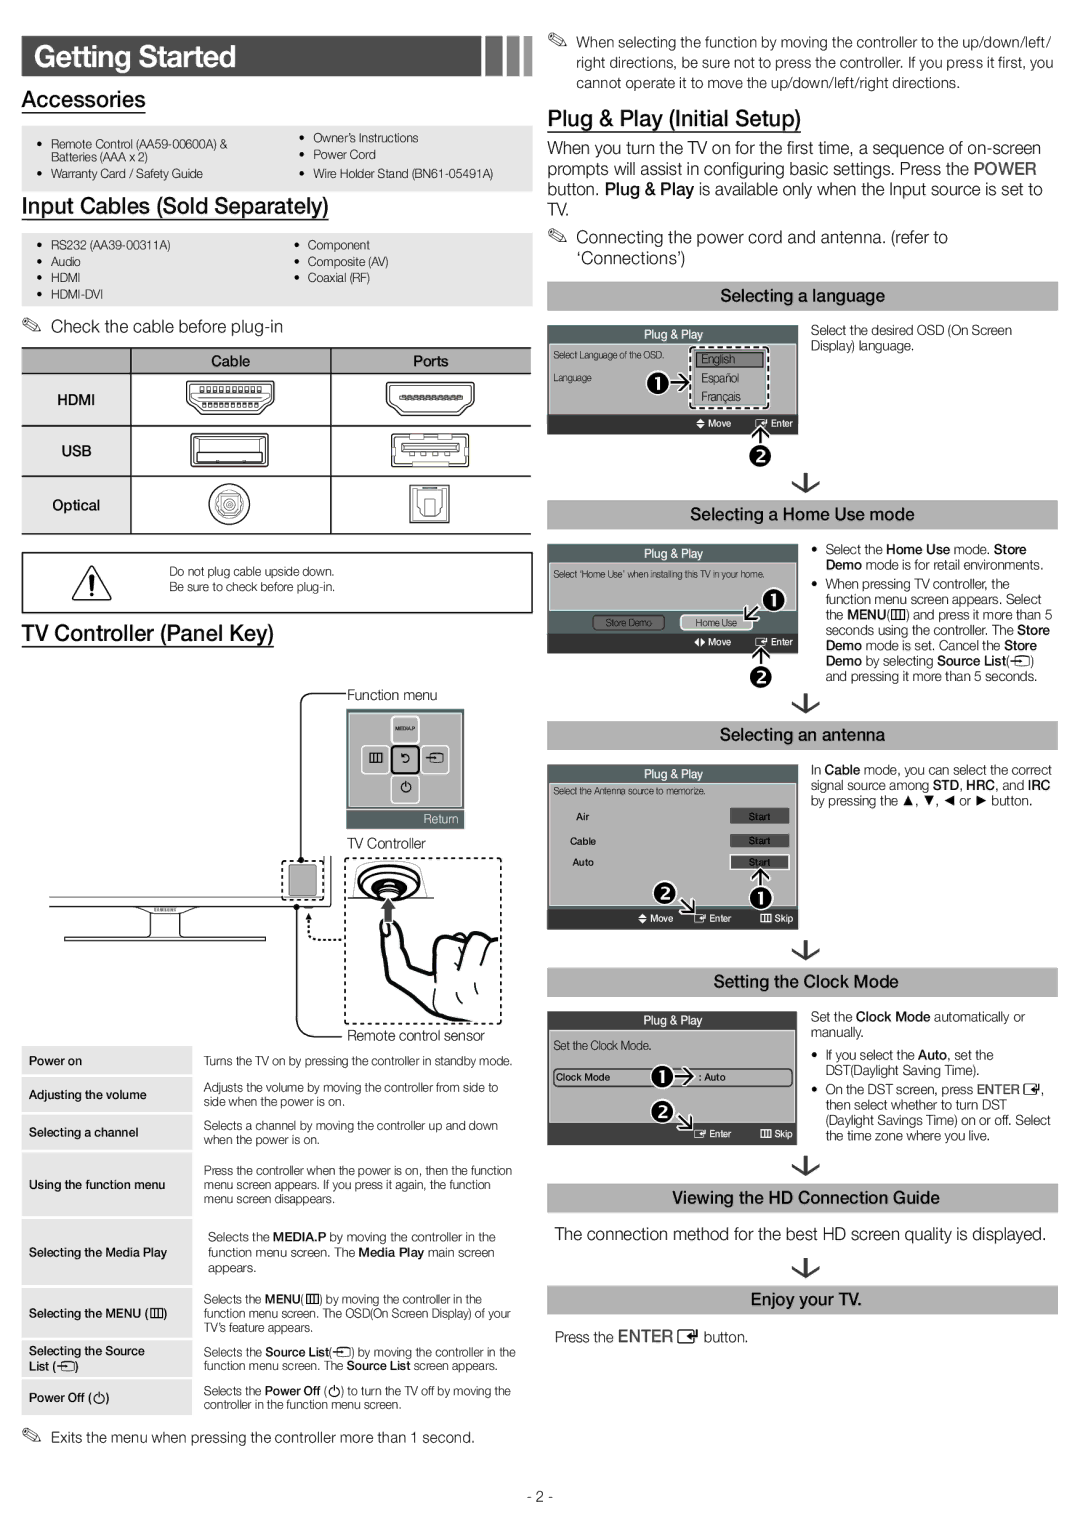
TV Controller (Panel Key)
Function menu
MEDIA.P
✎✎ When selecting the function by moving the controller to the up/down/left/ right directions, be sure not to press the controller. If you press it first, you cannot operate it to move the up/down/left/right directions.
Plug & Play (Initial Setup)
When you turn the TV on for the first time, a sequence of
✎✎ Connecting the power cord and antenna. (refer to ‘Connections’)
|
| Selecting a language | |
| Plug & Play | Select the desired OSD (On Screen | |
Select Language of the OSD. | English | Display) language. | |
| |||
Language | FrançaisEspañol |
| |
| U Move | E Enter |
|
|
|
|
| |
|
|
|
|
|
|
|
| |
|
| |
|
|
|
|
| |
| ||
| Selecting a Home Use mode | ||||
|
|
| • | Select the Home Use mode. Store | |
Plug & Play |
|
| |||
Select ‘Home Use’ when installing this TV in your home. |
|
| Demo mode is for retail environments. | ||
| • | When pressing TV controller, the | |||
|
| |
| ||
|
|
|
| function menu screen appears. Select | |
Store Demo | Home Use |
|
| the MENU(m) and press it more than 5 | |
|
|
|
|
| seconds using the controller. The Store |
| L Move | E Enter |
|
| Demo mode is set. Cancel the Store |
|
| |
|
| Demo by selecting Source List(s) |
|
| |
|
| and pressing it more than 5 seconds. |
Selecting an antenna
m R s
P
Return
TV Controller
|
| Plug & Play |
|
| ||||
| Select the Antenna source to memorize. |
|
| |||||
|
|
|
|
|
|
|
|
|
| Air |
|
|
|
|
| Start |
|
| Cable |
|
|
| Start | |||
| Auto |
|
|
| Start | |||
|
| | | |||||
|
| | ||||||
|
| U Move | E Enter | m Skip | ||||
In Cable mode, you can select the correct signal source among STD, HRC, and IRC by pressing the ▲, ▼, ◄ or ► button.
| Remote control sensor | |
Power on | Turns the TV on by pressing the controller in standby mode. | |
Adjusting the volume | Adjusts the volume by moving the controller from side to | |
side when the power is on. | ||
| ||
Selecting a channel | Selects a channel by moving the controller up and down | |
when the power is on. | ||
| ||
| Press the controller when the power is on, then the function | |
Using the function menu | menu screen appears. If you press it again, the function | |
| menu screen disappears. | |
| Selects the MEDIA.P by moving the controller in the | |
Selecting the Media Play | function menu screen. The Media Play main screen | |
| appears. | |
| Selects the MENU(m) by moving the controller in the | |
Selecting the MENU (m) | function menu screen. The OSD(On Screen Display) of your | |
| TV’s feature appears. | |
Selecting the Source | Selects the Source List(s) by moving the controller in the | |
List (s) | function menu screen. The Source List screen appears. | |
Power Off (P) | Selects the Power Off (P) to turn the TV off by moving the | |
controller in the function menu screen. | ||
|
✎✎ Exits the menu when pressing the controller more than 1 second.
Setting the Clock Mode
| Plug & Play | Set the Clock Mode automatically or | ||
Set the Clock Mode. | manually. | |||
• | If you select the Auto, set the | |||
| : Auto | |||
Clock Mode |
| DST(Daylight Saving Time). | ||
• | On the DST screen, press ENTERE, | |||
then select whether to turn DST
(Daylight Savings Time) on or off. Select
E Enter m Skip the time zone where you live.
Viewing the HD Connection Guide
The connection method for the best HD screen quality is displayed.
Enjoy your TV.
Press the ENTEREbutton.
- 2 -
