INSTALLATION & MAINTENANCE

The User’s Manual is for common use.

Make use of the User’s Manual depending upon your washing machine model.

ENVIRONMENT

Leave some space

Maintain at least 10cm between the washer and the wall.

Place the washer on a sturdy flat surface.

If the washer is placed on an uneven or weak surface, noise or vibration occurs. (Allowable is 1˚)

Adjust the legs for even placement.

Never install the washer near water.

Do not place the washer in steamy rooms or where the washer is directly exposed to rain.Moisture may destroy the electrical insulation causing an electrical shock hazard.

Avoid direct sunlight or heaters.

As plastic and electrical components are affected by direct heat,never place the washer near furnaces, boilers, etc. Do not place under direct sunlight.

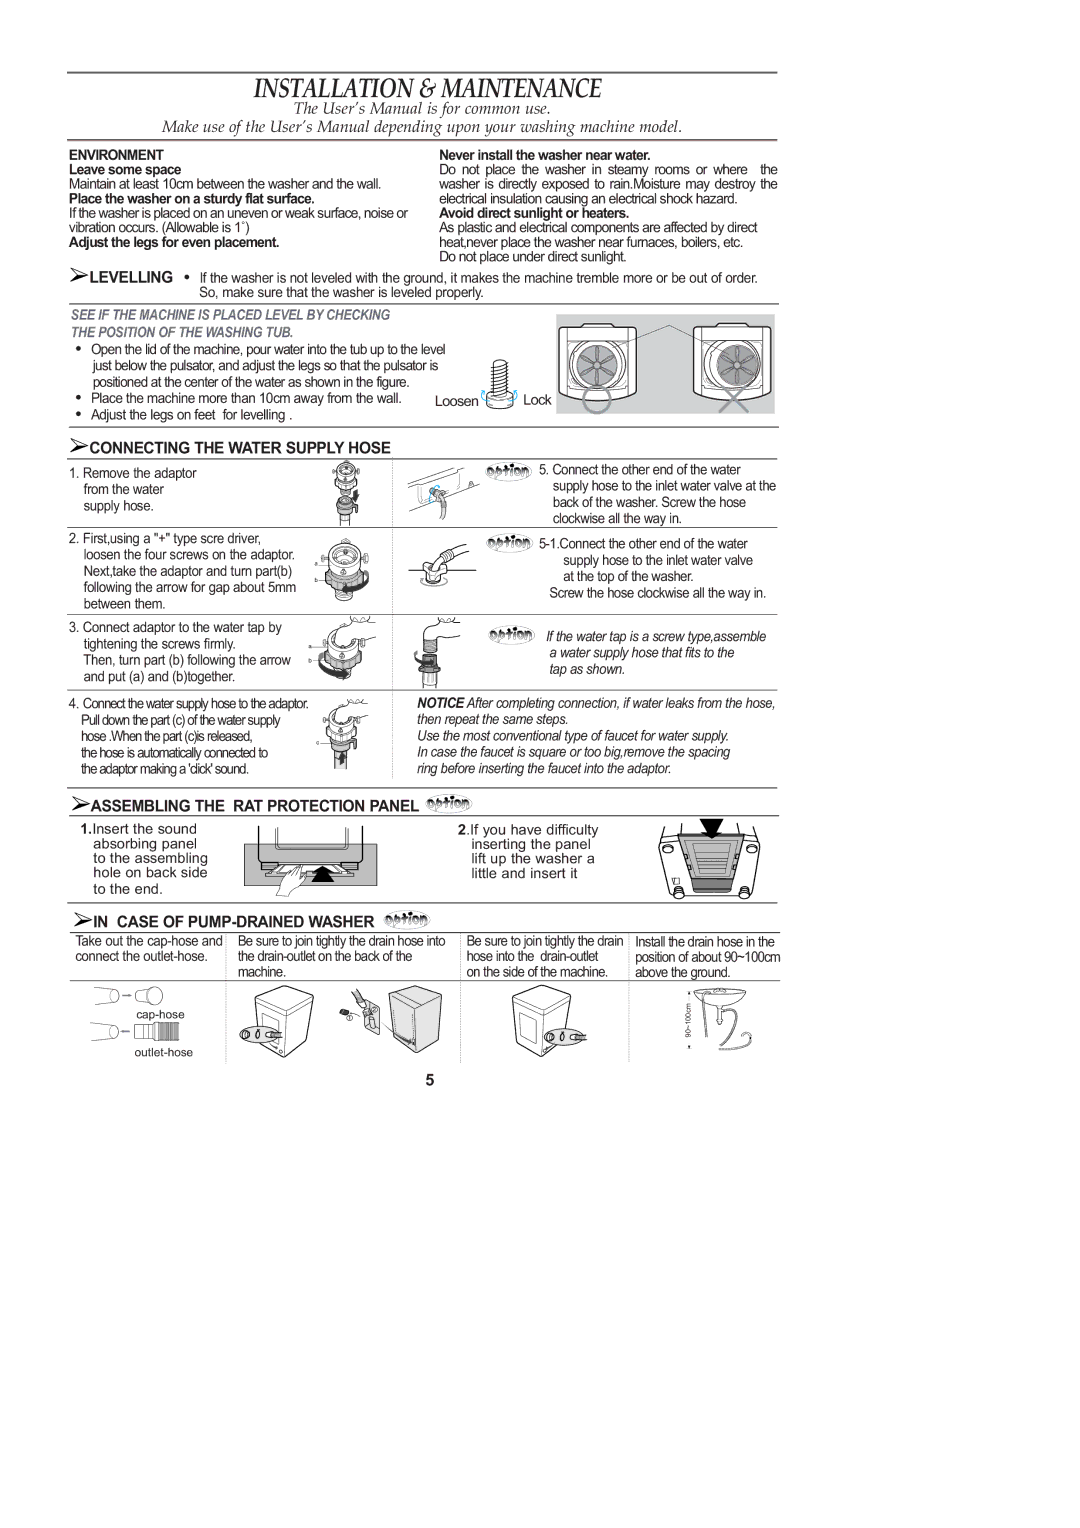
LEVELLING If the washer is not leveled with the ground, it makes the machine tremble more or be out of order. So, make sure that the washer is leveled properly.

SEE IF THE MACHINE IS PLACED LEVEL BY CHECKING

THE POSITION OF THE WASHING TUB.

Open the lid of the machine, pour water into the tub up to the level

just below the pulsator, and adjust the legs so that the pulsator is


positioned at the center of the water as shown in the figure.


Place the machine more than 10cm away from the wall.

Loosen

Lock

Adjust the legs on feet for levelling .

CONNECTING THE WATER SUPPLY HOSE

1.Remove the adaptor from the water supply hose.

5.Connect the other end of the water supply hose to the inlet water valve at the back of the washer. Screw the hose clockwise all the way in.

2. First,using a "+" type scre driver,


5-1.Connect the other end of the water

loosen the four screws on the adaptor.


a

supply hose to the inlet water valve

Next,take the adaptor and turn part(b)

b

at the top of the washer.

following the arrow for gap about 5mm


Screw the hose clockwise all the way in.

between them.


3. Connect adaptor to the water tap by


If the water tap is a screw type,assemble

tightening the screws firmly.

a

a water supply hose that fits to the

Then, turn part (b) following the arrow

b


tap as shown.

and put (a) and (b)together.


4. Connect the water supply hose to the adaptor.

NOTICE After completing connection, if water leaks from the hose,

Pull down the part (c) of the water supply


then repeat the same steps.

hose .When the part (c)is released,

c

Use the most conventional type of faucet for water supply.

the hose is automatically connected to


In case the faucet is square or too big,remove the spacing

the adaptor making a 'click' sound.


ring before inserting the faucet into the adaptor.

ASSEMBLING THE RAT PROTECTION PANEL

1.Insert the sound absorbing panel to the assembling hole on back side to the end.

2.If you have difficulty inserting the panel lift up the washer a little and insert it

IN CASE OF PUMP-DRAINED WASHER

Take out the cap-hose and connect the outlet-hose.

Be sure to join tightly the drain hose into the drain-outlet on the back of the machine.

Be sure to join tightly the drain hose into the drain-outlet on the side of the machine.

Install the drain hose in the position of about 90~100cm above the ground.

cap-hose

outlet-hose

90~100cm

5

Page 6
Image 6
Samsung WA71N3W1/YL Installation & Maintenance, Connecting the Water Supply Hose, Assembling the RAT Protection Panel

WA10B3S3ES/XST, WA10B3Q1DW/YL, WA71N3W1/YL, WA10B3Q1EW/XSG, WA10B3Q1EW/YPB specifications

Samsung has long been a leader in the home appliance sector, continuously setting benchmarks with innovative technology and design. Among its impressive lineup of washing machines, the models WA71NNW1/XSG, WA10B3S3EG/XST, WA10B3N1EW/XSG, WB80N4Q1EW/HAC, and WA71N3W2/YL stand out for their features and performance.

The WA71NNW1/XSG is well-regarded for its user-friendly interface and robust construction. This model typically comes equipped with a 7.1 kg capacity, making it suitable for medium-sized households. One of its standout features is the Eco Bubble technology, which allows for efficient cleaning at lower temperatures, preserving energy while still delivering exceptional washing results. The Diamond Drum design is another significant characteristic, reducing fabric damage and enhancing clothing care.

Next, the WA10B3S3EG/XST offers an advanced Digital Inverter Motor that provides quiet operation and enhances energy efficiency. This model usually boasts a 10 kg capacity, which is ideal for larger families or for those who prefer to do laundry less frequently. The machine’s Smart Check feature utilizes a smartphone app to diagnose issues and suggest troubleshooting solutions, minimizing downtime.

Meanwhile, the WA10B3N1EW/XSG incorporates the same advanced technologies as its counterparts, featuring a minimalistic design that fits seamlessly into modern homes. It often has multiple washing modes for various fabric types, allowing users to customize their washing experience. The rollout of its Auto Restart function ensures that users never have to worry about power interruptions, as the machine resumes operations once power is restored.

The WB80N4Q1EW/HAC takes efficiency up a notch with its Energy Rating, ensuring it operates with lower energy consumption. It features an 8 kg capacity and an array of washing programs, catering to diverse fabric needs. Its Add Wash door provides the flexibility to add forgotten items mid-cycle, which is a notable convenience for busy households.

Finally, the WA71N3W2/YL focuses on delivering high performance with a wide range of intelligent features. With its bubble wash technology, stubborn stains are effectively removed, thanks to the combination of strong washing action and gentle care for fabrics.

Whether for large families or individuals, these Samsung washing machines are engineered to deliver superior performance, user convenience, and energy efficiency, making laundry days less of a chore.