WAM250
AAFront Panel
q w e r
AAAdding a HUB
An Wireless Audio - Multiroom and a HUB may not pair successfullly if the Wireless Audio - Multiroom and HUB are too far apart or are on different floors.
In such cases, you can link two HUBs together by setting the second HUB to Repeater mode. The additional HUB amplifies the signal and lets you pair the Wireless Audio - Multiroom to the closest HUB.
AARegulatory Compliance Statements
|
|
|
|
|
|
| CAUTION |
| |
|
| RISK OF ELECTRIC SHOCK |
|
|
|
| DO NOT OPEN |
|
|
|
|
|
|
|
The lighting flash and arrowhead within the triangle is a | CAUTION: TO REDUCE THE RISK OF ELECTRIC SHOCK, DO NOT | The explanation point within the triangle is a warning sign | ||
warning sign alerting you to dangerous voltage inside the | REMOVE THE COVER (OR BACK). NO USER SERVICEABLE PARTS | alerting you to important instructions accompanying the | ||
product. | INSIDE. REFER SERVICING TO QUALIFIED SERVICE PERSONNEL. | product. | ||

 Wireless Audio - Multiroom

 HUB
HUB
User Manual ![]()
![]()
![]()
|
1 |
| This indicator turns on when power is supplied to the HUB. |
| ||
| ||
2 |
| This indicator blinks when the HUB is in pairing mode. |
| After pairing is complete, this indicator stops flashing and operates in normal mode. | |
| Pairing mode continues for a set time period. The indicator may keep blinking after pairing is | |
3 |
| completed. |
| This indicator turns on when the HUB is connected to a wireless router with an Ethernet cable. |
This indicator turns on when the HUB is set to Repeater mode and used to expand wireless
4 coverage in a network that includes another HUB and a wireless router.
If you have trouble connecting the HUB and Wireless Audio - Multiroom because the signal is blocked or the distance between them is too great, add a new HUB in Repeater mode to expand wireless coverage.
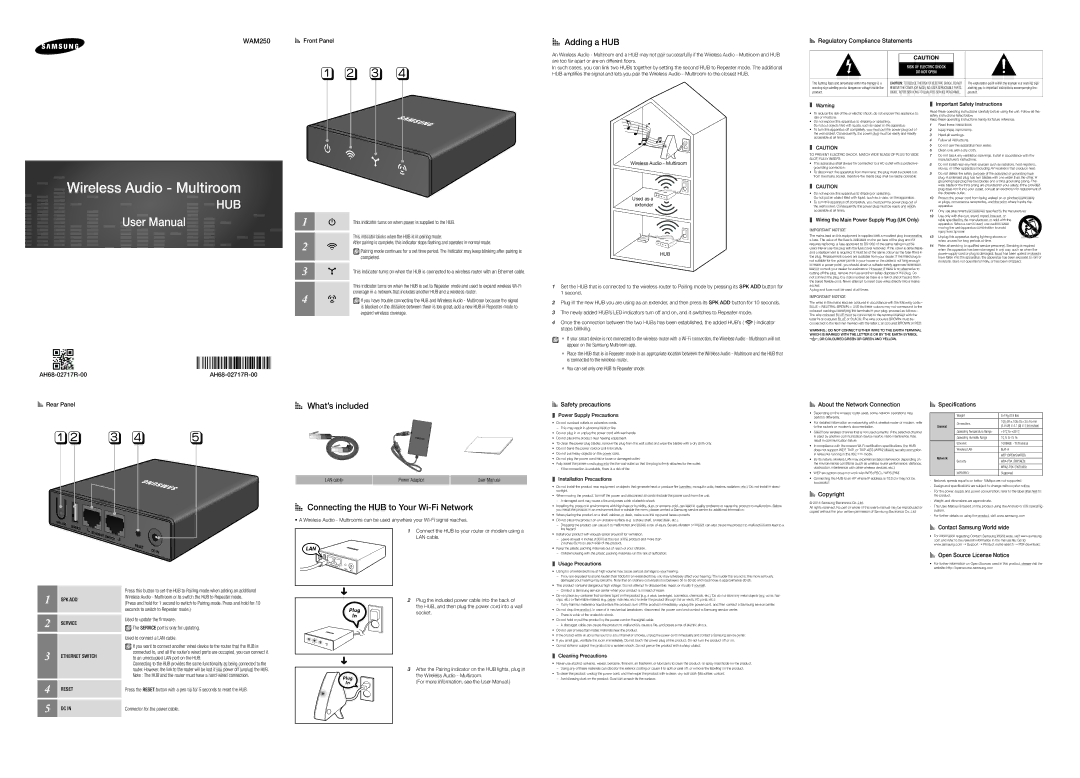
Wireless Audio - Multiroom
Used as a ![]() extender
extender ![]()
HUB
1Set the HUB that is connected to the wireless router to Pairing mode by pressing its SPK ADD button for 1 second.
2Plug in the new HUB you are using as an extender, and then press its SPK ADD button for 10 seconds.
3The newly added HUB’s LED indicators turn off and on, and it switches to Repeater mode.
4 Once the connection between the two HUBs has been established, the added HUB’s ( | ) indicator |
stops blinking. |
|
`` If your smart device is not connected to the wireless router with a
`` Place the HUB that is in Repeater mode in an appropriate location between the Wireless Audio - Multiroom and the HUB that is connected to the wireless router.
`` You can set only one HUB to Repeater mode.
❚❚ Warning
•To reduce the risk of fire or electric shock, do not expose this appliance to rain or moisture.
•Do not expose this apparatus to dripping or splashing.
Do not put objects filled with liquids, such as vases on the apparatus.
•To turn this apparatus off completely, you must pull the power plug out of the wall socket. Consequently, the power plug must be easily and readily accessible at all times.
❚❚ CAUTION
TO PREVENT ELECTRIC SHOCK, MATCH WIDE BLADE OF PLUG TO WIDE SLOT, FULLY INSERT.
•This apparatus shall always be connected to a AC outlet with a protective grounding connection.
•To disconnect the apparatus from the mains, the plug must be pulled out from the mains socket, therefore the mains plug shall be readily operable.
❚❚ CAUTION
•Do not expose this apparatus to dripping or splashing.
Do not put an object filled with liquid, such as a vase, on the apparatus.
•To turn this apparatus off completely, you must pull the power plug out of the wall socket. Consequently, the power plug must be easily and readily accessible at all times.
❚❚ Wiring the Main Power Supply Plug (UK Only)
IMPORTANT NOTICE
The mains lead on this equipment is supplied with a moulded plug incorporating a fuse. The value of the fuse is indicated on the pin face of the plug and if it requires replacing, a fuse approved to BS1362 of the same rating must be used. Never use the plug with the fuse cover removed. If the cover is detachable and a replacement is required, it must be of the same colour as the fuse fitted in the plug. Replacement covers are available from your dealer. If the fitted plug is not suitable for the power points in your house or the cable is not long enough to reach a power point, you should obtain a suitable safety approved extension lead or consult your dealer for assistance. However, if there is no alternative to cutting off the plug, remove the fuse and then safely dispose of the plug. Do not connect the plug to a mains socket as there is a risk of shock hazard from the bared flexible cord. Never attempt to insert bare wires directly into a mains socket.
A plug and fuse must be used at all times.
IMPORTANT NOTICE
The wires in the mains lead are coloured in accordance with the following code:– BLUE = NEUTRAL BROWN = LIVE As these colours may not correspond to the coloured markings identifying the terminals in your plug, proceed as follows:– The wire coloured BLUE must be connected to the terminal marked with the letter N or coloured BLUE or BLACK. The wire coloured BROWN must be connected to the terminal marked with the letter L or coloured BROWN or RED.
WARNING : DO NOT CONNECT EITHER WIRE TO THE EARTH TERMINAL WHICH IS MARKED WITH THE LETTER E OR BY THE EARTH SYMBOL ![]() , OR COLOURED GREEN OR GREEN AND YELLOW.
, OR COLOURED GREEN OR GREEN AND YELLOW.
❚❚ Important Safety Instructions
Read these operating instructions carefully before using the unit. Follow all the safety instructions listed below.
Keep these operating instructions handy for future reference.
1Read these instructions.
2Keep these instructions.
3Heed all warnings.
4Follow all instructions.
5Do not use this apparatus near water.
6Clean only with a dry cloth.
7Do not block any ventilation openings. Install in accordance with the manufacturer’s instructions.
8Do not install near any heat sources such as radiators, heat registers, stoves, or other apparatus (including AV receivers) that produce heat.
9Do not defeat the safety purpose of the polarized or
10Protect the power cord from being walked on or pinched particularly at plugs, convenience receptacles, and the point where it exits the apparatus.
11Only use attachments/accessories specified by the manufacturer.
12Use only with the cart, stand, tripod, bracket, or table specified by the manufacturer, or sold with the
apparatus. When a cart is used, use caution when![]() moving the cart/apparatus combination to avoid
moving the cart/apparatus combination to avoid![]() injury from
injury from
Unplug this apparatus during lightning storms or when unused for long periods of time.
14Refer all servicing to qualified service personnel. Servicing is required when the apparatus has been damaged in any way, such as when the
AARear Panel
qw e r | t |
1 |
| Press this button to set the HUB to Pairing mode when adding an additional |
SPK ADD | Wireless Audio - Multiroom or to switch the HUB to Repeater mode. | |
(Press and hold for 1 second to switch to Pairing mode. Press and hold for 10 | ||
2 |
| seconds to switch to Repeater mode.) |
SERVICE | Used to update the firmware. | |
The SERVICE port is only for updating. | ||
|
| Used to connect a LAN cable. |
3 |
| If you want to connect another wired device to the router that the HUB is |
ETHERNET SWITCH | connected to, and all the router’s wired ports are occupied, you can connect it | |
to an unoccupied LAN port on the HUB. | ||
|
| Connecting to the HUB provides the same functionality as being connected to the |
|
| router. However, the link to the router will be lost if you power off (unplug) the HUB. |
4 |
| Note : The HUB and the router must have a |
RESET | Press the RESET button with a pen tip for 5 seconds to reset the HUB. | |
5 | DC IN | Connector for the power cable. |
AAWhat’s included
LAN cable | Power Adaptor | User Manual |
AAConnecting the HUB to Your Wi-Fi Network
•A Wireless Audio - Multirooms can be used anywhere your
1Connect the HUB to your router or modem using a LAN cable.
LAN
➜ | Plug the included power cable into the back of |
2 | |
| the HUB, and then plug the power cord into a wall |
Plug | socket. |
In |
|
➜ | After the Pairing Indicator on the HUB lights, plug in |
3 | |
Plug | the Wireless Audio - Multiroom. |
In | (For more information, see the User Manual.) |
AASafety precautions
❚❚ Power Supply Precautions
•Do not overload outlets or extension cords.
•Do not plug in or unplug the power cord with wet hands.
•Do not place the product near heating equipment.
•To clean the power plug blades, remove the plug from the wall outlet and wipe the blades with a dry cloth only.
•Do not bend the power cord or pull it forcefully.
•Do not put heavy objects on the power cord.
•Do not plug the power cord into a loose or damaged outlet.
•Fully insert the power cord’s plug into the the wall outlet so that the plug is firmly attached to the outlet.
❚❚ Installation Precautions
•Do not install the product near equipment or objects that generate heat or produce fire (candles, mosquito coils, heaters, radiators, etc.). Do not install in direct sunlight.
•When moving the product, turn off the power and disconnect all cords (include the power cord) from the unit.
•Installing the product in environments with high heat or humidity, dust, or extreme cold, can lead to quality problems or cause the product to malfunction. Before you install the product in an environment that is outside the norm, please contact a Samsung service center for additional information.
•When placing the product on a shelf, cabinet, or desk, make sure the top panel faces upwards.
•Do not place the product on an unstable surface (e.g. a shaky shelf, a tilted desk, etc.).
•Install your product with enough space around it for ventilation.
•Keep the plastic packing materials out of reach of your children.
❚❚ Usage Precautions
•Using for an extended time at high volume may cause serious damage to your hearing.
•This product contains dangerous high voltage. Do not attempt to disassemble, repair, or modify it yourself.
•Do not place any container that contains liquid on the product (e.g. a vase, beverages, cosmetics, chemicals, etc.). Do do not allow any metal objects (e.g. coins, hair clips, etc.) or flammable material (e.g. paper, matches, etc.) to enter the product (through the air vents, I/O ports, etc.).
•Do not drop the product. In case of a mechanical breakdown, disconnect the power cord and contact a Samsung service center.
•Do not hold or pull the product by the power cord or the signal cable.
•Do not use or keep flammable materials near the product.
•If the product emits an abnormal sound or a burnt smell or smokes, unplug the
•If you smell gas, ventilate the room immediately. Do not touch the power plug of the product. Do not turn the product off or on.
•Do not strike or subject the product to a sudden shock. Do not pierce the product with a sharp object.
❚❚ Cleaning Precautions
•Never use alcohol, solvents, waxes, benzene, thinners, air freshener, or lubricants to clean the product, or spray insecticide on the product.
•To clean the product, unplug the power cord, and then wipe the product with a clean, dry, soft cloth (Microfiber, cotton).
AAAbout the Network Connection
•Depending on the wireless router used, some network operations may perform differently.
•For detailed information on networking with a wireless router or modem, refer to the router’s or modem’s documentation.
•Select one wireless channel that is not used currently. If the selected channel is used by another communication device nearby, radio interference may result in communication failure.
•In compliance with the newest
•By its nature, wireless LAN may experience radio interference depending on the environmental conditions (such as wireless router performance, distance, obstruction, interference with other wireless devices, etc.)
•WEP encryption does not work with WPS (PBC) / WPS (PIN).
•Connecting the HUB to an AP whose IP address is 10.0.0.x may not be successful.
AACopyright
© 2014 Samsung Electronics Co.,Ltd.
All rights reserved; No part or whole of this user’s manual may be reproduced or copied without the prior written permission of Samsung Electronics Co.,Ltd.
AASpecifications
|
| Weight | 0.4 Kg (0.9 Ibs) |
|
| Dimensions | 100 (W) x 106 (D) x 25 (H) mm |
| General | (3.9 (W) X 4.1 (D) X 1 (H) inches) | |
|
| ||
|
| Operating Temperature Range | +5°C to +35°C |
|
| Operating Humidity Range | 10 % to 75 % |
|
| Ethernet | 100BASE - TX Terminal |
|
| Wireless LAN | |
| Network |
| WEP (OPEN/SHARED) |
| Security | ||
|
| ||
|
|
| |
|
| WPS(PBC) | Supported |
Network speeds equal to or below 10Mbps are not supported. | |||
Design and specifications are subject to change without prior notice. | |||
For the power supply and power consumption, refer to the label attached to | |||
| the product. |
|
|
Weight and dimensions are approximate. |
| ||
This User Manual is based on the product using the Android or iOS operating | |||
| system. |
|
|
For further details on using the product, visit www.samsung.com | |||
AAContact Samsung World wide
•For information regarding Contact Samsung World wide, visit www.samsung. com and refer to the relevant information in the manual file. Go to: www.samsung.com Support Product name search PDF download.
AAOpen Source License Notice
•For further information on Open Sources used in this product, please visit the website: http://opensource.samsung.com