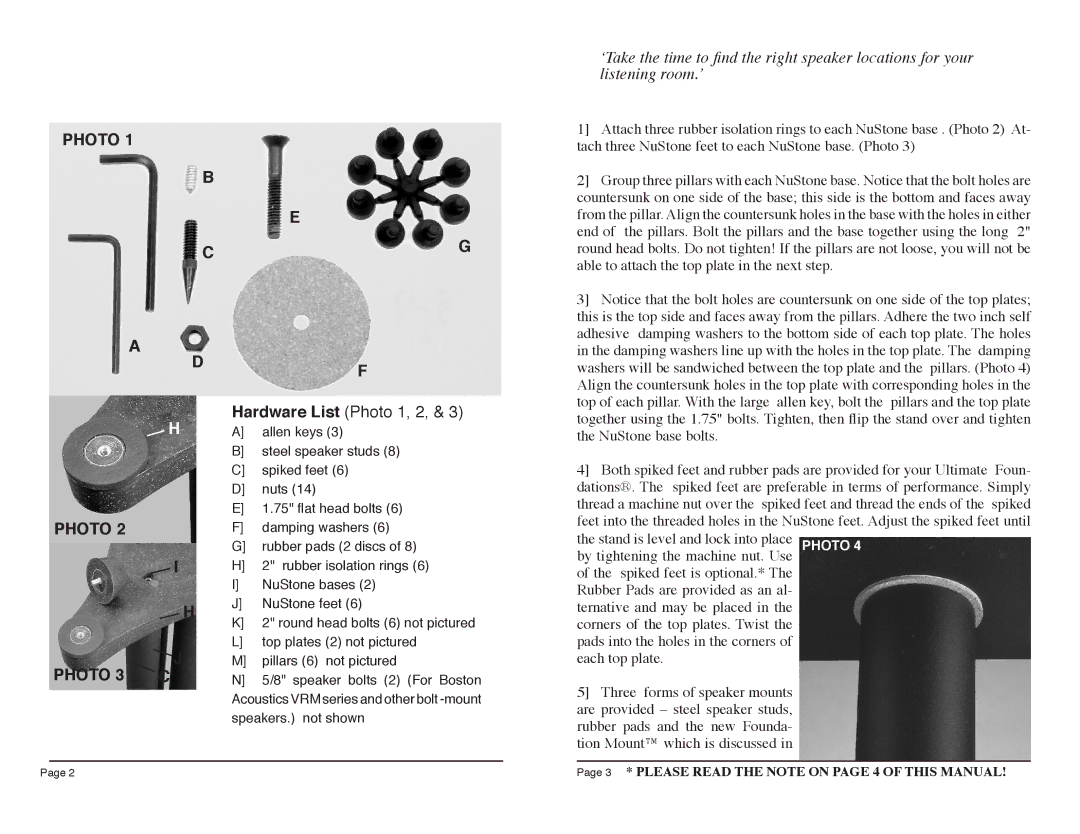
PHOTO 1

A

B

C

D

E

G

F

ʻTake the time to find the right speaker locations for your listening room.ʼ

1] Attach three rubber isolation rings to each NuStone base . (Photo 2) At- tach three NuStone feet to each NuStone base. (Photo 3)

2] Group three pillars with each NuStone base. Notice that the bolt holes are countersunk on one side of the base; this side is the bottom and faces away from the pillar. Align the countersunk holes in the base with the holes in either end of the pillars. Bolt the pillars and the base together using the long 2" round head bolts. Do not tighten! If the pillars are not loose, you will not be able to attach the top plate in the next step.

3] Notice that the bolt holes are countersunk on one side of the top plates; this is the top side and faces away from the pillars. Adhere the two inch self adhesive damping washers to the bottom side of each top plate. The holes in the damping washers line up with the holes in the top plate. The damping washers will be sandwiched between the top plate and the pillars. (Photo 4) Align the countersunk holes in the top plate with corresponding holes in the top of each pillar. With the large allen key, bolt the pillars and the top plate

H

PHOTO 2

I

H

Hardware List (Photo 1, 2, & 3)

A]

allen keys (3)

B]

steel speaker studs (8)

C]

spiked feet (6)

D]

nuts (14)

E]

1.75" flat head bolts (6)

F]

damping washers (6)

G]

rubber pads (2 discs of 8)

H]

2" rubber isolation rings (6)

I]

NuStone bases (2)

J]

NuStone feet (6)

K]

2" round head bolts (6) not pictured

L]

top plates (2) not pictured

together using the 1.75" bolts. Tighten, then flip the stand over and tighten the NuStone base bolts.

4] Both spiked feet and rubber pads are provided for your Ultimate Foun- dations®. The spiked feet are preferable in terms of performance. Simply thread a machine nut over the spiked feet and thread the ends of the spiked feet into the threaded holes in the NuStone feet. Adjust the spiked feet until the stand is level and lock into place PHOTO 4

by tightening the machine nut. Use of the spiked feet is optional.* The Rubber Pads are provided as an al- ternative and may be placed in the corners of the top plates. Twist the pads into the holes in the corners of

PHOTO 3 C

J

M]

pillars (6) not pictured

N]

5/8" speaker bolts (2) (For Boston

Acoustics VRM series and other bolt -mount speakers.) not shown

each top plate.

5] Three forms of speaker mounts are provided – steel speaker studs, rubber pads and the new Founda- tion Mount™ which is discussed in


Page 2

Page 3 * PLEASE READ THE NOTE ON PAGE 4 OF THIS MANUAL!

Page 2
Image 2
Sanus Systems UF34 instruction manual Hardware List Photo 1, 2, Photo 3 C

UF34 specifications

Sanus Systems UF34 is an innovative and versatile furniture solution designed specifically for enhancing home audio and visual experiences. This stunning piece is part of Sanus Systems’ commitment to high-quality home entertainment products that blend style with functionality.

One of the standout features of the UF34 is its adjustable shelving system, which allows users to customize the height of each shelf to accommodate various AV components. Whether it’s a sizable AV receiver, a gaming console, or a DVD player, the UF34 design caters to a diverse range of equipment sizes while ensuring optimal ventilation. This thoughtful design reduces the risk of overheating and keeps devices performing at their best.

The UF34 is built with a sturdy steel frame combined with high-quality tempered glass shelves, providing a sleek aesthetic that complements any modern décor. The robust construction ensures durability and stability, making it an excellent choice for housing heavier media components. The glass shelving gives it an airy look while providing ample support for the equipment placed on it.

Another notable characteristic of the Sanus Systems UF34 is its cable management system. The unit is designed with built-in cable management solutions that help organize and conceal wires and cords. This ensures a clean and clutter-free appearance, enhancing the overall look of the entertainment space. With a smart cable routing design, users can avoid the chaos of tangled wires and maintain an orderly environment.

In terms of installation and setup, the UF34 is user-friendly, allowing for quick and easy assembly without the need for complex tools. Sanus Systems has incorporated clear instructions and all necessary hardware right out of the box, making it accessible for anyone looking to enhance their home entertainment setup.

Moreover, with its contemporary design and neutral colors, the UF34 easily fits into various interior styles, from minimalist to traditional. Whether placed in a living room, bedroom, or dedicated media room, it serves as both a practical AV station and an elegant piece of furniture.

Overall, the Sanus Systems UF34 stands out with its blend of flexibility, durability, and aesthetic appeal. Its adjustable features, high-quality materials, and efficient cable management make it an ideal choice for anyone looking to elevate their entertainment experience at home.