Connections

Tips

Depending on your TV and other equipment you wish to connect, there are various ways you could connect the DVD+VCR. Use connections described on pages 12-14. Please refer to the manuals of your TV, VCR, Stereo System or other devices as necessary to make the best connections.

For better sound reproduction, connect the DVD+VCR’s DVD/VHS AUDIO OUT jack to the audio in jacks of your amplifier, receiver, stereo or audio/video equipment. See Connecting to optional equipment on page 14.

Caution

Make sure the DVD+VCR is connected directly to the TV. Tune the TV to the correct video input channel.

Do not connect the DVD+VCR’s DVD/VHS AUDIO OUT jack to the phono in jack (record deck) of your audio system.

Do not connect your DVD+VCR via your VCR. The DVD image could be distorted by the copy protection system.

Connecting Antenna/Cable TV to

DVD+VCR

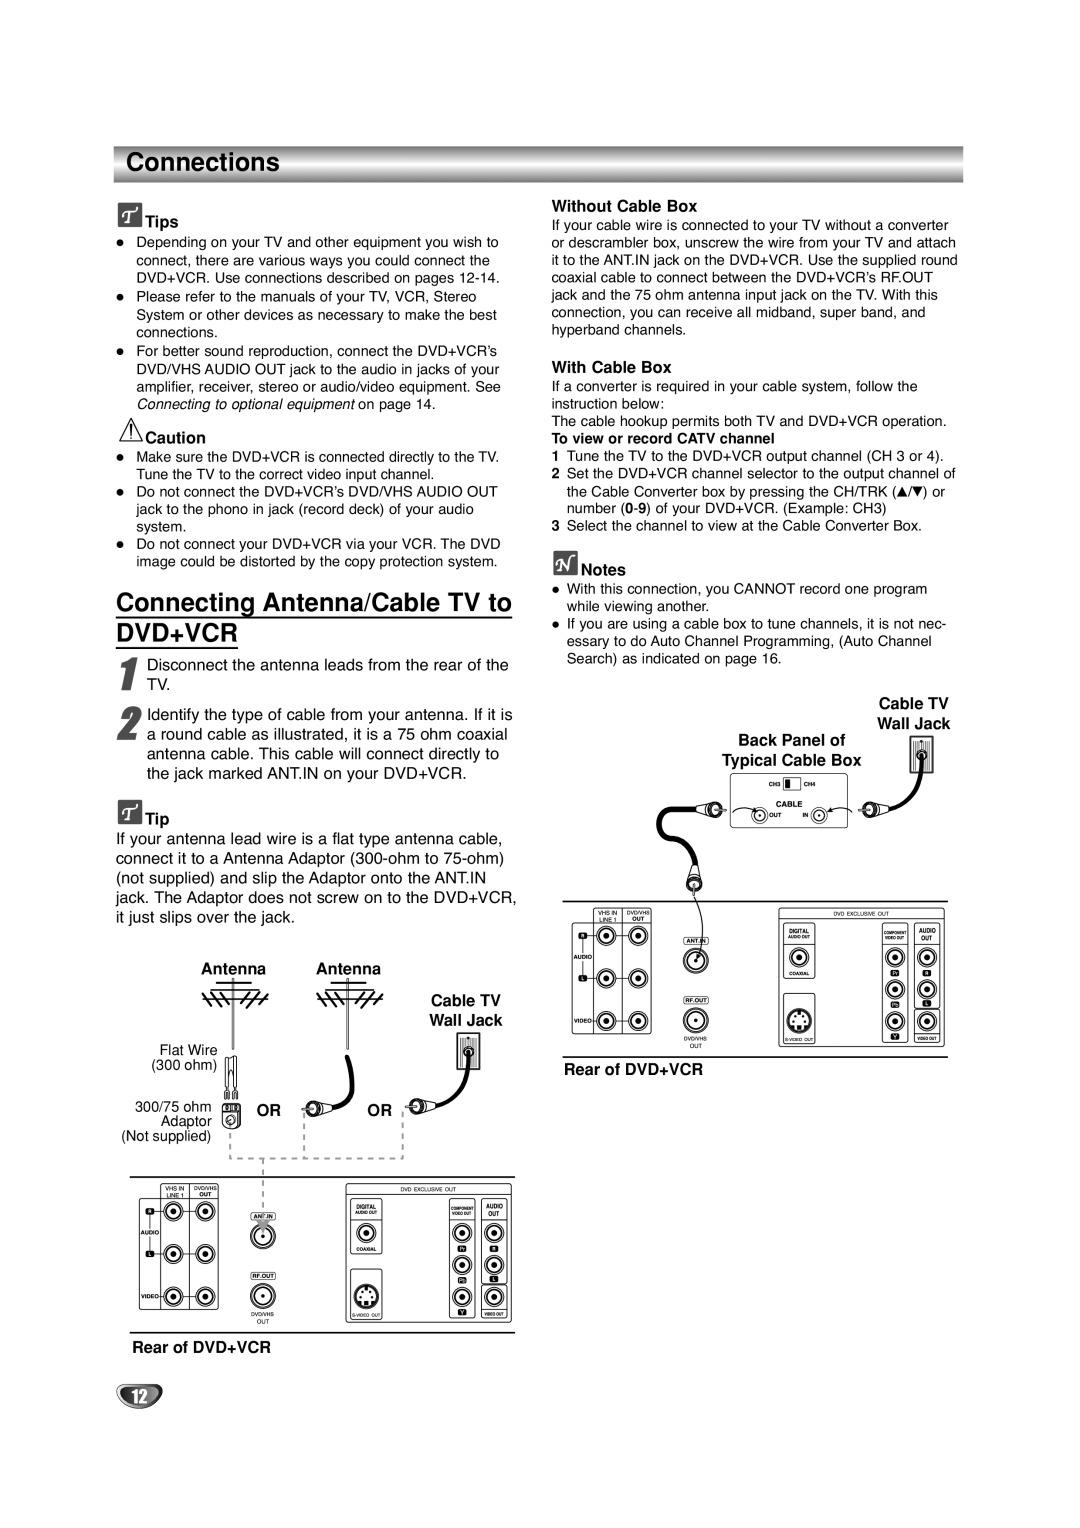
1 Disconnect the antenna leads from the rear of the TV.

2a round cable as illustrated, it is a 75 ohm coaxial

antenna cable. This cable will connect directly to the jack marked ANT.IN on your DVD+VCR.Identify the type of cable from your antenna. If it is

Tip

If your antenna lead wire is a flat type antenna cable, connect it to a Antenna Adaptor (300-ohm to 75-ohm) (not supplied) and slip the Adaptor onto the ANT.IN jack. The Adaptor does not screw on to the DVD+VCR, it just slips over the jack.

Antenna Antenna

Cable TV

Wall Jack

Flat Wire


(300 ohm)


300/75 ohm

OR

OR

Adaptor


(Not supplied)


Rear of DVD+VCR

Without Cable Box

If your cable wire is connected to your TV without a converter or descrambler box, unscrew the wire from your TV and attach it to the ANT.IN jack on the DVD+VCR. Use the supplied round coaxial cable to connect between the DVD+VCR’s RF.OUT jack and the 75 ohm antenna input jack on the TV. With this connection, you can receive all midband, super band, and hyperband channels.

With Cable Box

If a converter is required in your cable system, follow the instruction below:

The cable hookup permits both TV and DVD+VCR operation.

To view or record CATV channel

1Tune the TV to the DVD+VCR output channel (CH 3 or 4).

2Set the DVD+VCR channel selector to the output channel of the Cable Converter box by pressing the CH/TRK (v/V) or number (0-9) of your DVD+VCR. (Example: CH3)

3Select the channel to view at the Cable Converter Box.

Notes

With this connection, you CANNOT record one program while viewing another.

If you are using a cable box to tune channels, it is not nec- essary to do Auto Channel Programming, (Auto Channel Search) as indicated on page 16.

Cable TV

Wall Jack

Back Panel of

Typical Cable Box

Rear of DVD+VCR

12

Page 12
Image 12
Sanyo DVC-2500 manual Connections, Connecting Antenna/Cable TV to

DVC-2500 specifications

The Sanyo DVC-2500 is a versatile digital video camcorder that emerged as a notable entry in the realm of consumer-grade video recording devices. Released during the early 2000s, the DVC-2500 is recognized for delivering quality video performance paired with user-friendly features, catering to both amateur videographers and hobbyists.

One of the standout features of the Sanyo DVC-2500 is its ability to capture video in the Digital Video Cassette (DVC) format, which allows for high-quality recordings that are less susceptible to degradation than older analog formats. The camcorder supports digital video recording at a resolution of 720 x 480 pixels, providing clear and crisp visuals that enhance the viewing experience. Additionally, the DVC-2500's 3CCD technology plays a significant role in its image quality. 3CCD technology utilizes three separate image sensors to capture color information more accurately, resulting in vibrant colors and improved low-light performance.

Another key characteristic of the Sanyo DVC-2500 is its optical zoom capabilities. The camcorder features a 10x optical zoom lens, enabling users to get closer to their subjects without sacrificing image quality. Coupled with a digital zoom of up to 700x, users can achieve detailed shots from considerable distances, making it ideal for capturing both distant subjects and intricate details.

The DVC-2500 also boasts various recording formats and playback options, providing flexibility for users. It supports high-quality audio alongside its video capabilities, ensuring synchronized sound that enhances the overall viewing experience. Features like built-in image stabilization minimize the impact of shaky hands, which is especially useful for capturing dynamic action scenes or events like weddings and sporting activities.

In terms of usability, the Sanyo DVC-2500 is designed with user-friendly features including an intuitive interface and a viewfinder that allows for easy composition of shots. The camcorder is compact and lightweight, making it convenient for extended periods of use.

Overall, the Sanyo DVC-2500 stands out as a reliable and capable camcorder equipped with advanced technologies and features that cater to the needs of aspiring videographers. Its blend of quality, versatility, and ease of use makes it a memorable option in the history of portable video recording.