Remote Control Unit (continued)

SENSOR button

When you press this button (use a small-tipped object such as a ballpoint pen),


the

mark will appear at the display. And the room temperature is detected by


the sensor which is built into the indoor unit and the air conditioner is controlled


accordingly.


If the remote control is located near a heat source, such as a space heater or in direct


NOTE


sunlight, press the SENSOR button to switch to the sensor on the indoor unit.


Temperature Display Selector button

This switches the temperature display between °C and °F.


Time Display Selector button

This switches the time display between 24-hour time and 12-hour time.


ACL button (ALL CLEAR)

Puts the remote control unit into pre-operation status. Always press this button


after replacing the batteries.


ADDRESS switch

• The address switch changes to prevent mixing of signals from remote control


units when two air conditioners are installed next to each other. Normally, the


address switch is set to A. For more information, please contact the dealer


where you made the purchase.


• Normally, the tabs on the remote control unit should not be bent.


NOTE

The remote control unit sends the temperature signal to the air conditioner regularly at five minute intervals. If the signal from the remote control unit stops for more than 15 minutes due to the loss of the remote control unit or other trouble, the air conditioner will switch to the temperature sensor which is built into the indoor unit and control the room temperature. In these cases, the temperature around the remote control unit may differ from the temperature detected at the air conditioner’s position.

Using the Remote Control Unit

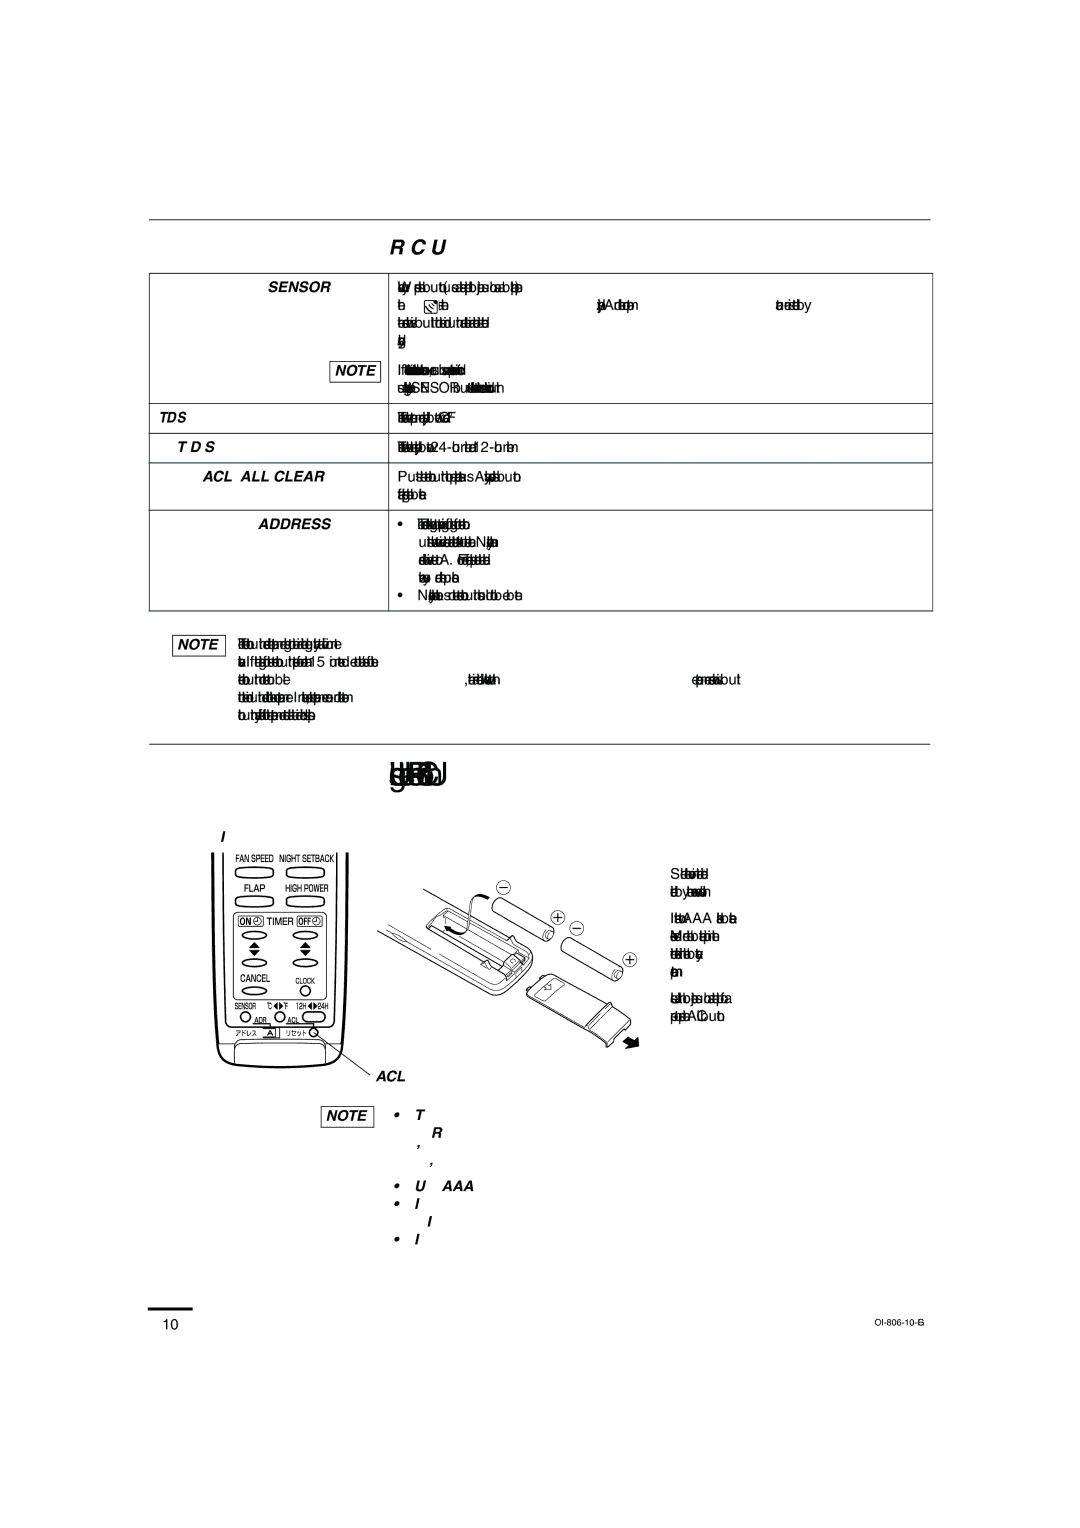
How to Install Batteries

1. Slide the cover in the direction indicated by the arrow and remove it.

2. Install two AAA alkaline batteries. Make sure the batteries point in the direction marked in the battery compartment.

3. Use a thin object such as the tip of a pen to press the ACL button.

ACL button

NOTE

The batteries last about six months, depending on how much you use the remote control unit. Replace the batteries when the remote control unit’s display fails to light, or when the remote control cannot be used to change the air conditioner’s settings.

Use two fresh leak-proof type-AAA alkaline batteries.

In replacing batteries, follow the instructions as mentioned in the sub- section “How to Install Batteries”.

If you do not use the remote control unit more than 1 month, take out the batteries.

10

OI-806-10-EG


Page 10
Image 10
Sanyo KMS0972, KMS1272 instruction manual Using the Remote Control Unit, ACL button ALL Clear, How to Install Batteries

KMS1272, KMS0972 specifications

The Sanyo KMS0972 and KMS1272 are two prominent models from Sanyo, a brand known for its commitment to innovation and performance in the realm of electronics. These models specifically cater to the needs of consumers looking for efficient and high-quality appliances, ensuring that everyday tasks are simplified while also providing excellent functionality.

Both the KMS0972 and KMS1272 come equipped with state-of-the-art features aimed at delivering user-friendly experiences. A key hallmark of these models is their energy efficiency, which is increasingly important in today's environmentally-conscious market. By optimizing power consumption, these models not only reduce electricity bills but also contribute to a lower carbon footprint.

The KMS0972 is particularly noted for its compact design, making it a perfect fit for smaller spaces without compromising on performance. This model includes advanced temperature management technology that allows users to precisely control heat settings. It features multiple temperature presets, catering to various cooking needs, from baking to grilling. Its intuitive interface ensures that even novice cooks can achieve culinary excellence.

On the other hand, the KMS1272 presents a larger capacity, suited for families or those who frequent entertaining guests. It is designed with advanced cooking technologies that facilitate even heat distribution, which helps in achieving consistent results every time. The KMS1272 boasts a sleek digital display and touch controls, providing users with an effortless way to navigate through settings and options.

Both models are constructed with durable materials, ensuring longevity even with frequent use. Safety features are paramount in the design, including over-temperature protection and auto shut-off mechanisms. These features not only promote safety in the kitchen but also give users peace of mind while cooking.

In addition to traditional cooking methods, both the KMS0972 and KMS1272 integrate modern technologies such as smart connectivity. This allows users to connect their appliances to smartphones, enabling remote operation and monitoring. This progression towards smart technology accentuates the convenience factor, allowing users to multitask effectively.

In summary, the Sanyo KMS0972 and KMS1272 stand out as exceptional choices for consumers seeking advanced features, energy efficiency, and convenience. With their innovative technologies and user-friendly characteristics, these models are designed to meet diverse cooking needs, making them a valuable addition to any kitchen.