Part Names and Functions

Laser Pointer Function

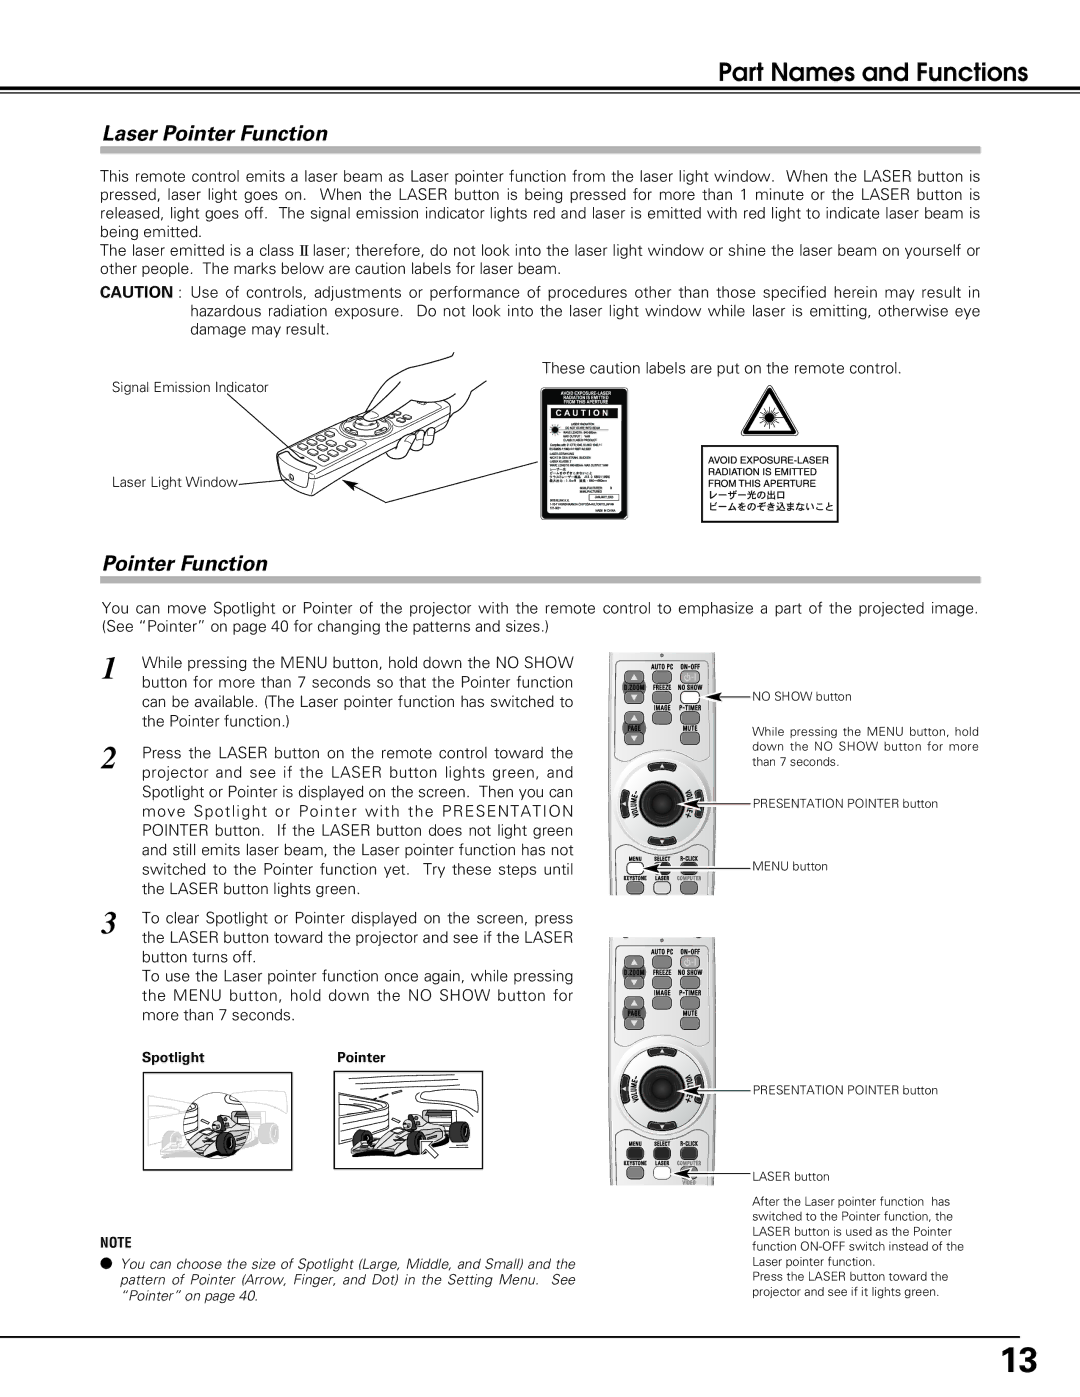
This remote control emits a laser beam as Laser pointer function from the laser light window. When the LASER button is pressed, laser light goes on. When the LASER button is being pressed for more than 1 minute or the LASER button is released, light goes off. The signal emission indicator lights red and laser is emitted with red light to indicate laser beam is being emitted.

The laser emitted is a class II laser; therefore, do not look into the laser light window or shine the laser beam on yourself or other people. The marks below are caution labels for laser beam.

CAUTION : Use of controls, adjustments or performance of procedures other than those specified herein may result in hazardous radiation exposure. Do not look into the laser light window while laser is emitting, otherwise eye damage may result.

These caution labels are put on the remote control.

Signal Emission Indicator

Laser Light Window

Pointer Function

You can move Spotlight or Pointer of the projector with the remote control to emphasize a part of the projected image. (See “Pointer” on page 40 for changing the patterns and sizes.)

1

While pressing the MENU button, hold down the NO SHOW


button for more than 7 seconds so that the Pointer function


can be available. (The Laser pointer function has switched to


the Pointer function.)

2

Press the LASER button on the remote control toward the


projector and see if the LASER button lights green, and


Spotlight or Pointer is displayed on the screen. Then you can


move Spotlight or Pointer with the PRESENTATION


POINTER button. If the LASER button does not light green


and still emits laser beam, the Laser pointer function has not


switched to the Pointer function yet. Try these steps until


the LASER button lights green.

3

To clear Spotlight or Pointer displayed on the screen, press


the LASER button toward the projector and see if the LASER

button turns off.

To use the Laser pointer function once again, while pressing the MENU button, hold down the NO SHOW button for more than 7 seconds.

NO SHOW button

While pressing the MENU button, hold down the NO SHOW button for more than 7 seconds.

PRESENTATION POINTER button

MENU button

Spotlight

Pointer

NOTE

You can choose the size of Spotlight (Large, Middle, and Small) and the pattern of Pointer (Arrow, Finger, and Dot) in the Setting Menu. See “Pointer” on page 40.

PRESENTATION POINTER button

LASER button

After the Laser pointer function has switched to the Pointer function, the LASER button is used as the Pointer function ON-OFF switch instead of the Laser pointer function.

Press the LASER button toward the projector and see if it lights green.

13

Page 13
Image 13
Sanyo PLC-XU55, PLC-XU50, PLC-SU50 owner manual Laser Pointer Function

PLC-SU50, PLC-XU55, PLC-XU50 specifications

The Sanyo PLC-XU50, PLC-XU55, and PLC-SU50 projectors are part of Sanyo's commitment to delivering high-quality projection solutions for various environments, including classrooms, conference rooms, and home theaters. Each model offers distinct features and technologies tailored to meet diverse projection needs, while maintaining Sanyo’s reputation for reliability and performance.

The Sanyo PLC-XU50 is a versatile projector that boasts a high brightness of 3500 ANSI lumens, making it ideal for well-lit rooms. This model utilizes a 3LCD technology, which ensures vibrant colors and sharp images. With a native resolution of XGA (1024x768), it is capable of displaying detailed presentations and videos. The PLC-XU50 also incorporates Sanyo's Robust Color technology, enhancing color reproduction accuracy across various content types. Additionally, it features a long-lasting lamp life of up to 4000 hours in eco mode, providing cost-efficiency and minimizing maintenance needs.

The Sanyo PLC-XU55 takes the performance a step further with enhanced brightness of 4000 ANSI lumens, making it suitable for larger venues or environments with significant ambient light. Like the PLC-XU50, it utilizes 3LCD technology, ensuring vivid and realistic colors. The PLC-XU55 supports a higher resolution of XGA and offers advanced connectivity options, including HDMI, making it compatible with a wide range of devices. Its dynamic contrast ratio further boosts image depth, making images more engaging for audiences.

Sanyo's PLC-SU50 is designed with sleek aesthetics and advanced features catering to both business and educational use. Operating at a brightness of 3500 ANSI lumens, the PLC-SU50 complements spaces that require good illumination while also empowering users with a resolution of SXGA (1280x1024), which enhances the quality of projected content. This model includes features such as a built-in speaker for audio output and an auto vertical keystone correction, making setup quick and straightforward.

All three projectors prioritize user-friendliness, equipped with an easy-to-navigate menu system and various input options to ensure compatibility with numerous devices. Their compact designs make them portable and easy to install in various settings, catering to users on the move.

In summary, the Sanyo PLC-XU50, PLC-XU55, and PLC-SU50 offer cutting-edge features, adaptable to different projection requirements. Their focus on brightness, color accuracy, and user convenience positions them as excellent choices for any projection scenario.