readings are taken, the battery should be charged five minutes to stimulate mixing. (Refer to battery manufacturer’s instructions regarding removal of vent caps while charging battery).
ELECTROLYTE CAUTION
Battery electrolyte is SULFURIC ACID. It can eat holes in clothes and skin. Flush spills with water.
STATE OF CHARGE CHECK
By Specific Gravity (open vent battery only)
Sample, measure and return the electrolyte from each cell with a hydrometer.
1.The specific gravity should be at least 1.230 in all cells. If not, charge the battery. If charging the battery does not bring the specific gravity up to 1.230, then the battery should be replaced.
2.The specific gravity readings should not vary more than 50 points (.050) between all cells. If the difference is greater, replace the battery.
By Open Circuit Voltage (any lead-acid battery)
Measure the open circuit (no load) stabilized voltage. A stabilized battery has no “surface charge”, which means that the electro- lyte has had a chance to remix and shed gas bubbles after cur- rent flow has stopped.
Open Circuit Volts | 12.6 | 12.4 | 12.2 | 12.0 |
|
|
|
|
|
% of Charge | 100 | 75 | 50 | 25 |
|
|
|
|
|
If the measured voltage is less than 12.4 volts, first recharge the battery. With a low % of charge, performance will be reduced and any load test results may be invalid.
LOAD TEST
A battery must have the capability to crank an engine while main- taining enough voltage to power the ignition. To give consistent results, these tests require that a battery be at least 75% charged and must not have been heavily used within the last 10 minutes.
The standard battery performance test is based on battery rat- ings provided by the manufacturer. If the test load amperage is known, use it, otherwise use one of the following:
1.Cold Cranking Amperes at 0°F. (CCA) - When using CCA, divide the given value by 2 to obtain the load. FOR example, 1000 CCA divided by 2 equals a 500 amperes test load.
2.Ampere Hour Rating (Ah) - If only the Ampere Hour rating is known, multiply the value by 3 to obtain the load. For example, a 200 Ah battery times 3 equals a 600 amperes load.
3.BATTERY WATTS - When only the battery rating in watts is known then use Table 1 (below) as a guide to determine what battery load or cranking amps would be normal. FOR EXAMPLE: A battery load or cranking amps for a battery rated at 2400 watts would be 125 to 200 amps.
TABLE 1
|
|
| Battery Load or |
|
Engine | Cubic | Cubic | Cranking Amp | Watt |
Size | Inches | Centimeters | Rating |
|
|
|
|
|
|
Small | 100 to 200 | 1600 to 2400 | 1200 to 1800 | |
|
|
|
|
|
Medium | 200 to 350 | 2400 to 5600 | 1500 to 2400 | |
|
|
|
|
|
Large | 350 to 500 | 5600 to 8000 | 2100 to 3600 |
Ratings can be found on the battery, in the vehicle manual or in a replacement battery application guide. In the battery performance load test, the rated amperage is drawn from the battery for 15 seconds while watching the battery voltage. At 70°F and higher, a good battery will maintain an output of 9.6 volts or more during the load testing period (4.8 volts for 6 volt battery). When a bat- tery is cooler than 70°F, the output voltage requirement is re- duced to give equivalent test conclusions per the following (Table 2):
Table 2 | ELECTROLYTE TEMP | MINIMUM | |
| LOADED VOLTS | ||
| 70 | 21 | 9.6 |
| 60 | 16 | 9.5 |
| 50 | 10 | 9.4 |
| 40 | 4 | 9.3 |
| 30 | 9.1 | |
| 20 | 8.9 | |
| 10 | .7 | |
| 0 | 8.5 | |
NOTE: DIVIDE MINIMUM TEST VOLTAGE IN HALF FOR 6 VOLT BATTERIES.
LOAD TEST CAUTION
If the amperes display goes out while loading a battery, the voltage has fallen below 4.0 volts. TURN THE LOAD OFF IM-
MEDIATELY.
The battery could become overheated. If a battery smokes while being loaded, immediately discontinue using it. It is not safe.
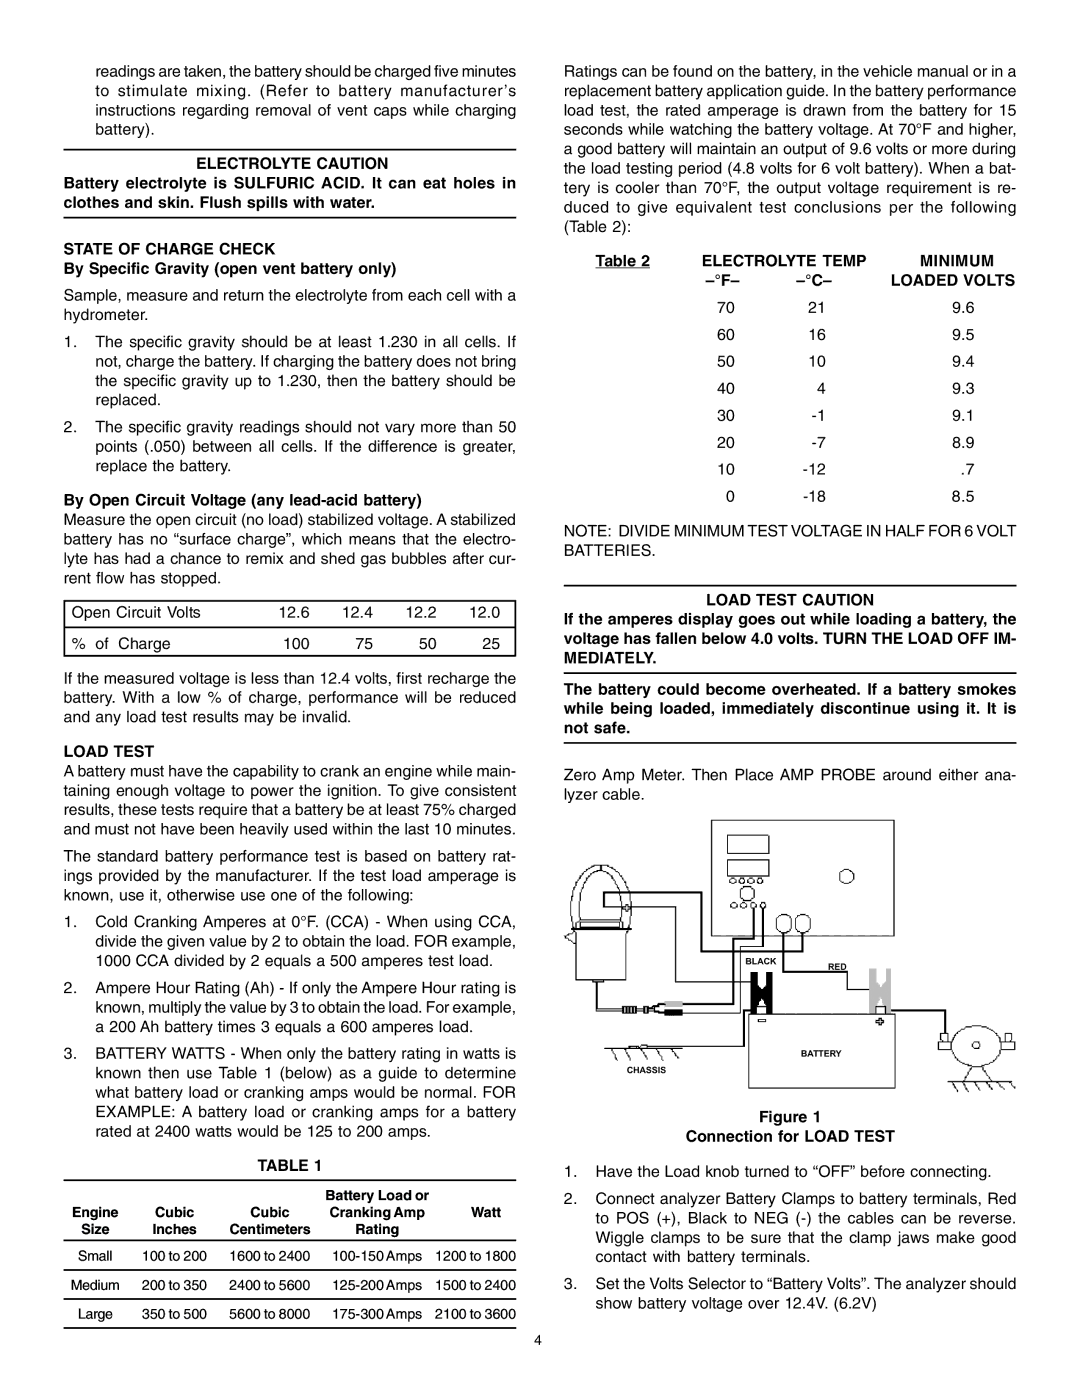
Zero Amp Meter. Then Place AMP PROBE around either ana- lyzer cable.
BLACK
RED
BATTERY
CHASSIS
Figure 1
Connection for LOAD TEST
1.Have the Load knob turned to “OFF” before connecting.
2.Connect analyzer Battery Clamps to battery terminals, Red to POS (+), Black to NEG
3.Set the Volts Selector to “Battery Volts”. The analyzer should show battery voltage over 12.4V. (6.2V)
4
