MEDALIST PRO HARD DRIVE
INSTALLATION GUIDE
Medalist Pro 6450 (ST36450A) Medalist Pro 6451 (ST36451A) for ATA
11. ONE DRIVE OR TWO?
If your new Seagate® Medalist ®Pro drive will be the only drive in your computer, you do not have to change any jumper settings. In this case, skip ahead to “Attaching Cables and Mounting the Drive.”
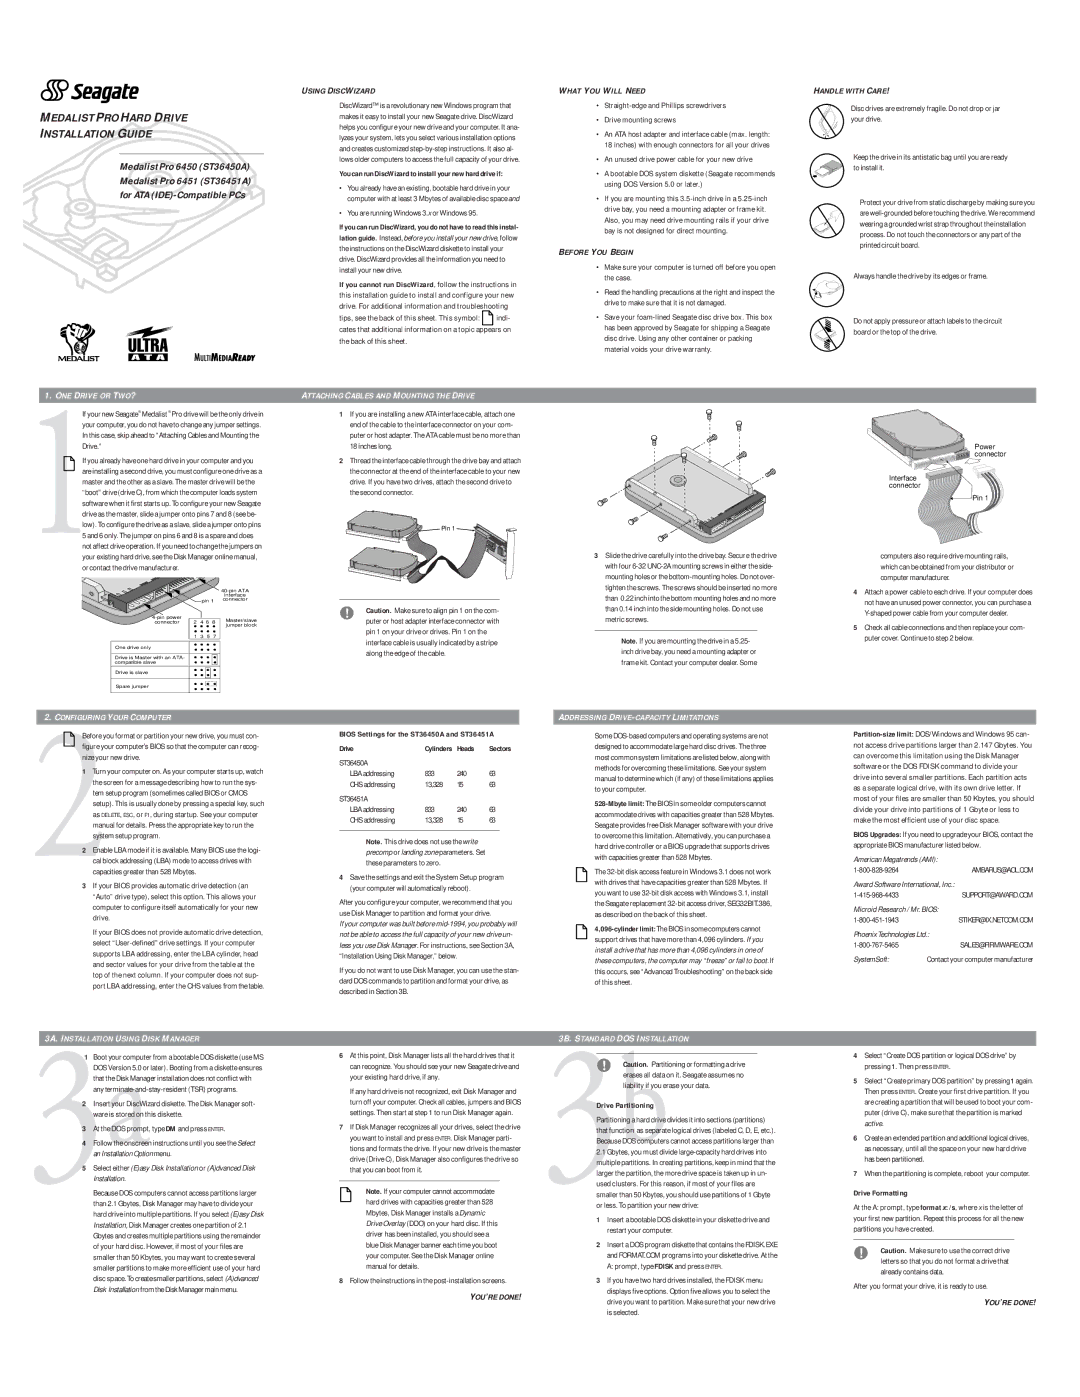
If you already have one hard drive in your computer and you are installing a second drive, you must configure one drive as a master and the other as a slave. The master drive will be the “boot” drive (drive C), from which the computer loads system software when it first starts up. To configure your new Seagate drive as the master, slide a jumper onto pins 7 and 8 (see be- low). To configure the drive as a slave, slide a jumper onto pins 5 and 6 only. The jumper on pins 6 and 8 is a spare and does not affect drive operation. If you need to change the jumpers on your existing hard drive, see the Disk Manager online manual, or contact the drive manufacturer.
|
|
|
|
| ||
|
|
|
|
| interface | |
|
| pin 1 | connector | |||
2 | 4 |
| 8 | Master/slave | ||
connector | 6 | |||||
jumper block | ||||||
|
|
|
|
| ||
| 1 | 3 | 5 | 7 |
| |
One drive only
Drive is Master with an ATA- compatible slave
Drive is slave
Spare jumper
USING DISCWIZARD
DiscWizard™ is a revolutionary new Windows program that makes it easy to install your new Seagate drive. DiscWizard helps you configure your new drive and your computer. It ana- lyzes your system, lets you select various installation options and creates customized
You can run DiscWizard to install your new hard drive if:
•You already have an existing, bootable hard drive in your computer with at least 3 Mbytes of available disc spaceand
•You are running Windows 3.x or Windows 95.
If you can run DiscWizard, you do not have to read this instal-
lation guide. Instead,before you install your new drive, follow the instructions on the DiscWizard diskette to install your drive. DiscWizard provides all the information you need to install your new drive.
If you cannot run DiscWizard, follow the instructions in this installation guide to install and configure your new drive. For additional information and troubleshooting
tips, see the back of this sheet. This symbol: ![]()
![]() indi- cates that additional information on a topic appears on the back of this sheet.
indi- cates that additional information on a topic appears on the back of this sheet.
ATTACHING CABLES AND MOUNTING THE DRIVE
1If you are installing a new ATA interface cable, attach one end of the cable to the interface connector on your com- puter or host adapter. The ATA cable must be no more than 18 inches long.
2Thread the interface cable through the drive bay and attach the connector at the end of the interface cable to your new drive. If you have two drives, attach the second drive to the second connector.
Pin 1 |
!Caution. Make sure to align pin 1 on the com- puter or host adapter interface connector with
pin 1 on your drive or drives. Pin 1 on the interface cable is usually indicated by a stripe along the edge of the cable.
WHAT YOU WILL NEED
•
•Drive mounting screws
•An ATA host adapter and interface cable (max. length: 18 inches) with enough connectors for all your drives
•An unused drive power cable for your new drive
•A bootable DOS system diskette (Seagate recommends using DOS Version 5.0 or later.)
•If you are mounting this
BEFORE YOU BEGIN
•Make sure your computer is turned off before you open the case.
•Read the handling precautions at the right and inspect the drive to make sure that it is not damaged.
•Save your
3Slide the drive carefully into the drive bay. Secure the drive with four
Note. If you are mounting the drive in a 5.25- inch drive bay, you need a mounting adapter or frame kit. Contact your computer dealer. Some
HANDLE WITH CARE!
Disc drives are extremely fragile. Do not drop or jar your drive.
Keep the drive in its antistatic bag until you are ready to install it.
Protect your drive from static discharge by making sure you are
Always handle the drive by its edges or frame.
Do not apply pressure or attach labels to the circuit board or the top of the drive.
Power connector
Interface connector
Pin 1
computers also require drive mounting rails, which can be obtained from your distributor or computer manufacturer.
4Attach a power cable to each drive. If your computer does not have an unused power connector, you can purchase a
5Check all cable connections and then replace your com- puter cover. Continue to step 2 below.
22. CONFIGURING YOUR COMPUTER
Before you format or partition your new drive, you must con- figure your computer’s BIOS so that the computer can recog- nize your new drive.
1 Turn your computer on. As your computer starts up, watch the screen for a message describing how to run the sys- tem setup program (sometimes called BIOS or CMOS setup). This is usually done by pressing a special key, such as DELETE, ESC, or F1, during startup. See your computer manual for details. Press the appropriate key to run the system setup program.
2 Enable LBA mode if it is available. Many BIOS use the logi- cal block addressing (LBA) mode to access drives with capacities greater than 528 Mbytes.
3 If your BIOS provides automatic drive detection (an “Auto” drive type), select this option. This allows your computer to configure itself automatically for your new drive.
If your BIOS does not provide automatic drive detection, select
33A. INSTALLATIONaUSING DISK MANAGER
1 Boot your computer from a bootable DOS diskette (use MS DOS Version 5.0 or later). Booting from a diskette ensures that the Disk Manager installation does not conflict with any
2 Insert your DiscWizard diskette. The Disk Manager soft- ware is stored on this diskette.
3 At the DOS prompt, typeDM and press ENTER.
4 Follow the onscreen instructions until you see theSelect an Installation Optionmenu.
5 Select either(E)asy Disk Installation or (A)dvanced Disk Installation.
Because DOS computers cannot access partitions larger than 2.1 Gbytes, Disk Manager may have to divide your hard drive into multiple partitions. If you select (E)asy Disk Installation, Disk Manager creates one partition of 2.1 Gbytes and creates multiple partitions using the remainder of your hard disc. However, if most of your files are smaller than 50 Kbytes, you may want to create several smaller partitions to make more efficient use of your hard disc space.To create smaller partitions, select (A)dvanced Disk Installation from the Disk Manager main menu.
BIOS Settings for the ST36450A and ST36451A
Drive | Cylinders | Heads | Sectors |
ST36450A |
|
|
|
LBA addressing | 833 | 240 | 63 |
CHS addressing | 13,328 | 15 | 63 |
ST36451A |
|
|
|
LBA addressing | 833 | 240 | 63 |
CHS addressing | 13,328 | 15 | 63 |
Note. This drive does not use thewrite precomp orlanding zone parameters. Set these parameters to zero.
4Save the settings and exit the System Setup program (your computer will automatically reboot).
After you configure your computer, we recommend that you use Disk Manager to partition and format your drive.
If your computer was built before
If you do not want to use Disk Manager, you can use the stan- dard DOS commands to partition and format your drive, as described in Section 3B.
6At this point, Disk Manager lists all the hard drives that it can recognize. You should see your new Seagate drive and your existing hard drive, if any.
If any hard drive is not recognized, exit Disk Manager and turn off your computer. Check all cables, jumpers and BIOS settings. Then start at step 1 to run Disk Manager again.
7If Disk Manager recognizes all your drives, select the drive you want to install and press ENTER. Disk Manager parti- tions and formats the drive. If your new drive is the master drive (Drive C), Disk Manager also configures the drive so that you can boot from it.
Note. If your computer cannot accommodate hard drives with capacities greater than 528 Mbytes, Disk Manager installs a Dynamic Drive Overlay (DDO) on your hard disc. If this driver has been installed, you should see a blue Disk Manager banner each time you boot your computer. See the Disk Manager online manual for details.
8Follow the instructions in the
YOU’RE DONE!
ADDRESSING DRIVE-CAPACITY LIMITATIONS
Some
The
33B. STANDARD DOSbINSTALLATION
! Caution. Partitioning or formatting a drive erases all data on it. Seagate assumes no liability if you erase your data.
Drive Partitioning
Partitioning a hard drive divides it into sections (partitions) that function as separate logical drives (labeled C, D, E, etc.). Because DOS computers cannot access partitions larger than 2.1 Gbytes, you must divide
1Insert a bootable DOS diskette in your diskette drive and restart your computer.
2Insert a DOS program diskette that contains the FDISK.EXE and FORMAT.COM programs into your diskette drive. At the A: prompt, typeFDISK and press ENTER.
3If you have two hard drives installed, the FDISK menu displays five options. Option five allows you to select the drive you want to partition. Make sure that your new drive is selected.
BIOS Upgrades: If you need to upgrade your BIOS, contact the appropriate BIOS manufacturer listed below.
American Megatrends (AMI):
Award Software International, Inc.:
Microid Research / Mr. BIOS:
Phoenix Technologies Ltd.:
SystemSoft: | Contact your computer manufacturer |
4Select “Create DOS partition or logical DOS drive” by pressing1. Then press ENTER.
5Select “Create primary DOS partition” by pressing1 again. Then press ENTER. Create your first drive partition. If you are creating a partition that will be used to boot your com- puter (drive C), make sure that the partition is marked active.
6Create an extended partition and additional logical drives, as necessary, until all the space on your new hard drive has been partitioned.
7When the partitioning is complete, reboot your computer.
Drive Formatting
At the A: prompt, type format x: /s, where x is the letter of your first new partition. Repeat this process for all the new partitions you have created.
!Caution. Make sure to use the correct drive letters so that you do not format a drive that
already contains data.
After you format your drive, it is ready to use.
YOU’RE DONE!