MEDALISTHARDDRIVE
INSTALLATIONGUIDE
Medalist 630xe (ST3630A) Medalist 850xe (ST3850A) forATA (IDE)-CompatiblePCs
1.ONE DRIVE OR TWO?
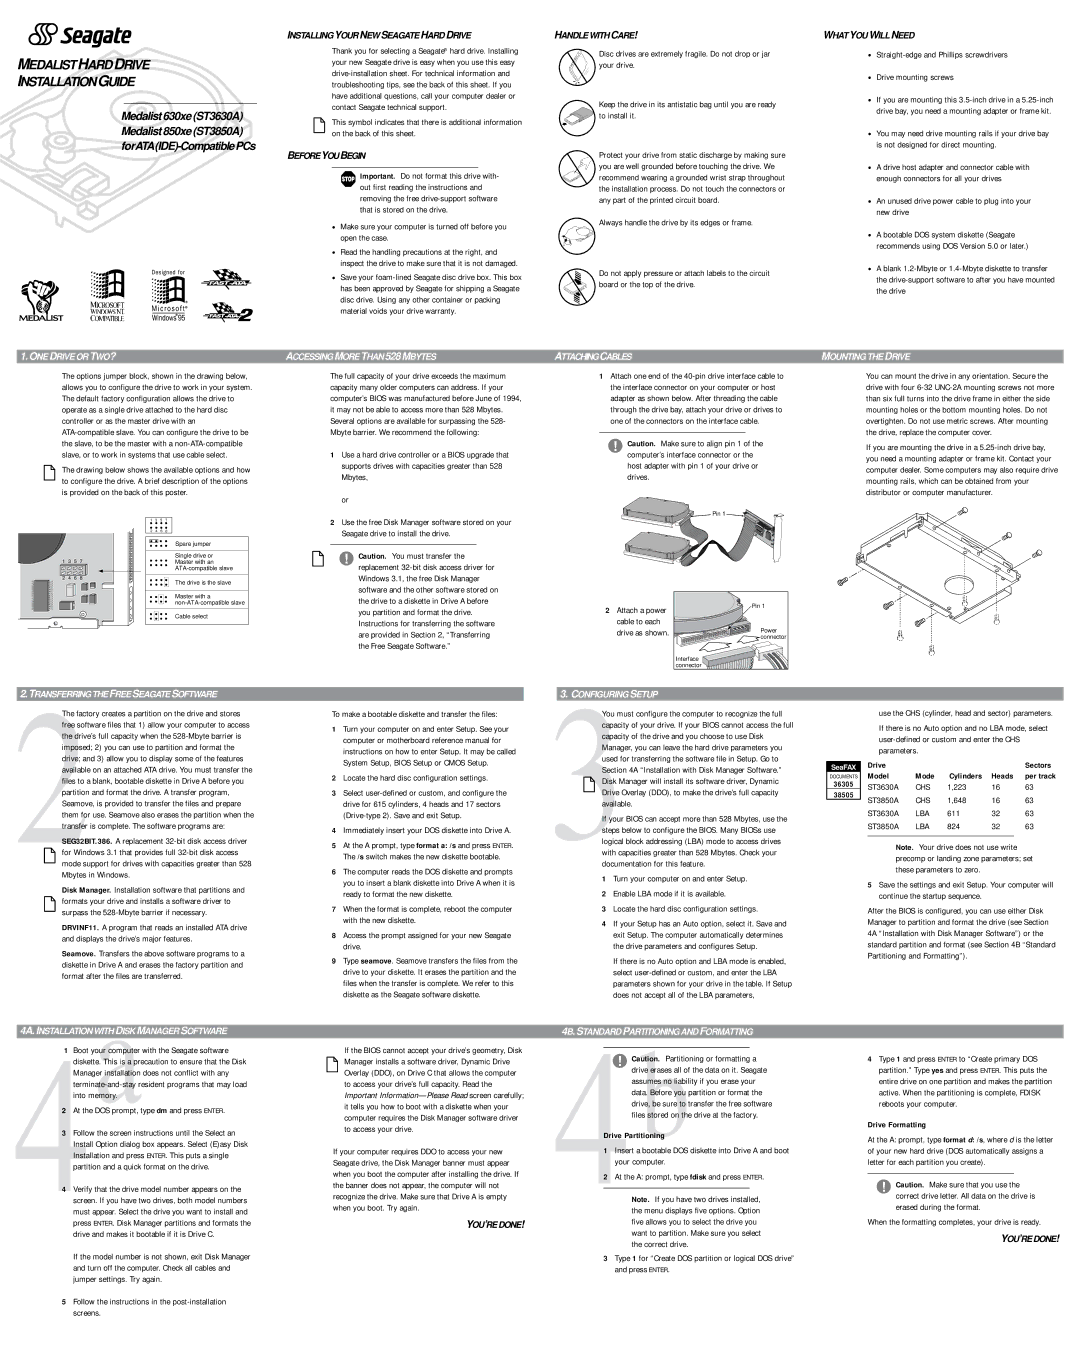
The options jumper block, shown in the drawing below, allows you to configure the drive to work in your system. The default factory configuration allows the drive to operate as a single drive attached to the hard disc controller or as the master drive with an ATA-compatible slave. You can configure the drive to be the slave, to be the master with a non-ATA-compatible slave, or to work in systems that use cable select.
The drawing below shows the available options and how to configure the drive. A brief description of the options is provided on the back of this poster.
| | | | Spare jumper |
| | | | Single drive or |
1 | 3 | 5 | 7 | Master with an |
| | | | ATA-compatible slave |
2 | 4 | 6 | 8 | The drive is the slave |
| | | |
| | | | Master with a |
| | | | non-ATA-compatible slave |
| | | | Cable select |
2.TRANSFERRING THE FREE SEAGATESOFTWARE
2The factory creates a partition on the drive and stores free software files that 1) allow your computer to access the drive’s full capacity when the 528-Mbyte barrier is imposed; 2) you can use to partition and format the drive; and 3) allow you to display some of the features available on an attached ATA drive. You must transfer the files to a blank, bootable diskette in Drive A before you partition and format the drive. A transfer program, Seamove, is provided to transfer the files and prepare them for use. Seamove also erases the partition when the transfer is complete. The software programs are:
SEG32BIT.386. A replacement 32-bit disk access driver for Windows 3.1 that provides full 32-bit disk access mode support for drives with capacities greater than 528 Mbytes in Windows.
Disk Manager. Installation software that partitions and formats your drive and installs a software driver to surpass the 528-Mbyte barrier if necessary.
DRVINF11. A program that reads an installed ATA drive and displays the drive’s major features.
Seamove. Transfers the above software programs to a diskette in Drive A and erases the factory partition and format after the files are transferred.
4A. INSTALLATION WITHaDISK MANAGER SOFTWARE 41 Boot your computer with the Seagate software
diskette. This is a precaution to ensure that the Disk Manager installation does not conflict with any terminate-and-stay resident programs that may load into memory.
2 At the DOS prompt, type dm and press ENTER.
3 Follow the screen instructions until the Select an Install Option dialog box appears. Select (E)asy Disk Installation and press ENTER. This puts a single partition and a quick format on the drive.
4 Verify that the drive model number appears on the screen. If you have two drives, both model numbers must appear. Select the drive you want to install and press ENTER. Disk Manager partitions and formats the drive and makes it bootable if it is Drive C.
If the model number is not shown, exit Disk Manager and turn off the computer. Check all cables and jumper settings. Try again.
5 Follow the instructions in the post-installation screens.
INSTALLINGYOUR NEW SEAGATE HARD DRIVE
Thank you for selecting a Seagate® hard drive. Installing your new Seagate drive is easy when you use this easy drive-installation sheet. For technical information and troubleshooting tips, see the back of this sheet. If you have additional questions, call your computer dealer or contact Seagate technical support.
This symbol indicates that there is additional information on the back of this sheet.
BEFOREYOUBEGIN
Important. Do not format this drive with- out first reading the instructions and removing the free drive-support software that is stored on the drive.
•Make sure your computer is turned off before you open the case.
•Read the handling precautions at the right, and inspect the drive to make sure that it is not damaged.
•Save your foam-lined Seagate disc drive box. This box has been approved by Seagate for shipping a Seagate disc drive. Using any other container or packing material voids your drive warranty.
ACCESSING MORE THAN 528 MBYTES
The full capacity of your drive exceeds the maximum capacity many older computers can address. If your computer’s BIOS was manufactured before June of 1994, it may not be able to access more than 528 Mbytes. Several options are available for surpassing the 528- Mbyte barrier. We recommend the following:
1Use a hard drive controller or a BIOS upgrade that supports drives with capacities greater than 528 Mbytes,
or
2Use the free Disk Manager software stored on your Seagate drive to install the drive.
! Caution. You must transfer the replacement 32-bit disk access driver for Windows 3.1, the free Disk Manager software and the other software stored on the drive to a diskette in Drive A before you partition and format the drive. Instructions for transferring the software are provided in Section 2, “Transferring the Free Seagate Software.”
To make a bootable diskette and transfer the files:
1Turn your computer on and enter Setup. See your computer or motherboard reference manual for instructions on how to enter Setup. It may be called System Setup, BIOS Setup or CMOS Setup.
2Locate the hard disc configuration settings.
3Select user-defined or custom, and configure the drive for 615 cylinders, 4 heads and 17 sectors (Drive-type 2). Save and exit Setup.
4Immediately insert your DOS diskette into Drive A.
5At the A prompt, type format a: /s and press ENTER. The /s switch makes the new diskette bootable.
6The computer reads the DOS diskette and prompts you to insert a blank diskette into Drive A when it is ready to format the new diskette.
7When the format is complete, reboot the computer with the new diskette.
8Access the prompt assigned for your new Seagate drive.
9Type seamove. Seamove transfers the files from the drive to your diskette. It erases the partition and the files when the transfer is complete. We refer to this diskette as the Seagate software diskette.
If the BIOS cannot accept your drive’s geometry, Disk Manager installs a software driver, Dynamic Drive Overlay (DDO), on Drive C that allows the computer to access your drive’s full capacity. Read the Important Information—Please Read screen carefully; it tells you how to boot with a diskette when your computer requires the Disk Manager software driver to access your drive.
If your computer requires DDO to access your new Seagate drive, the Disk Manager banner must appear when you boot the computer after installing the drive. If the banner does not appear, the computer will not recognize the drive. Make sure that Drive A is empty when you boot. Try again.
YOU’RE DONE!
HANDLE WITH CARE!
Disc drives are extremely fragile. Do not drop or jar your drive.
Keep the drive in its antistatic bag until you are ready to install it.
Protect your drive from static discharge by making sure you are well grounded before touching the drive. We recommend wearing a grounded wrist strap throughout the installation process. Do not touch the connectors or any part of the printed circuit board.
Always handle the drive by its edges or frame.
Do not apply pressure or attach labels to the circuit board or the top of the drive.
ATTACHINGCABLES
1Attach one end of the 40-pin drive interface cable to the interface connector on your computer or host adapter as shown below. After threading the cable through the drive bay, attach your drive or drives to one of the connectors on the interface cable.
!Caution. Make sure to align pin 1 of the computer’s interface connector or the
host adapter with pin 1 of your drive or drives.
2 Attach a power | Pin 1 |
|
cable to each | Power |
drive as shown. |
| connector |
| Interface |
| connector |
3. CONFIGURING SETUP
3You must configure the computer to recognize the full capacity of your drive. If your BIOS cannot access the full capacity of the drive and you choose to use Disk Manager, you can leave the hard drive parameters you used for transferring the software file in Setup. Go to Section 4A “Installation with Disk Manager Software.”  Disk Manager will install its software driver, Dynamic Drive Overlay (DDO), to make the drive’s full capacity available.
If your BIOS can accept more than 528 Mbytes, use the steps below to configure the BIOS. Many BIOSs use logical block addressing (LBA) mode to access drives with capacities greater than 528 Mbytes. Check your documentation for this feature.
1Turn your computer on and enter Setup.
2Enable LBA mode if it is available.
3Locate the hard disc configuration settings.
4If your Setup has an Auto option, select it. Save and exit Setup. The computer automatically determines the drive parameters and configures Setup.
If there is no Auto option and LBA mode is enabled, select user-defined or custom, and enter the LBA parameters shown for your drive in the table. If Setup does not accept all of the LBA parameters,
4B. STANDARD PARTITIONING AND FORMATTING
4! Caution.bPartitioning or formatting a drive erases all of the data on it. Seagate assumes no liability if you erase your data. Before you partition or format the drive, be sure to transfer the free software files stored on the drive at the factory.
Drive Partitioning
1 Insert a bootable DOS diskette into Drive A and boot your computer.
2 At the A: prompt, type fdisk and press ENTER.
Note. If you have two drives installed, the menu displays five options. Option five allows you to select the drive you want to partition. Make sure you select the correct drive.
3Type 1 for “Create DOS partition or logical DOS drive” and press ENTER.
WHATYOU WILL NEED
•Straight-edge and Phillips screwdrivers
•Drive mounting screws
•If you are mounting this 3.5-inch drive in a 5.25-inch drive bay, you need a mounting adapter or frame kit.
•You may need drive mounting rails if your drive bay is not designed for direct mounting.
•A drive host adapter and connector cable with enough connectors for all your drives
•An unused drive power cable to plug into your new drive
•A bootable DOS system diskette (Seagate recommends using DOS Version 5.0 or later.)
•A blank 1.2-Mbyte or 1.4-Mbyte diskette to transfer the drive-support software to after you have mounted the drive
MOUNTING THE DRIVE
You can mount the drive in any orientation. Secure the drive with four 6-32 UNC-2A mounting screws not more than six full turns into the drive frame in either the side mounting holes or the bottom mounting holes. Do not overtighten. Do not use metric screws. After mounting the drive, replace the computer cover.
If you are mounting the drive in a 5.25-inch drive bay, you need a mounting adapter or frame kit. Contact your computer dealer. Some computers may also require drive mounting rails, which can be obtained from your distributor or computer manufacturer.
use the CHS (cylinder, head and sector) parameters.
If there is no Auto option and no LBA mode, select user-defined or custom and enter the CHS parameters.
SeaFAX | | Drive | | | | Sectors |
DOCUMENTS | Model | Mode | Cylinders | Heads | per track |
36305 | | ST3630A | CHS | 1,223 | 16 | 63 |
38505 | |
| ST3850A | CHS | 1,648 | 16 | 63 |
| |
| | ST3630A | LBA | 611 | 32 | 63 |
| | ST3850A | LBA | 824 | 32 | 63 |
| | | | | | |
Note. Your drive does not use write precomp or landing zone parameters; set these parameters to zero.
5Save the settings and exit Setup. Your computer will continue the startup sequence.
After the BIOS is configured, you can use either Disk Manager to partition and format the drive (see Section 4A “Installation with Disk Manager Software”) or the standard partition and format (see Section 4B “Standard Partitioning and Formatting”).
4Type 1 and press ENTER to “Create primary DOS partition.” Type yes and press ENTER. This puts the entire drive on one partition and makes the partition active. When the partitioning is complete, FDISK reboots your computer.
Drive Formatting
At the A: prompt, type format d: /s, where d is the letter of your new hard drive (DOS automatically assigns a letter for each partition you create).
!Caution. Make sure that you use the correct drive letter. All data on the drive is
erased during the format.
When the formatting completes, your drive is ready.
YOU’RE DONE!