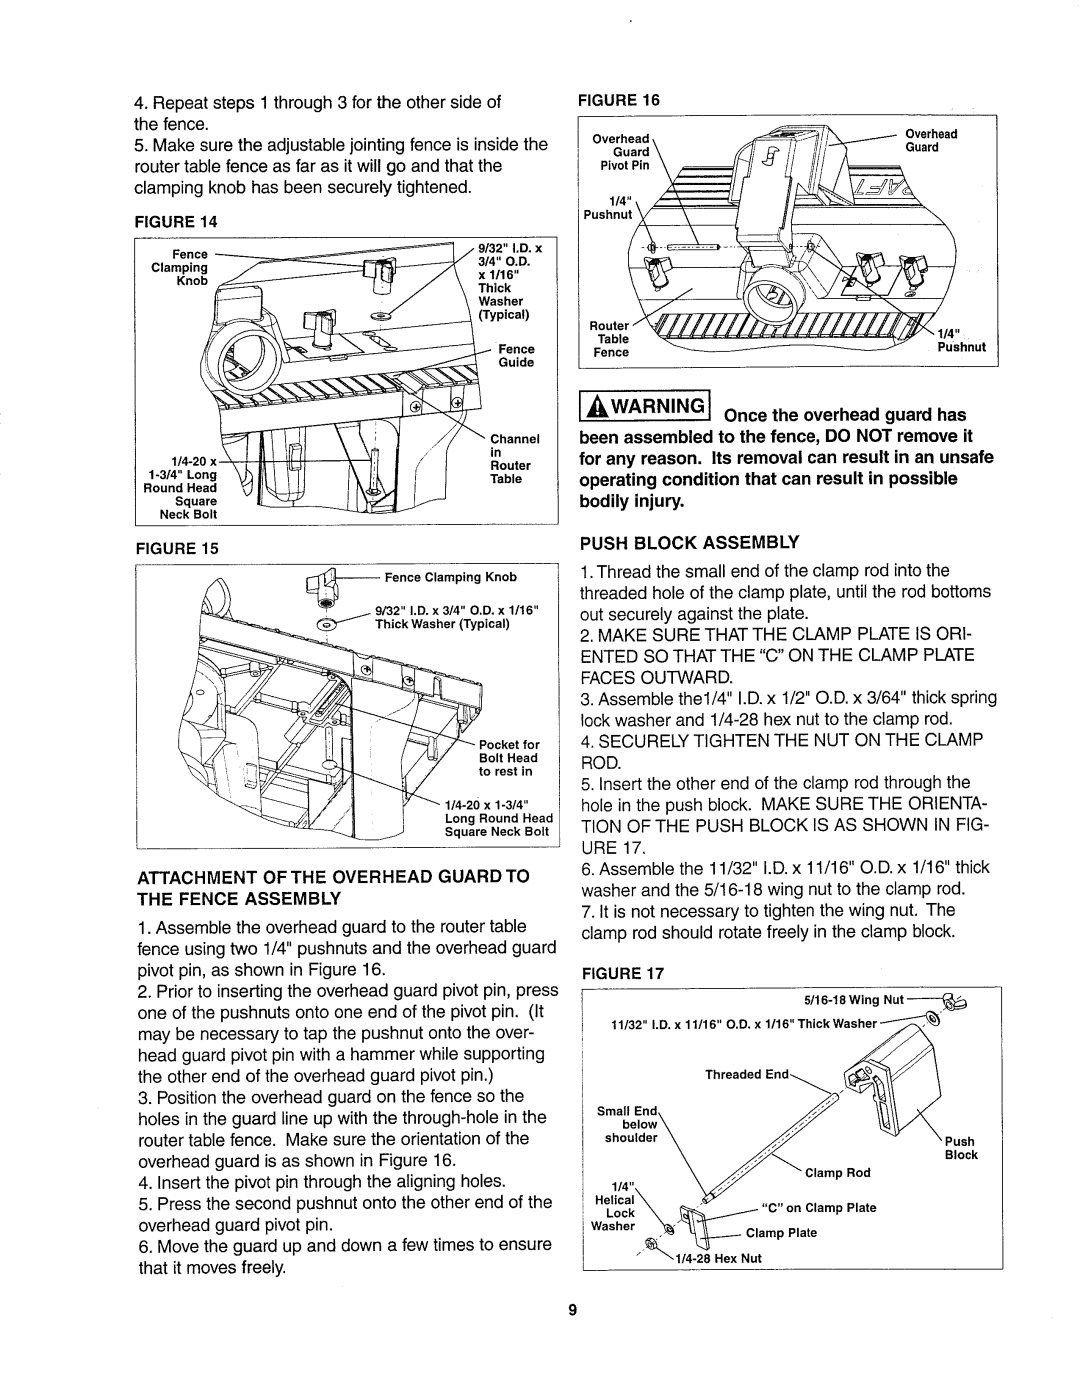
4.Repeat steps 1 through 3 for the other side of the fence.

5.Make sure the adjustable jointing fence is inside the router table fence as far as it will go and that the clamping knob has been securely tightened.

FIGURE 14

Fence


/

9/32"

LD. x


3/4"

O.D.

Clamping


L_

/\

x 1/16"

Knob


FIGURE 16

Overhead


_

_

Overhead

Guard\


_/

_//

/!///'"_

Guard

PivotPin

_///._


_'d t__


/,j

/

\

Thick

-_-_-L


/

\

Washer

_


0"ypical)

/_

/) _'_=_ '_


_

Fence


_


Guide

J__WARNINGJ

Once the overhead guard has


t

It_l

\ \ :

J

.//

"" Channel

been assembled

to the fence, DO NOT remove it

114-20 x


for any reason. Its removal can result in an unsafe


I'I i[_

_\

_

I

// [

Rn°uter

1-3/4",ong II


operating condition that can result in possible

Round Head

_./l


Table


bodily injury.


Square

IL


Neck

Bolt


FIGURE

15


PUSH BLOCK ASSEMBLY


1. Thread the small end of the clamp rod into the


_


Fence Clamping

Knob


threaded hole of the clamp plate, until the rod bottoms


9/32" I.D. x 314" O.D. x 1116"

out securely against the plate.


(_YI_

Thick

Washer (Typical)


2. MAKE SURE THAT THE CLAMP PLATE IS ORI-


ENTED SO THAT THE "C" ON THE CLAMP PLATE


FACES OUTWARD.


L


3. Assemble

the1/4" I.D. x 1/2" O.D. x 3/64" thick spring


lock washer

and 1/4-28 hex nut to the clamp rod.


ocket

for

4. SECURELY TIGHTEN THE NUT ON THE CLAMP

_---'_/_/'__ _-_///_

_'_[ i


(

/ _/

Bolt Head

ROD.


5. Insert the other end of the clamp rod through the


Z


tores,,ni


1/4-20x1-3/4" /

hole in the push block. MAKE SURE THE ORIENTA-


"_l/


/ !


t

Long

Round

Head

TION OF THE PUSH BLOCK tS AS SHOWN IN FIG-


Square Neck

Bolt


URE 17.


ATTACHMENT OF THE OVERHEAD GUARD TO

6. Assemble

the 11/32" I.D. x 11/16" O.D. x 1/16" thick

washer and the 5/16-18 wing nut to the clamp rod.

THE FENCE ASSEMBLY


7. It is not necessary to tighten the wing nut. The

1. Assemble the overhead guard to the router table

clamp rod should rotate freely in the clamp block.

fence using two 1/4" pushnuts and the overhead guard


pivot pin, as shown in Figure 16.


FIGURE 17


2. Prior to inserting the overhead guard pivot pin, press


5116-18 Wing

one of the pushnuts onto one end of the pivot pin. (It


11/32" I.D. x 11/16"

O.D. x 1/16" Thick

may be necessary to tap the pushnut onto the over-


head guard pivot pin with a hammer

while supporting


the other end of the overhead

guard

pivot pin.)


Threaded

3. Position the overhead guard on the fence so the


Small End


holes in the guard line up with the through-hole in the


router table fence.

Make

sure the orientation

of the

shoulder


overhead guard is as shown in Figure 16.


Block


Rod

4. Insert the pivot pin through

the

aligning holes.


114"\


5. Press the second pushnut onto the other end of the

Helical\


Lock_

_

"C" on Clamp Plate

overhead

guard pivot pin.


Washer _'_-

_ //_

Clamp Plate

6. Move the guard up and down a few times to ensure

"_"_

1/4-28_8Hex Nut


that it moves freely.

Page 9
Image 9
Sears 26462_0 owner manual Jwarningj, Push Block Assembly, Attachment of the Overhead Guard to

26462_0 specifications

Sears 26462_0 is a notable product designed to meet the needs of a diverse range of consumers, offering a blend of functionality, style, and performance. One of the standout features of this model is its sleek and modern design, making it an attractive addition to any home or workspace. The aesthetic appeal is complemented by a sturdy construction that ensures durability, providing users with a reliable product that will stand the test of time.

The 26462_0 is equipped with advanced technologies that enhance its usability. One such technology is its energy-efficient operation, which allows users to reduce their energy consumption while still enjoying optimal performance. This feature not only helps in lowering electricity bills but also contributes to environmental sustainability, making it an appealing choice for eco-conscious consumers.

Another key characteristic of the Sears 26462_0 is its user-friendly interface. The controls are intuitive and accessible, allowing users to quickly familiarize themselves with the product and maximize its features. Additionally, its compact design makes it suitable for small spaces, further increasing its versatility.

Performance-wise, the 26462_0 excels in delivering consistent results. Whether it’s related to its primary function or supplementary features, users can expect reliable performance that meets or exceeds expectations. This model's robust engineering ensures that it can handle a variety of tasks efficiently, catering to both light and heavy-duty requirements.

In terms of maintenance, the Sears 26462_0 has been designed with ease of care in mind. Its materials are easy to clean, and the components are accessible for repairs if necessary. This practicality contributes to a lower total cost of ownership, as users can manage and maintain their product without costly interventions.

Overall, the Sears 26462_0 is a well-rounded choice for anyone in the market for a dependable and stylish addition to their home or office. Its blend of modern design, user-friendly features, energy efficiency, and durable construction positions it as a product that truly meets the evolving needs of today’s consumers. With its solid performance and practical characteristics, the 26462_0 emerges as a commendable option for those seeking quality and reliability in a singular offering.