ASSEMBLY INSTRUCTIONS

TOOLS REQUIRED FOR ASSEMBLY

(1)Pliers

(1)Hammer

(1)7/16" Open End or Box Wrench

(1)1/2'3 Open End or Box Wrench

(1)9/16" Open End or Box Wrench

(1)3/4" Open End or Box Wrench

(1)Adjustable Wrench

Refer to carton contents figure on page 2 and figure 1 on page 3 for parts and hardware needed to assemble snow blade.

RIGHT HAND (R.H.) AND LEFT HAND

(L.H.) ARE DETERMINED FROM

OPERATOR'S POSITION WHILE SEATED ON TRACTOR.

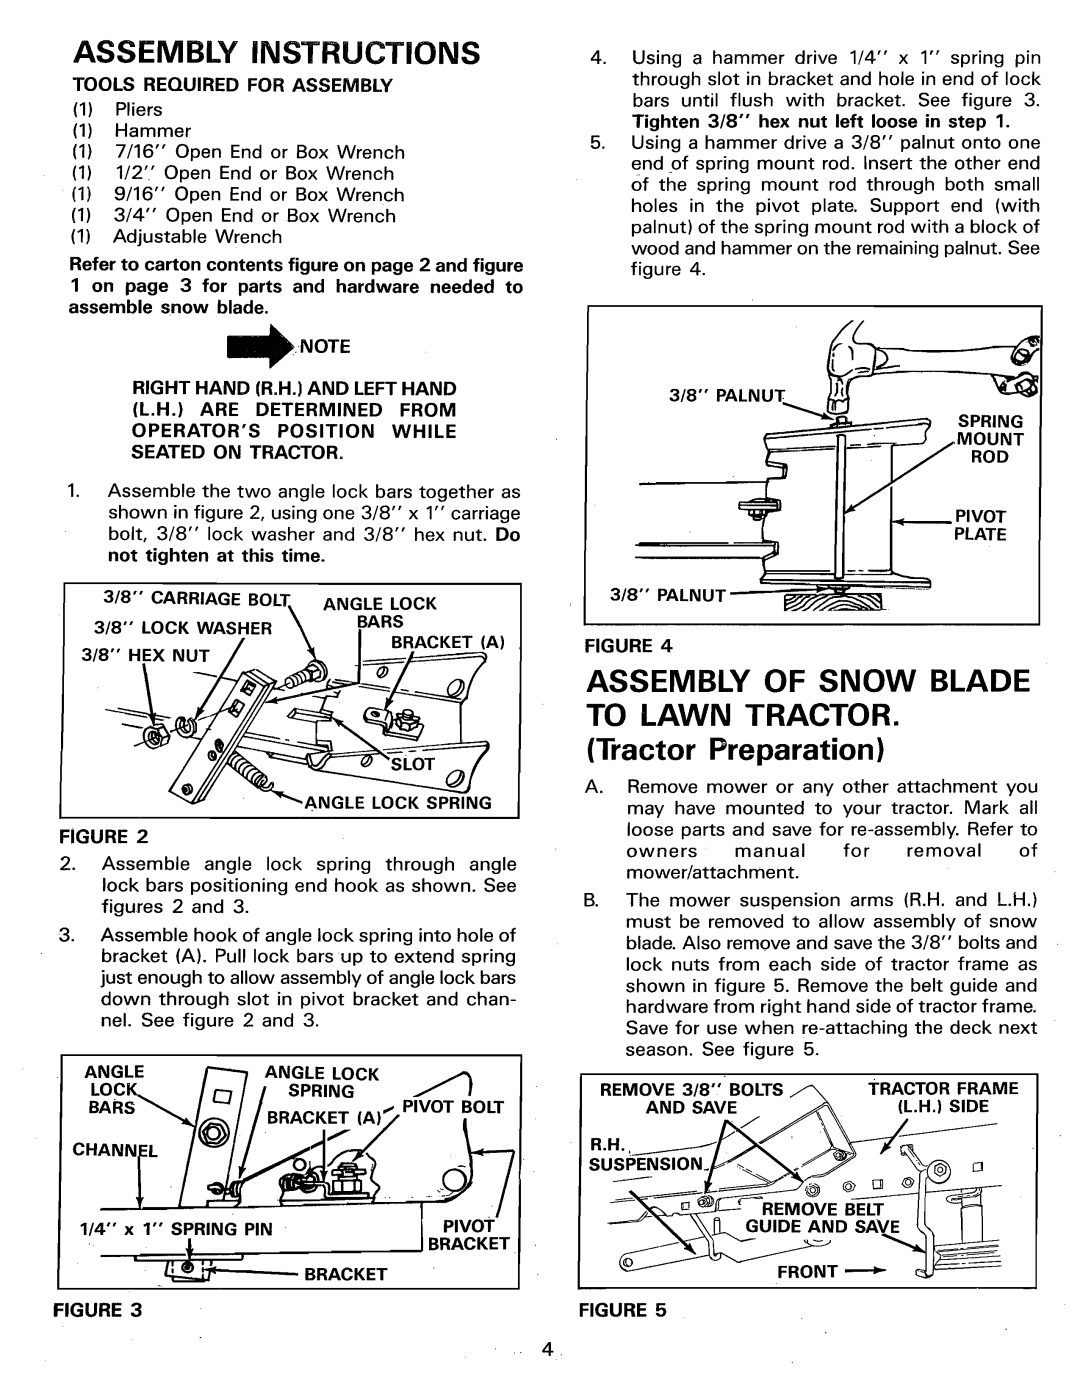
. Assemble the two angle lock bars together as shown in figure 2, using one 3/8" x 1" carriage bolt, 3/8" lock washer and 3/8" hex nut. Do not tighten at this time.

3/8"" CARRIAGE BOLT\ ANGLE LOCK

3/8"

LOCK WASHER

\

BARS


/

_

I BRACKET (A)

3/8"

HEX NUT /

_

/______/=========_

/'_"_ANGLE LOCK SP_'NG

FIGURE 2

2. Assemble angle lock spring through angle lock bars positioning end hook as shown. See figures 2 and 3.

3.Assemble hook of angle lock spring into hole of bracket (A). Pull lock bars up to extend spring just enough to allow assembly of angle lock bars down through slot in pivot bracket and chan- nel. See figure 2 and 3.

ANGLE

ANGLE LOCK

LocK..

3

BARS _,_

(A). PIVOT BOLT

1/4"

x 1"

SPRING

PIN

PIVOT


=


'

_

'

- BRACKET

FIGURE

3


.

Using

a hammer

drive

1/4"

x 1"' spring

pin


through slot in bracket and hole in end of lock


bars until flush with bracket. See figure 3.


Tighten 3/8"" hex nut left loose in step 1.

.

Using

a hammer

drive

a 3/8"

palnut onto

one


end of spring mount rod. Insert the other end


Of the spring mount rod through both small


holes in the pivot plate. Support end (with


palnut) of the spring mount rod with a block of


wood and hammer on the remaining palnut. See


figure

4.


3,8

.MouNT

3/8" PALNUT

=-_=

FIGURE 4

ASSEMBLY OF SNOW BLADE TO LAWN TRACTOR.

(Tractor Preparation)

A=Remove mower or any other attachment you may have mounted to your tractor. Mark all loose parts and save for re-assembly. Refer to

owners manual for removal of mower/attachment.

g.The mower suspension arms (R.H. and L.H.) must be removed to allow assembly of snow blade. Also remove and save the 3/8" bolts and lock nuts from each side of tractor frame as

shown in figure 5. Remove the belt guide and hardware from right hand side of tractor frame. Save for use when re-attaching the deck next season. See figure 5.

REMOVE

3/8"' BOLTS _


TRACTOR FRAME

AND

SAVE

_


(L.H.) SIDE

R.H. __[

/>,.//\\


_


_---X

_-_

_.__UIDEAND SAVE I\ I I

FRONT _

FIGURE 5

--4,

Page 4
Image 4
Sears 486.244062 owner manual Assembly Instructions, Assembly of Snow Blade to Lawn Tractor

486.244062 specifications

The Sears 486.244062 is a notable entry in the realm of consumer electronics, specifically in the category of personal computers. Launched during a time when PCs were becoming increasingly integral to both home and business environments, this model featured a blend of cutting-edge technologies and user-friendly characteristics that appealed to a wide range of customers.

At the heart of the Sears 486.244062 was its Intel 80486 microprocessor, which represented significant advancement over its predecessors. Operating at a speed of 33 MHz, this processor provided enhanced performance for multitasking capabilities, enabling users to run various applications simultaneously without significant lag. This was particularly valuable during the early 1990s when software applications began to demand more processing power.

The computer typically came equipped with 8 MB of RAM, expandable up to 32 MB, accommodating the increasing demands of modern operating systems and applications of the time. This validated the 486's suitability for both business and home use, ranging from simple document editing to more detailed graphic design tasks.

In terms of storage, the Sears 486.244062 incorporated a 520 MB hard drive, which was ample for the period. It allowed users to store numerous files, applications, and multimedia content, marking a departure from the limited storage capacities of earlier models. The inclusion of a 3.5-inch floppy disk drive further enhanced its functionality, offering a convenient medium for data transfer and backups.

The system also featured a VGA-compatible graphics card, which enabled it to deliver clear and vibrant visuals, enhancing the user experience, particularly in gaming and graphic applications. Coupled with high-fidelity sound capabilities, the Sears 486.244062 catered to an audience interested in multimedia entertainment.

User comfort was also prioritized in the design of this model. It often featured an ergonomic keyboard layout and a mouse that was precise and responsive, creating a comfortable environment for extended use.

In conclusion, the Sears 486.244062 emerged as a reliable computer option during a transformative period in technology. With its robust performance, expandable hardware capabilities, and focus on user experience, it carved a niche that appealed to both professionals and casual users, leaving a lasting impact on personal computing trends of the era.