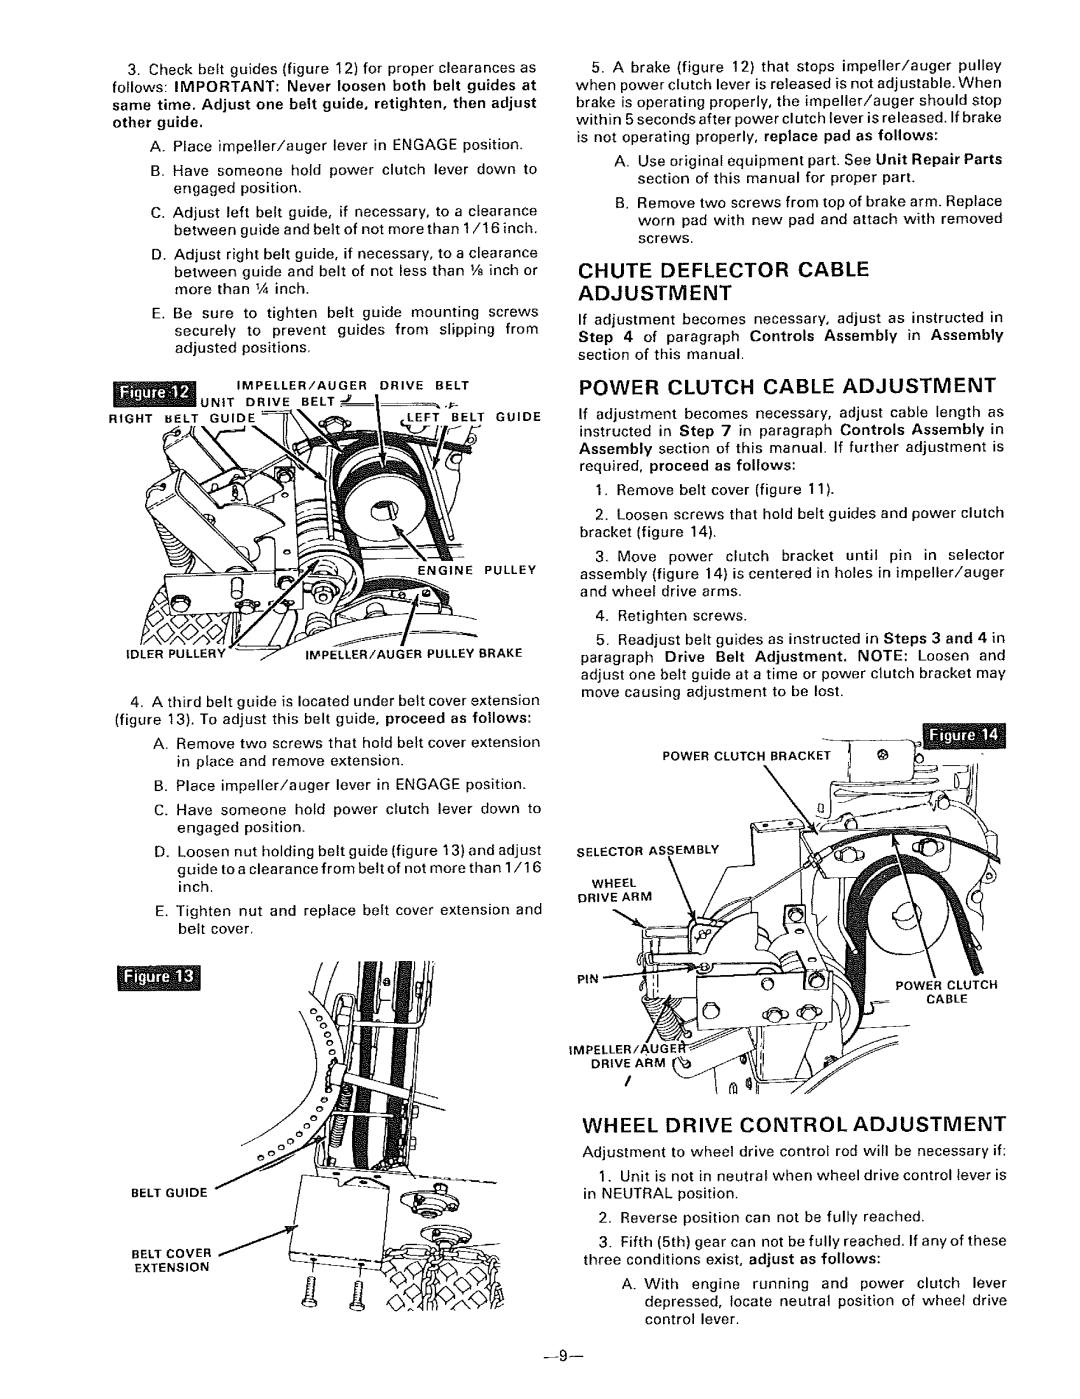
3.Checkbeltguides(figure12)forproperclearancesas

follows:IMPORTANT:Neverloosenbothbeltguidesat sametime.Adjustonebeltguide,retighten, then adjust

other guide.

A, Ptace impeller!auger lever in ENGAGE position.

B. Have someone hold power clutch lever down to engaged position.

C. Adjust left belt guide, if necessary, to a clearance between guide and be}t of not more than 1/16 inch.

D. Adjust right belt guide, if necessary, to a clearance

between guide and belt of not less than V8 inch or more than V_ inch.

E. Be sure to tighten belt guide mounting screws

securely to prevent guides from slipping from adjusted positions.


UNIT

IMPELLER/AUGER

DRIVE

BELT


DRIVE

BELT


.._.

RIGHT

BELT GUIDE


,LEFT

BELT GUIDE

ENGINE PULLEY

IDLER PULLERY'IMPELLER/AUGER PULLEY BRAKE

4.A third belt guide is located under belt cover extension (figure 13). To adjust this belt guide, proceed as follows:

A.Remove two screws that hold belt cover extension in place and remove extension.

B.Place impeller/auger lever in ENGAGE position.

C.Have someone hold power clutch lever down to engaged position.

D.Loosen nut holding belt guide (figure 1 3) and adjust guide to a clearance from belt of not more than 1/1 6 inch.

E.Tighten nut and replace belt cover extension and belt cover.

5.A brake (figure 12) that stops impeller/auger pulley when power clutch lever is released is not adjustable. When

brake is operating properly, the impeller/auger should stop within 5 seconds after power clutch lever is released. If brake is not operating properly, replace pad as follows:

A.Use original equipment part. See Unit Repair Parts section of this manual for proper part.

B.Remove two screws from top of brake arm. Replace worn pad with new pad and attach with removed screws.

CHUTE DEFLECTOR CABLE

ADJUSTMENT

If adjustment becomes necessary, adjust as instructed in

Step 4 of paragraph Controls Assembly in Assembly section of this manual.

POWER CLUTCH CABLE ADJUSTMENT

If adjustment becomes necessary, adjust cable length as

instructed in Step 7 in paragraph Controls Assembly in

Assembly section of this manual. If further adjustment is required, proceed as follows:

1.Remove belt cover (figure 1 1).

2.Loosen screws that hold belt guides and power clutch bracket (figure 14).

3.Move power clutch bracket until pin in selector assembly (figure 14) is centered in holes in impeller/auger and wheel drive arms.

4.Retighten screws.

5.Readjust belt guides as instructed in Steps 3 and 4 in

paragraph Drive Belt Adjustment. NOTE: Loosen and adjust one belt guide at a time or power clutch bracket may

move causing adjustment to be lost.

POWER CLUTCH BRACKET

\

SELECTOR ASSEMBLY

wHEEL

DRIVE ARM

POWER CLUTCH

CABLE

BELT GUIDE

BELT COVER EXTENSION

IMPELLER/AUGEF

DRIVE ARM

/

WHEEL DRIVE CONTROL ADJUSTMENT

Adjustment to wheel drive controf rod will be necessary if:

1.Unit is not in neutral when wheel drive control lever is in NEUTRAL position.

2.Reverse position can not be fully reached.

3.Fifth (5th) gear can not be fully reached. If any of these

three conditions exist, adjust as follows:

A.With engine running and power clutch lever

depressed, locate neutral position of wheel drive control lever.

--9--

Page 9
Image 9
Sears 536.9183 owner manual Chute Deflector Cable, Wheel Drive Control Adjustment

536.9183 specifications

The Sears 536.9183 is a versatile and reliable snow blower designed to tackle winter's toughest challenges. This machine is particularly noted for its robust build quality and user-friendly operation, making it an ideal choice for homeowners dealing with heavy snowfall.

One of the standout features of the Sears 536.9183 is its powerful engine. Equipped with a dependable gas-powered motor, it delivers ample horsepower that enables the snow blower to easily clear driveways, sidewalks, and patios. This engine is designed for efficient performance, proving to be fuel-efficient while still offering the torque necessary to navigate through dense snow and ice.

In terms of design, the 536.9183 showcases a well-thought-out structure that ensures durability and ease of use. It features a heavy-duty auger system made of steel, capable of breaking through hard-packed snow and ice. The auger effectively collects the snow and propels it through the chute, allowing for a clean and thorough clearing process. Additionally, the adjustable chute provides the flexibility to direct the snow away from the areas that have already been cleared, minimizing the effort needed to maintain a clear path.

The snow blower offers multiple speed settings, allowing users to navigate various conditions with ease. Whether tackling light, fluffy snow or heavier, compacted snow, the adjustable speed settings provide tailored performance. Moreover, the self-propelled function ensures that users can maneuver the machine effortlessly, reducing physical strain during operation.

Safety features are also a priority in the design of the Sears 536.9183. It comes equipped with user-friendly controls that are easy to understand and operate, ensuring that even novice users can handle the machine effectively. Additionally, the snow blower includes safety measures such as an emergency shut-off and a protective shield around the auger and impeller to prevent accidents.

In summary, the Sears 536.9183 stands out in the realm of snow blowers due to its powerful engine, durable construction, and thoughtful safety features. Its combination of efficiency, ease of use, and performance make it an excellent choice for homeowners looking to tackle winter's snow with confidence. As winter approaches, having the Sears 536.9183 ready to go ensures that homeowners can keep their pathways clear and safe throughout the season.