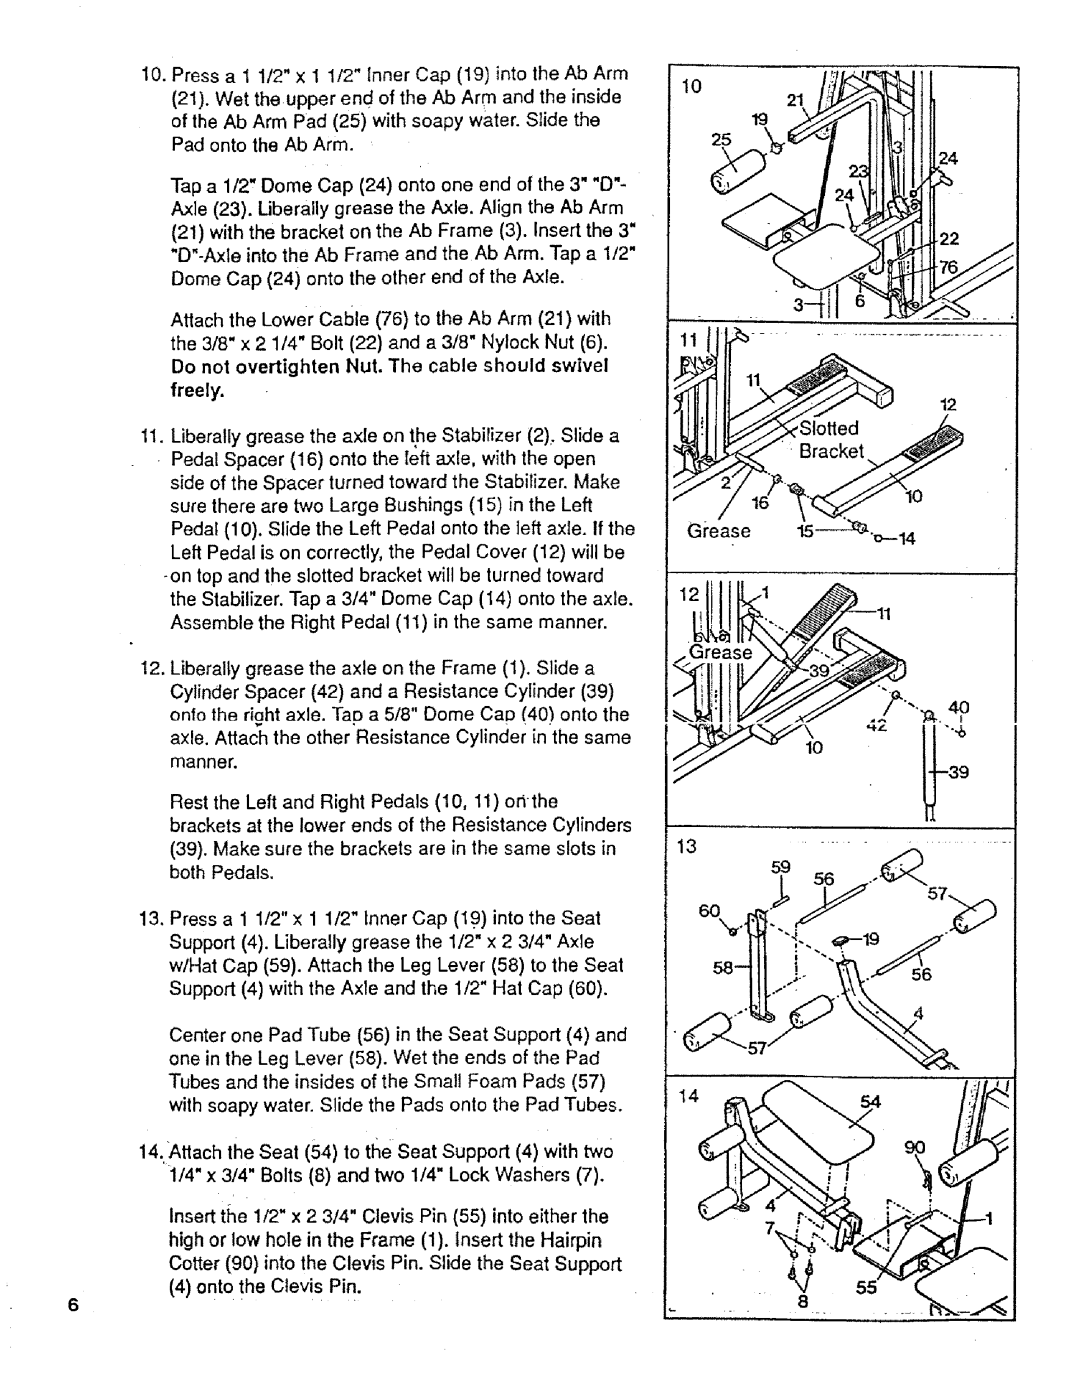
10.Press a 1 1/2" x 1 1/2" Inner Cap (19) into the Ab Arm (21). Wet the upper end of the Ab Arm and the inside of the Ab Arm Pad (25) with soapy water. Slide the Pad onto the Ab Arm.
Tap a 1/2" Dome Cap (24) onto one end of the 3" "D"- Axle (23). liberally grease the Axle. Align the Ab Arm
(21)with the bracket on the Ab Frame (3). Insert the 3"
Attach the Lower Cable (76) to the Ab Arm (21) with the 3/8" x 2 1/4" Bolt (22) and a 3/8" Nylock Nut (6).
Do not overtighten Nut. The cable should swivel freely.
1I. Liberally grease the axle on the Stabilizer (2), Slide a
Pedal Spacer (16) onto the left axle, with the open side of the Spacer turned toward the Stabilizer. Make sure there are two Large Bushings (15) in the Left Pedal (10). Slide the Left Pedal onto the left axle. if the Left Pedal is on correctly, the Pedal Cover (12) will be
12.Liberally grease the axle on the Frame (1). Slide a Cylinder Spacer (42) and a Resistance Cylinder (39)
onlo the right axle. Tap a 5/8" Dome CaD (40) onto the axle. Attach the other Resistance Cylinder in the same
manner.
Rest the Left and Right Pedals (10, 11) orithe
brackets at the lower ends of the Resistance Cylinders (39). Make sure the brackets are in the same slots in both Pedals.
13.Press a 1 1/2" x 1 1/2" Inner Cap (19) into the Seat Support (4). Liberally grease the 1/2" x 2 3/4" Axle w/Hat Cap (59). Attach the Leg Lever (58) to the Seat Support (4) with the Axle and the 1/2" Hat Cap (60).
Center one Pad Tube (56) in the Seat Support (4) and one in the Leg Lever (58). Wet the ends of the Pad Tubes and the insides of the Small Foam Pads (57) with soapy water. Slide the Pads onto the Pad Tubes.
14.Attach the Seat (54) to the seat support (4) with two 1/4" x 3/4" Bolts (8) and two 1/4" Lock Washers (7).
Insert the 1/2" x 2 3/4" Clevis Pin (55) into either the high or low hole in the Frame (1). Insert the Hairpin Cotter (90) into the Clevis Pin. Slide the Seat Support
(4) onto the Clevis Pin.
lO
N
_,_ _"" 8racket_
GJ'ease
0 | _'_ | ""b |
|
| • |
..........,,, ,_,
6