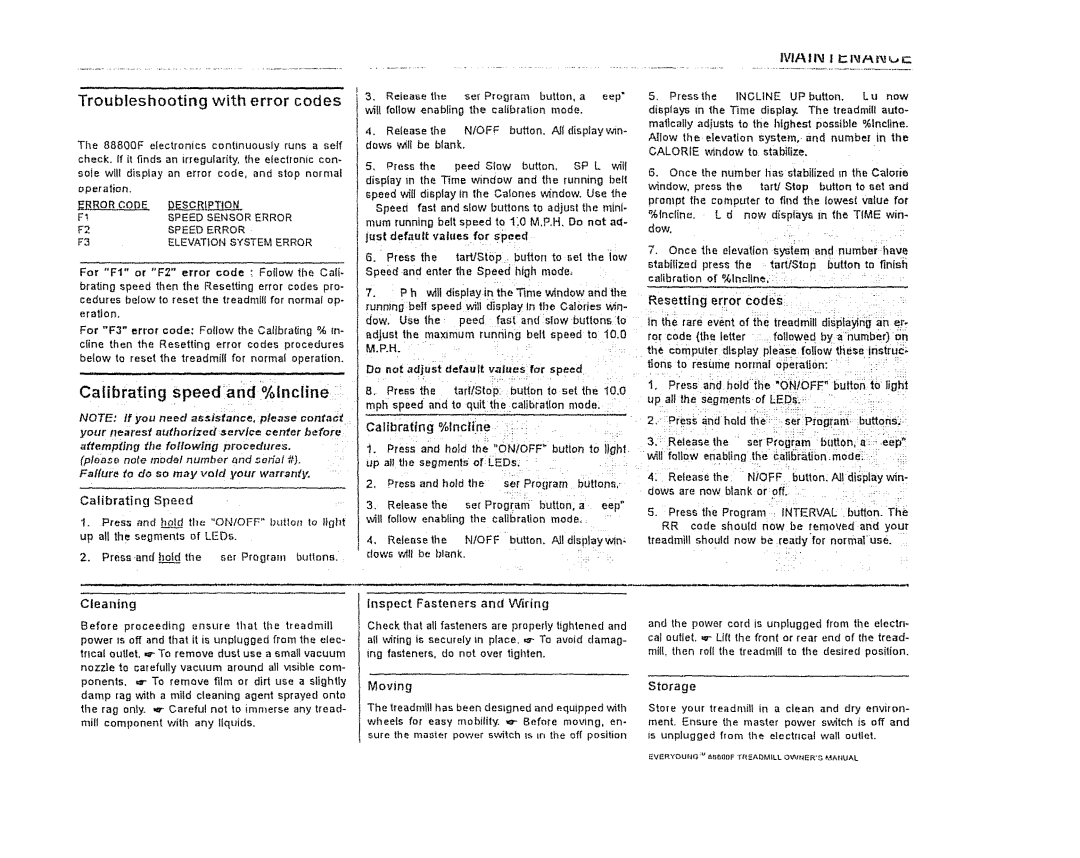
Troubleshooting with error codes

The 88800F electronics continuously runs a self check. If it finds an irregularity, the electronic con- soie will display an error code, and stop normal operation.

_..__R_RCOnE

_.RRIPT!O

N

F!

SPEED

SENSOR ERROR

F2

SPEED

ERROR

F3

ELEVATION

SYSTEM ERROR

For "FI" or "F2" error code _ Foiiow ihe Cali- bratin0 speed then the Resetting error codes pro-

cedures below to reset the treadmill for normal op- eration.

For "F3" error code; Follow the Calibrating % in-

cline then the Resetting error codes procedures below to reset the treadmill for normal operation,

Calibrating Speedand %Incline :

NOTE: tf you need a_istatice,:ptease contact

your nearest authorized serv/¢e center before

attempting the following procedures.

(pleas{i

note

model number

and

.set_al #).

-:

Faiflxre

to do

so may void

your

warranty,

....

Calibrating

Speed


..

1.Press and hal.__tiled "ONIOFF" butlon to tfghf up o!l the segments of LEDs.

2.Press.and hold the set Program butlanB,

3. Release the set Program button, a eep"

wit! follow enabling the calibration mode.

4.Release the N!OFF button. All displayv, nn- dows w41lbe blank,

5, Press the peed Slow button, SP L v,_ll dispfay in the Time window and the running belt _peed v4lt display in the Calones window. Use the Speed fast end slow buttons to adjust the mini- mum running belt sp_ed to I]0 M.P.H. Do not ad-

jt_s{ default values for Speed

6.Pres_ the taWStt_p, butlon to _et the low Speed and enter the Speed high mode,

71P h will display in the Time window and the runn)r_g bell speed will display In the Calories win-

dow. Us_ lhe peed fast and stow 6uttons10

adjust the maximum running belt speed to 10.0

M.P.H.

Do not adjust default vaues for speed.

B. Press the tartlStop: button to set the !0.O

mph speed and lo quElhe:calibratlon mode.

Calibrating %Incl(rle. :=.

.

--.-

1.Press and hold the "ON/OFF" button to )!ght.

up all'dle segments of-LEDs:

2+

Press and

hold

the

set PrDgram

buttons,.

3.

Release

the

see Program

button,

a

eep"

will

follow

enabling the

calibration

mode.


4.

Releaseihe


NtOFF

button.

Alldisplayw)n_

dow6 willbe

blank.


. .

IV!/ttl%l l l;:Itl/4i'_t,,C

5. Pressthe INCLINE UPbutton. Lu now displays in the T_me display. The treadmill auto- maifcafly adiusts to the highest possible %Incline.

Allow the elevation system,- and numbel in the CALORIE v4ndow to stabilize.

6.Once the number lias stabilized in the Calorie

window, press the tart/Stop button to set and

prompt the computer to find the IowesI wIue for

%Incline. L d now displays in the TIME win- dow.

7.Once the elevation system and number-have

stabilized press lhe tarUStop button to finish calibration of %Incline,

Resetting error €odes

In the rare event of the treadmill displayinl]--ah Or.

roe code

(th_

letter


"

followed

byanumbeQ

on

the computer

display

pleas e follow

the_a!nstru_


tlon_ to resLlme normal

opera,

on:

:

:

.

_ - .

..


. ,;_-


.,, -

..:

1.Press and hold the "ON/OFF" button tOtight

up all the segments of LEDsw:

"

L.

2., : PCesS andheld lhe _i-:-ser P_'dg[an(. buttohSL::

.....

t -- ,

....

-

3, : Release....the "

set prog(am

b{itton;;l:_/,eep"

w_tl follow enabling

the calibratibn.mode_i-...::


4; Release the NtOFF' button. All display win- dows are now blank or:off.

5. Press the Program INTERVAL button. The.

RRcode should now be removed and your treadmill should now be ready for normaluse.

Cleaning

Before proceeding ensure that the treadmill power is off and that it is unplugged from the elec- Iflcaloutlet. ,_- To remove dust use a small vacuum nozzle to carefully vacuum around all ,Asibte com-

ponents. ,_r To remove film or dirt use a slightly damp rag with a mild cleaning ageni sprayed onto the rag only. ,_r Carefu! not to immerse any tread- mill component with any liquids.

Inspect

Fasteners

and

Wiring


Check that

all

fasteners

are

properly

tightened and

and

the

power

cord

is unplugged

from

the electri-


end of the tread-

atf wiring

is

securely

in

place. _ To

avoid damag-

cal

outlet.

,r Liftthe

front

or

rear

ing fasieners,

do not

over

tighten.


mill,

then

roll

the treadmill

to

the

desired

position.

Moving


Storage


The treadmill

has

been

designed

and equipped '_th

Store

your

treadmill

in

a clean

and

dry

environ-

wheels for

easy

mobfllly. _'- Before moving, en-

ment.

Ensure

the

master

power

s_,,4tch is

off and

sure the ma,_er

power

swffch

is in the off position

is unplugged

f_om

the

electrical

wall

outlet,

EV_ftYC)Ui'4G v 586(]£JF TREADMILL O"_INER'.% MAIlUAL

Page 2
Image 2
Sears 88800F warranty Troubleshooting with error codes, Calibrating %Inclrle. =, Resetting error €odes

88800F specifications

The Sears 88800F is a versatile and innovative product designed to enhance various aspects of home improvement and DIY projects. A well-known name in the retail and appliance sector, Sears has developed this model to cater to both professionals and weekend warriors who require reliable tools for their tasks.

One of the main features of the 88800F is its powerful motor, which provides robust performance for a range of applications. The high torque output enables users to tackle challenging tasks with ease, making it suitable for drilling, driving screws, and handling multiple materials. This feature is particularly important for those who work on diverse projects, from woodworking to metalwork.

In addition to its power, the Sears 88800F includes various speed settings and torque adjustments. These settings allow users to customize the tool's performance according to the specific needs of their project. The ability to switch between different speeds makes it easier to work with delicate materials, while the torque adjustments ensure that screws can be driven in securely without damaging the workpiece.

The tool also boasts an ergonomic design, with a comfortable grip that reduces fatigue during extended use. This is crucial for users who often engage in long hours of work, as it helps to minimize strain on the hands and wrists. The balanced weight distribution of the tool further contributes to its ease of handling, allowing for greater maneuverability in tight spaces.

Another notable characteristic of the 88800F is its durability. Built with high-quality materials, this tool is designed to withstand the rigors of demanding environments. Whether it's a home improvement project or a professional job site, users can rely on the rugged construction to deliver consistent performance.

Incorporating advanced technologies, the Sears 88800F includes a built-in LED light that illuminates the work area, facilitating visibility in low-light conditions. This feature is especially valuable for tasks that require precision and attention to detail, ensuring that users can see what they are working on.

Overall, the Sears 88800F combines power, versatility, and user-friendly features, making it an ideal tool for anyone looking to tackle projects with confidence. Whether for home use or job site applications, this model stands as a reliable choice for individuals who prioritize quality and performance in their tools.