Components
Power “On” Light (red): This light will illuminate when the unit is plugged into the 120V. wall outlet. This light will cycle on and off with the steam ready light.
CAUTION: Read the instructions for “Filling the Water Tank” before opening the Safety Cap.
CAUTION: Always unplug before filling. ALLOW UNIT TO
COOL FOR FIFTEEN (15) MINUTES BEFORE REFILLING.
IMPORTANT: Do NOT add cleaning solutions, scented perfumes, oils or any other chemicals to the boiler in this appliance. Use tap water or distilled/purified water if the tap water in your area is very hard.
Filling or Refilling Your Steam Cleaner With Water
IMPORTANT: Prior to filling or re-filling your steam cleaner, always vent residual steam pressure from boiler by depressing the steam switch while the unit is still plugged in. Allow the unit to cool for fifteen (15) minutes and insure that the unit is “UNPLUGGED” from the wall receptacle prior to initial filling or re-filling the water tank. Never attempt to fill this unit under a water tap, always use the filling funnel provided.
Step 1: Before refilling the steam cleaner, make sure that the unit is NOT plugged in and has been allowed to cool for fifteen (15) minutes.
Step 2: Plug the power cord in to an electrical outlet and press the steam switch on the hand grip to the “ON” position to vent of any residual steam that is in the boiler.
Step 3: Remove the power cord from the electrical outlet and turn the steam switch on the hand grip to the “OFF” position.
Step 4: Place the unit on a flat, stable surface. Slowly turn the safety filler cap counter clockwise until it is removed.
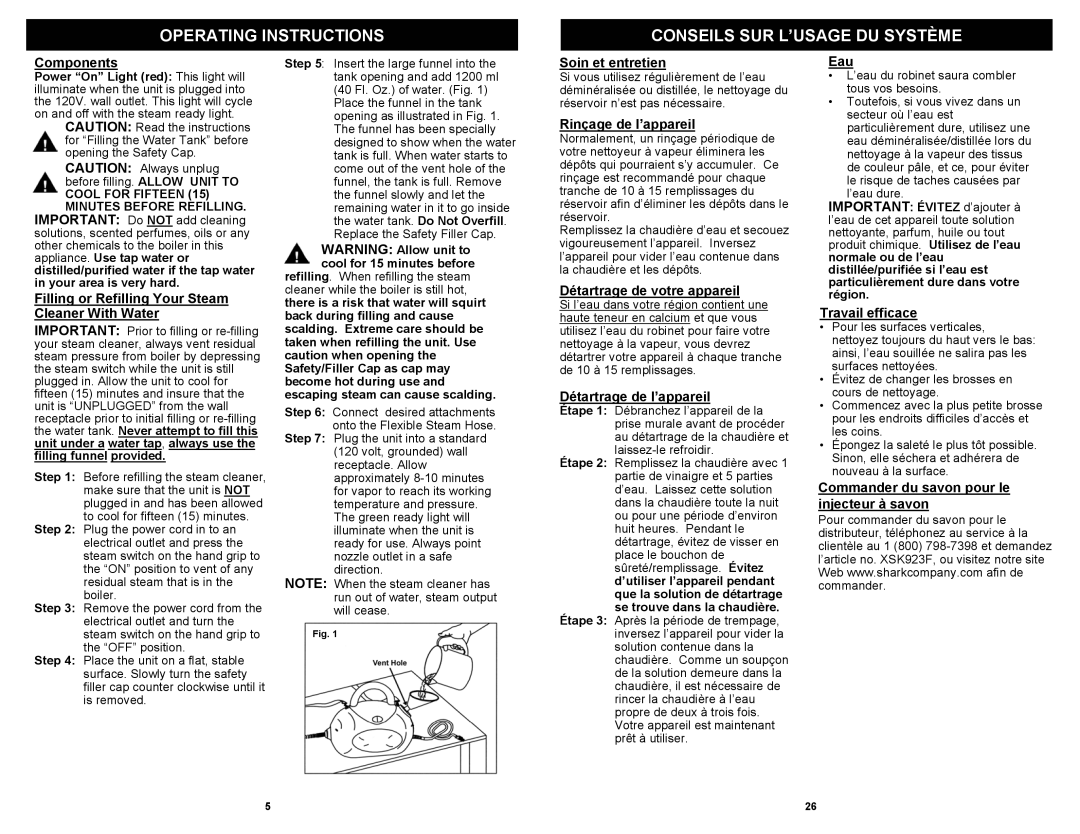
Step 5: Insert the large funnel into the tank opening and add 1200 ml (40 Fl. Oz.) of water. (Fig. 1)
Place the funnel in the tank opening as illustrated in Fig. 1. The funnel has been specially designed to show when the water tank is full. When water starts to come out of the vent hole of the funnel, the tank is full. Remove the funnel slowly and let the remaining water in it to go inside the water tank. Do Not Overfill. Replace the Safety Filler Cap.
WARNING: Allow unit to cool for 15 minutes before refilling. When refilling the steam
cleaner while the boiler is still hot,
there is a risk that water will squirt back during filling and cause scalding. Extreme care should be taken when refilling the unit. Use caution when opening the Safety/Filler Cap as cap may become hot during use and escaping steam can cause scalding.
Step 6: Connect desired attachments onto the Flexible Steam Hose.
Step 7: Plug the unit into a standard (120 volt, grounded) wall receptacle. Allow approximately 8-10 minutes for vapor to reach its working temperature and pressure. The green ready light will illuminate when the unit is ready for use. Always point nozzle outlet in a safe direction.
NOTE: When the steam cleaner has run out of water, steam output will cease.
Fig. 1
Soin et entretien
Si vous utilisez régulièrement de l’eau déminéralisée ou distillée, le nettoyage du réservoir n’est pas nécessaire.
Rinçage de l’appareil
Normalement, un rinçage périodique de votre nettoyeur à vapeur éliminera les dépôts qui pourraient s’y accumuler. Ce rinçage est recommandé pour chaque tranche de 10 à 15 remplissages du réservoir afin d’éliminer les dépôts dans le réservoir.
Remplissez la chaudière d’eau et secouez vigoureusement l’appareil. Inversez l’appareil pour vider l’eau contenue dans la chaudière et les dépôts.
Détartrage de votre appareil
Si l’eau dans votre région contient une haute teneur en calcium et que vous utilisez l’eau du robinet pour faire votre nettoyage à la vapeur, vous devrez détartrer votre appareil à chaque tranche de 10 à 15 remplissages.
Détartrage de l’appareil
Étape 1: Débranchez l’appareil de la prise murale avant de procéder au détartrage de la chaudière et laissez-le refroidir.
Étape 2: Remplissez la chaudière avec 1 partie de vinaigre et 5 parties d’eau. Laissez cette solution dans la chaudière toute la nuit ou pour une période d’environ huit heures. Pendant le détartrage, évitez de visser en place le bouchon de sûreté/remplissage. Évitez d’utiliser l’appareil pendant que la solution de détartrage se trouve dans la chaudière.
Étape 3: Après la période de trempage, inversez l’appareil pour vider la solution contenue dans la chaudière. Comme un soupçon de la solution demeure dans la chaudière, il est nécessaire de rincer la chaudière à l’eau propre de deux à trois fois. Votre appareil est maintenant prêt à utiliser.
Eau
•L’eau du robinet saura combler tous vos besoins.
•Toutefois, si vous vivez dans un secteur où l’eau est particulièrement dure, utilisez une eau déminéralisée/distillée lors du nettoyage à la vapeur des tissus de couleur pâle, et ce, pour éviter le risque de taches causées par l’eau dure.
IMPORTANT: ÉVITEZ d’ajouter à l’eau de cet appareil toute solution nettoyante, parfum, huile ou tout produit chimique. Utilisez de l’eau normale ou de l’eau distillée/purifiée si l’eau est particulièrement dure dans votre région.
Travail efficace
•Pour les surfaces verticales, nettoyez toujours du haut vers le bas: ainsi, l’eau souillée ne salira pas les surfaces nettoyées.
•Évitez de changer les brosses en cours de nettoyage.
•Commencez avec la plus petite brosse pour les endroits difficiles d’accès et les coins.
•Épongez la saleté le plus tôt possible. Sinon, elle séchera et adhérera de nouveau à la surface.
Commander du savon pour le injecteur à savon
Pour commander du savon pour le distributeur, téléphonez au service à la clientèle au 1 (800) 798-7398 et demandez l’article no. XSK923F, ou visitez notre site Web www.sharkcompany.com afin de commander.