OPERATING INSTRUCTIONS cont.
OPERATING INSTRUCTIONS cont.
ATTACHMENTS
Concentrator Nozzle
Window Squeegee
CAUTION: When cleaning windows,
Using the Steam Cleaner with | Attaching a Towel to the |
Floor Brush | Floor Brush |
To attach the concentrator nozzle to the nozzle of the unit, align the "U" arrow on the concentrator nozzle with the arrow on the appliance. (See illustration.) Push the attachment onto the nozzle until it stops against the appliance body. Turn in a clockwise direction approximately 90°. The attachment is now locked into position.
Angle Concentrator Attachment
This attachment can only be used with either the unit concentrator nozzle or the hose concentrator nozzle. To attach, push the attachment onto the end of the concentrator nozzle. (See below)
always avoid any sudden changes in temperature to prevent glass breakage or cracks.
Please note that the window squeegee can only be used with the
hose. To attach the window squeegee to the hose, push it in until the squeegee locking button clicks in place on the hose.
Apply steam abundantly,
rub with the soft spongy end, then remove excess water and dirt with the glass wiping edge.
This attachment is very useful for cleaning large windows, plastic material, ceramic, tiled or marble surfaces.
Attaching the Hose
To attach the hose to the nozzle of the unit, align the "U" arrow on the concentrator nozzle with the arrow on the appliance. (See illustration.) Push the hose onto the nozzle until it stops against the appliance body. Turn in a clockwise direction approximately 90°. The hose is now locked into position.
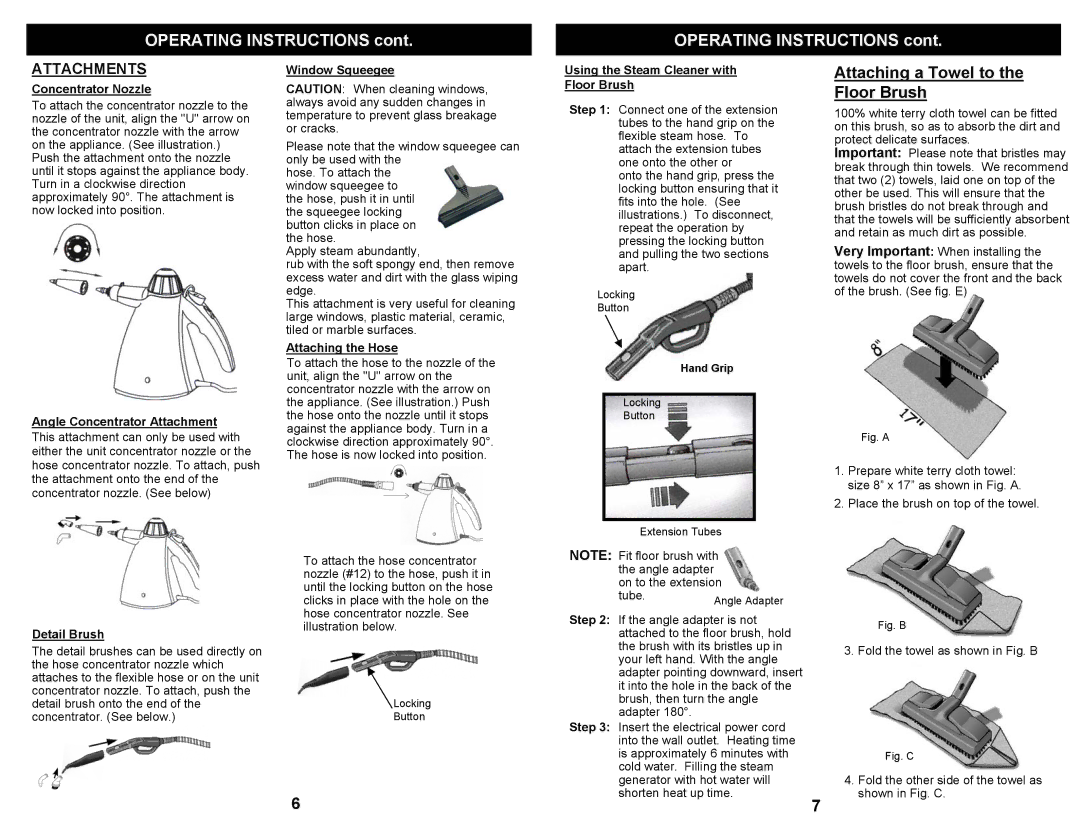
Step 1: Connect one of the extension tubes to the hand grip on the flexible steam hose. To attach the extension tubes one onto the other or
onto the hand grip, press the locking button ensuring that it fits into the hole. (See illustrations.) To disconnect, repeat the operation by pressing the locking button and pulling the two sections apart.
Locking
Button
Hand Grip
Locking
Button
100% white terry cloth towel can be fitted on this brush, so as to absorb the dirt and protect delicate surfaces.
Important: Please note that bristles may break through thin towels. We recommend that two (2) towels, laid one on top of the other be used. This will ensure that the brush bristles do not break through and that the towels will be sufficiently absorbent and retain as much dirt as possible.
Very Important: When installing the towels to the floor brush, ensure that the towels do not cover the front and the back of the brush. (See fig. E)
Fig. A
1.Prepare white terry cloth towel: size 8” x 17” as shown in Fig. A.
2.Place the brush on top of the towel.
Detail Brush
The detail brushes can be used directly on the hose concentrator nozzle which attaches to the flexible hose or on the unit concentrator nozzle. To attach, push the detail brush onto the end of the concentrator. (See below.)
To attach the hose concentrator nozzle (#12) to the hose, push it in until the locking button on the hose clicks in place with the hole on the hose concentrator nozzle. See illustration below.
Locking
Button
Extension Tubes
NOTE: Fit floor brush with
the angle adapter |
|
| |
on to the extension |
| ||
tube. | Angle Adapter |
| |
|
| ||
Step 2: If the angle adapter is not | Fig. B | ||
attached to the floor brush, hold | |||
| |||
the brush with its bristles up in | 3. Fold the towel as shown in Fig. B | ||
your left hand. With the angle | |||
| |||
adapter pointing downward, insert |
| ||
it into the hole in the back of the |
| ||
brush, then turn the angle |
| ||
adapter 180°. |
|
| |
Step 3: Insert the electrical power cord |
| ||
into the wall outlet. Heating time |
| ||
is approximately 6 minutes with | Fig. C | ||
cold water. Filling the steam |
| ||
generator with hot water will | 4. Fold the other side of the towel as | ||
shorten heat up time. | shown in Fig. C. | ||
6
7 |