OPERATING INSTRUCTIONS

8.Slip the belt over the brush bar cap.

9.Insert the brush bar into the slot. (Fig. 14)

10.Insert the gear box tabs into the tab slots and push down until it clicks into place.

11.To replace the squeegee, follow instructions above for removing the gear box and slide the squeegee out from left to right. (Fig. 16)

Fig. 15

Changing the Belt

If you find that the belt has broken and it needs replacing:

1.Remove the brush cover. (Fig. 11)

2.Push in on the locking tab of the gear box and lift gear box to remove. (Fig. 12 & 13)

3.Push in on the locking tab of the belt access panel and lift off to remove. (Fig. 17)

Belt Access Panel

Fig. 16

4.

Using a pair of tweezers, remove any leftover bits of the belt that might still be

5.

there.

Pull the brush bar out of the bushing. (Fig. 14)

6.

Using a new belt, insert it into the opening until it is in all the way.

7.

Using a pair of tweezers, insert them into the belt access panel and lift the new belt

OPERATING INSTRUCTIONS

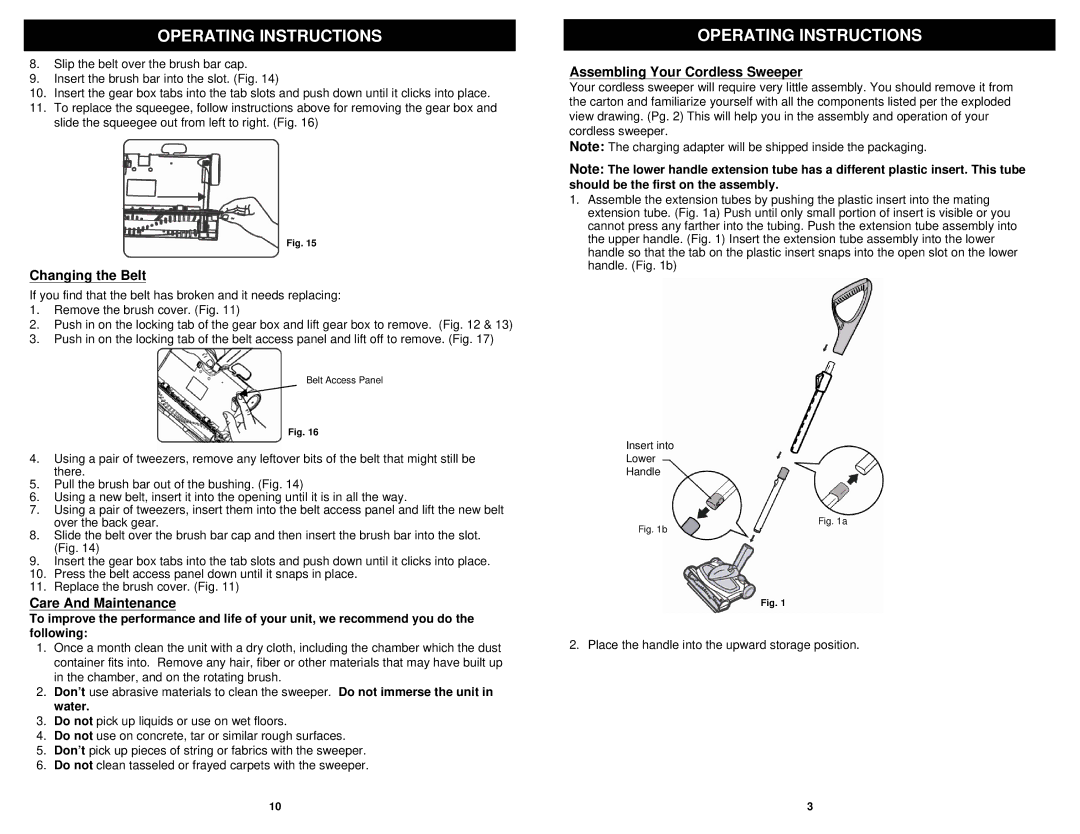
Assembling Your Cordless Sweeper

Your cordless sweeper will require very little assembly. You should remove it from the carton and familiarize yourself with all the components listed per the exploded view drawing. (Pg. 2) This will help you in the assembly and operation of your cordless sweeper.

Note: The charging adapter will be shipped inside the packaging.

Note: The lower handle extension tube has a different plastic insert. This tube should be the first on the assembly.

1.Assemble the extension tubes by pushing the plastic insert into the mating extension tube. (Fig. 1a) Push until only small portion of insert is visible or you cannot press any farther into the tubing. Push the extension tube assembly into the upper handle. (Fig. 1) Insert the extension tube assembly into the lower handle so that the tab on the plastic insert snaps into the open slot on the lower handle. (Fig. 1b)

Insert into

Lower

Handle

8.

over the back gear.

Slide the belt over the brush bar cap and then insert the brush bar into the slot.

9.

(Fig. 14)

Insert the gear box tabs into the tab slots and push down until it clicks into place.

10.

Press the belt access panel down until it snaps in place.

11.

Replace the brush cover. (Fig. 11)

Fig. 1b

Fig. 1a

Care And Maintenance

To improve the performance and life of your unit, we recommend you do the following:

1.Once a month clean the unit with a dry cloth, including the chamber which the dust container fits into. Remove any hair, fiber or other materials that may have built up in the chamber, and on the rotating brush.

2.Don’t use abrasive materials to clean the sweeper. Do not immerse the unit in water.

3.Do not pick up liquids or use on wet floors.

4.Do not use on concrete, tar or similar rough surfaces.

5.Don’t pick up pieces of string or fabrics with the sweeper.

6.Do not clean tasseled or frayed carpets with the sweeper.

10

Fig. 1

2. Place the handle into the upward storage position.

3

Page 5
Image 5
Shark V1917 owner manual Changing the Belt, Assembling Your Cordless Sweeper, Care And Maintenance

V1917 specifications

The Shark V1917 is a premium vacuum cleaner that has gained recognition for its advanced features and exceptional performance. As part of the Shark lineup, this model is designed to cater to the needs of modern households, providing powerful cleaning capabilities with user-friendly functionalities.

One of the standout features of the Shark V1917 is its impressive suction power. Equipped with a high-efficiency motor, it ensures effective dirt removal from carpets and hard floors alike. The vacuum is designed with a dual-brush roll system, which combines a soft brush roll for capturing large debris and a stiff brush roll for deep cleaning embedded dirt, offering a comprehensive solution for various floor types.

The model also incorporates advanced technology in its filtration system. The Shark V1917 is equipped with a HEPA filter, which is crucial for trapping allergens and dust particles, making it an excellent choice for allergy sufferers. This feature ensures that the air released back into the home is cleaner and healthier.

In addition to its powerful suction and filtration, the Shark V1917 showcases a lightweight and ergonomic design. Weighing significantly less than competing models, it allows for easy maneuverability around furniture and up and down stairs without the fatigue typically associated with heavier vacuums. The vacuum also features a swivel steering mechanism, enhancing its ability to navigate tight spaces with ease.

A notable characteristic of the Shark V1917 is its versatility. It comes with various attachments, including a crevice tool and a pet tool, which allows users to clean upholstery, stairs, and tight corners effectively. The vacuum’s detachable canister enables seamless transitions from floor cleaning to above-floor surfaces, further expanding its usability.

The Shark V1917 also emphasizes convenience with its easy-to-empty dust cup, which minimizes the mess often associated with traditional bagged vacuums. Furthermore, the power cord offers an extended reach, reducing the frequency of outlet changes during cleaning sessions.

In summary, the Shark V1917 stands out in the competitive vacuum cleaner market due to its powerful performance, advanced filtration technology, lightweight design, and versatile attachments. These features make it a reliable choice for households seeking an efficient cleaning solution tailored to their needs. With its combination of technology and practicality, the Shark V1917 is designed to deliver exceptional cleaning results while enhancing the user experience.