RECORDING

When recording important selections, be sure to make a preliminary test to ensure that the desired material is being properly recorded.

The volume and sound quality can be adjusted with no effect on the recorded signal. (Variable Sound Monitor)

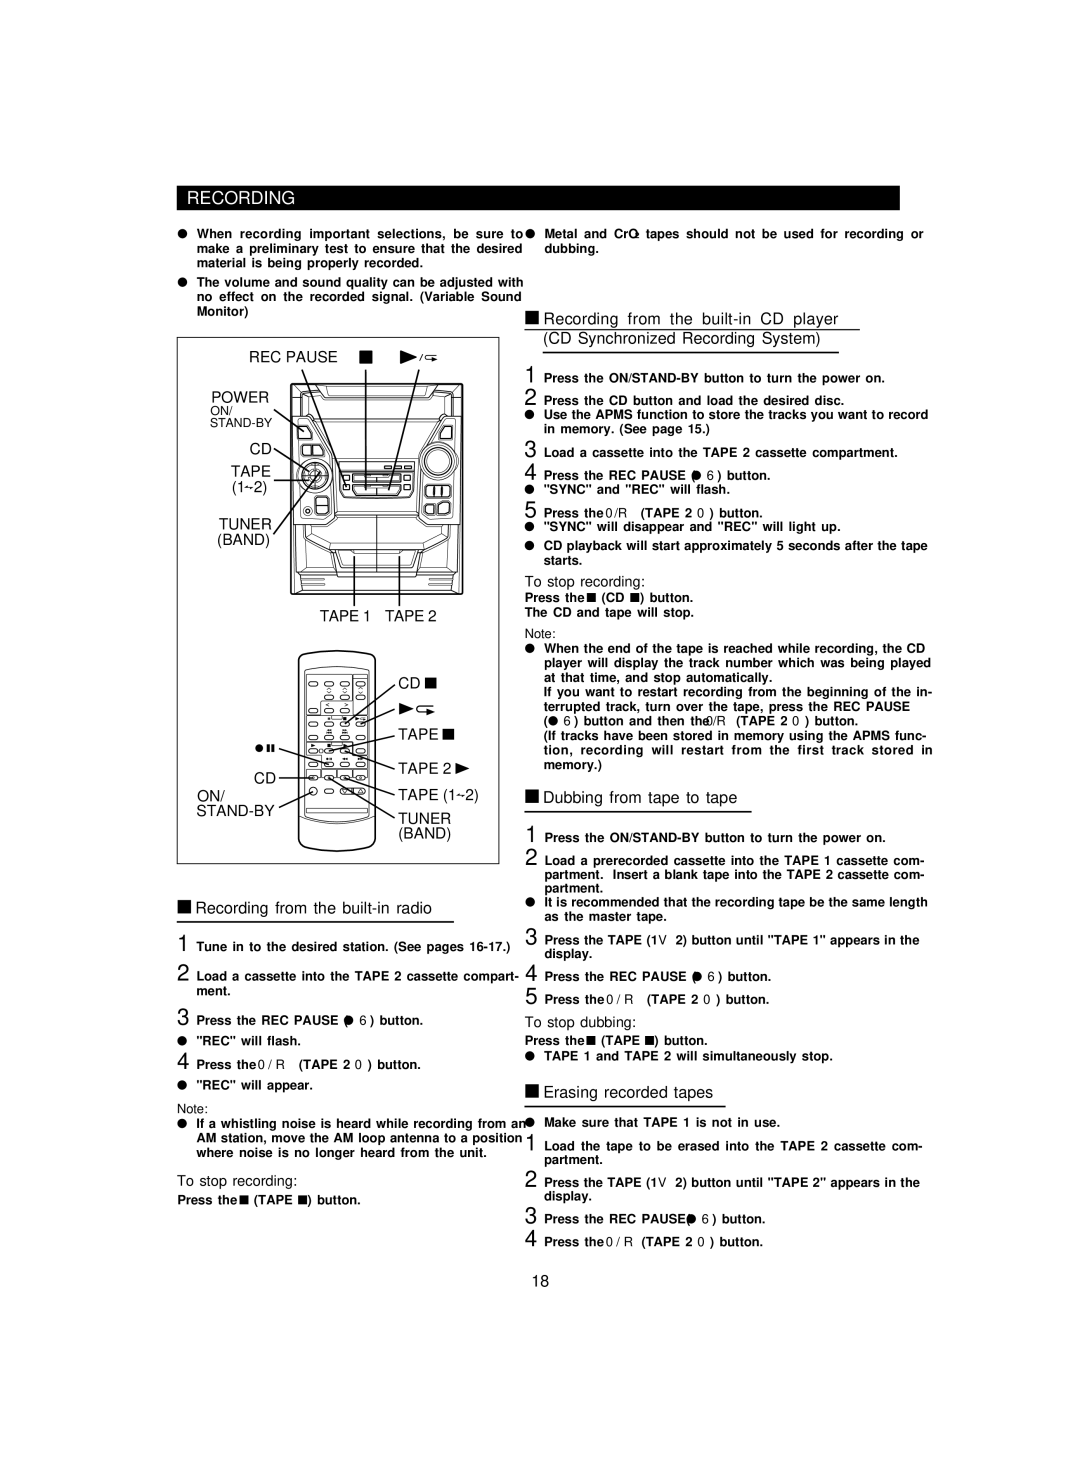
REC PAUSE

POWER

ON/

STAND-BY

CD

TAPE (1 2)

TUNER (BAND)

TAPE 1

TAPE 2


CD


TAPE

CD

TAPE 2

TAPE (1 2)

ON/

STAND-BY

TUNER


(BAND)

Recording from the built-in radio

1 Tune in to the desired station. (See pages 16-17.)

2 Load a cassette into the TAPE 2 cassette compart- ment.

3 Press the REC PAUSE (● 6) button.

"REC" will flash.

4 Press the 0 / R (TAPE 2 0) button.

"REC" will appear.

Note:

If a whistling noise is heard while recording from an AM station, move the AM loop antenna to a position where noise is no longer heard from the unit.

To stop recording:

Press the ■ (TAPE ■) button.

Metal and CrO2 tapes should not be used for recording or dubbing.

Recording from the built-in CD player (CD Synchronized Recording System)

1 Press the ON/STAND-BY button to turn the power on. 2 Press the CD button and load the desired disc.

Use the APMS function to store the tracks you want to record in memory. (See page 15.)

3 Load a cassette into the TAPE 2 cassette compartment. 4 Press the REC PAUSE (● 6) button.

"SYNC" and "REC" will flash.

5 Press the 0 /R (TAPE 2 0) button.

"SYNC" will disappear and "REC" will light up.

CD playback will start approximately 5 seconds after the tape starts.

To stop recording:

Press the ■ (CD ■) button.

The CD and tape will stop.

Note:

When the end of the tape is reached while recording, the CD player will display the track number which was being played at that time, and stop automatically.

If you want to restart recording from the beginning of the in- terrupted track, turn over the tape, press the REC PAUSE (● 6) button and then the 0/R (TAPE 2 0) button.

(If tracks have been stored in memory using the APMS func- tion, recording will restart from the first track stored in memory.)

Dubbing from tape to tape

1 Press the ON/STAND-BY button to turn the power on.

2 Load a prerecorded cassette into the TAPE 1 cassette com- partment. Insert a blank tape into the TAPE 2 cassette com- partment.

It is recommended that the recording tape be the same length as the master tape.

3 Press the TAPE (1 V 2) button until "TAPE 1" appears in the display.

4 Press the REC PAUSE (● 6) button.

5 Press the 0 / R (TAPE 2 0) button.

To stop dubbing:

Press the ■ (TAPE ■) button.

TAPE 1 and TAPE 2 will simultaneously stop.

Erasing recorded tapes

Make sure that TAPE 1 is not in use.

1 Load the tape to be erased into the TAPE 2 cassette com- partment.

2 Press the TAPE (1 V 2) button until "TAPE 2" appears in the display.

3 Press the REC PAUSE(● 6) button.

4 Press the 0 / R(TAPE 2 0) button.

18

Page 19
Image 19
Sharp CDPC3500 Tape 1, Recording from the built-in radio, Dubbing from tape to tape, Erasing recorded tapes

CDPC3500 specifications

The Sharp CDPC3500 is a compact, high-performance CD player designed to deliver an exceptional audio experience for music enthusiasts. This player exemplifies Sharp's commitment to quality and innovative technology, making it an ideal choice for both casual listeners and audiophiles.

One of the standout features of the CDPC3500 is its advanced digital-to-analog converter (DAC). This technology ensures that the sound produced is of superior quality, faithfully reproducing the original recording. The DAC reduces distortion and enhances the clarity of the audio, allowing users to experience their favorite tracks with increased detail and depth.

The design of the Sharp CDPC3500 is both sleek and functional. It boasts a user-friendly interface with easy-to-navigate controls. The front panel features a bright LCD display that provides clear song information, track numbers, and playback status, enhancing usability during operation. The compact size of the player makes it an excellent fit for various settings, whether on a desk, shelf, or as part of a home audio system.

In terms of playback capabilities, the CDPC3500 supports a wide range of disc types. It easily plays standard audio CDs, CD-Rs, and CD-RWs, giving users flexibility in their music choices. The player also features a programmable memory function that allows listeners to create custom playlists, ensuring a personalized listening experience.

Moreover, the Sharp CDPC3500 incorporates anti-shock technology that minimizes skips and interruptions during playback. This feature is particularly beneficial for those who enjoy moving around while listening to music, as it ensures uninterrupted playback even in dynamic environments.

The player is designed to deliver rich and powerful sound through its dedicated audio output options. It includes both analog and digital outputs, allowing for seamless integration with various audio systems. This versatility makes it an excellent addition to any home theater setup or music collection.

In summary, the Sharp CDPC3500 combines cutting-edge audio technologies with elegant design and user-friendly features. Its high-quality DAC, compatibility with multiple disc formats, and anti-shock capabilities make it a reliable choice for anyone seeking an exceptional listening experience. Whether used solo or as part of a more extensive sound system, the CDPC3500 delivers performance that stands out in today's market.