®
ELECTRONIC PRINTING CALCULATOR
CALCULATRICE IMPRIMANTE ÉLECTRONIQUE
CALCULADORA IMPRESORA ELECTRÓNICA |
|
|
OPERATION MANUAL
MODE D’EMPLOI
MANUAL DE MANEJO
In U.S.A.:
WARNING – FCC Regulations state that any unauthorized changes or modifications to this equipment not expressly approved by the manufacturer could void the user’s authority to operate this equipment.
Note: This equipment has been tested and found to comply with the limits for a Class B digital device, pursuant to Part 15 of the FCC Rules. These limits are designed to provide reasonable protection against harmful interference in a residential installation. This equipment generates, uses, and can radiate radio frequency energy and, if not installed and used in accordance with the instructions, may cause harmful interference to radio communications. However, there is no guarantee that interference will not occur in a particular installation. If this equipment does cause harmful interference to radio or television reception, which can be determined by turning the equipment off and on, the user is encouraged to try to correct the interference by one or more of the following measures:
–Reorient or relocate the receiving antenna.
–Increase the separation between the equipment and receiver.
–Connect the equipment into an outlet on a circuit different from that to which the receiver is connected.
–Consult the dealer or an experienced radio/TV technician for help.
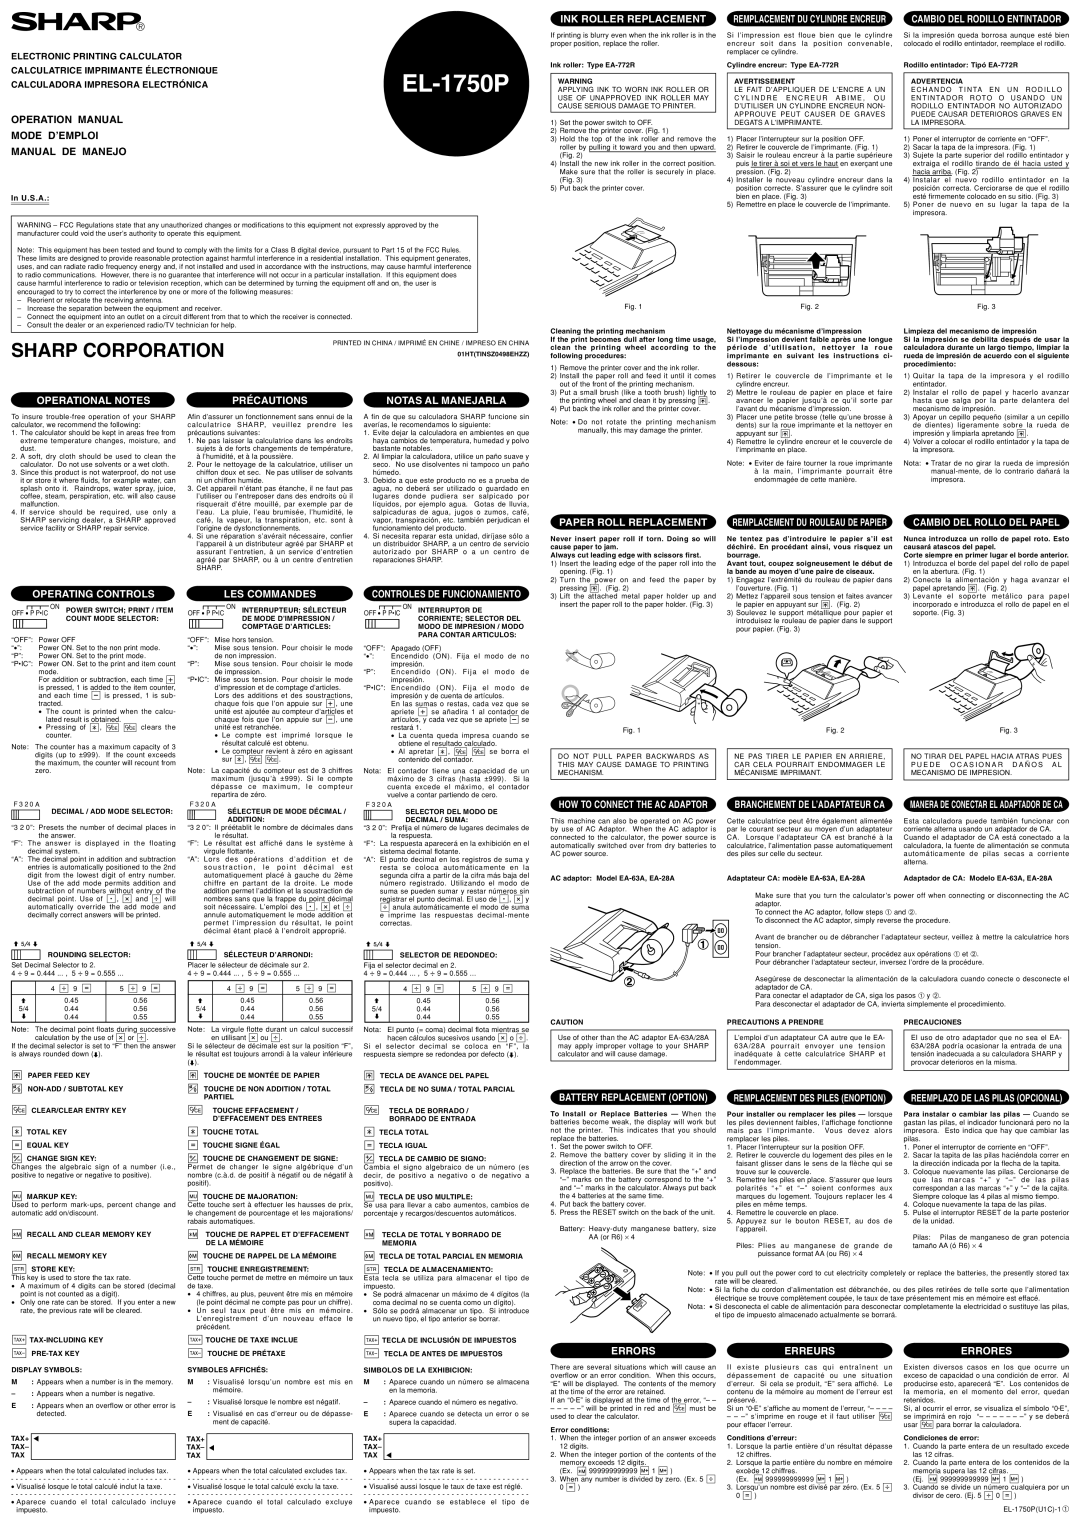
INK ROLLER REPLACEMENT
If printing is blurry even when the ink roller is in the proper position, replace the roller.
Ink roller: Type EA-772R
WARNING
APPLYING INK TO WORN INK ROLLER OR USE OF UNAPPROVED INK ROLLER MAY CAUSE SERIOUS DAMAGE TO PRINTER.
1)Set the power switch to OFF.
2)Remove the printer cover. (Fig. 1)
3)Hold the top of the ink roller and remove the roller by pulling it toward you and then upward. (Fig. 2)
4)Install the new ink roller in the correct position. Make sure that the roller is securely in place. (Fig. 3)
5)Put back the printer cover.
Fig. 1
REMPLACEMENT DU CYLINDRE ENCREUR
Si l’impression est floue bien que le cylindre encreur soit dans la position convenable, remplacer ce cylindre.
Cylindre encreur: Type
AVERTISSEMENT
LE FAIT D’APPLIQUER DE L’ENCRE A UN C Y L I N D R E E N C R E U R A B I M E , O U D’UTILISER UN CYLINDRE ENCREUR NON- APPROUVE PEUT CAUSER DE GRAVES DEGATS A L’IMPRIMANTE.
1)Placer l’interrupteur sur la position OFF.
2)Retirer le couvercle de l’imprimante. (Fig. 1)
3)Saisir le rouleau encreur à la partie supérieure puis le tirer à soi et vers le haut en exerçant une pression. (Fig. 2)
4)Installer le nouveau cylindre encreur dans la position correcte. S’assurer que le cylindre soit bien en place. (Fig. 3)
5)Remettre en place le couvercle de l’imprimante.
Fig. 2
CAMBIO DEL RODILLO ENTINTADOR
Si la impresión queda borrosa aunque esté bien colocado el rodillo entintador, reemplace el rodillo.
Rodillo entintador: Tipó
ADVERTENCIA
E C H A N D O T I N TA E N U N R O D I L L O E N T I N TA D O R R O TO O U S A N D O U N RODILLO ENTINTADOR NO AUTORIZADO PUEDE CAUSAR DETERIOROS GRAVES EN LA IMPRESORA.
1)Poner el interruptor de corriente en “OFF”.
2)Sacar la tapa de la impresora. (Fig. 1)
3)Sujete la parte superior del rodillo entintador y extraiga el rodillo tirando de él hacia usted y hacia arriba. (Fig. 2)
4)Instalar el nuevo rodillo entintador en la posición correcta. Cerciorarse de que el rodillo esté firmemente colocado en su sitio. (Fig. 3)
5)Poner de nuevo en su lugar la tapa de la impresora.
Fig. 3
SHARP CORPORATION | PRINTED IN CHINA / IMPRIMÉ EN CHINE / IMPRESO EN CHINA | ||||
| 01HT(TINSZ0498EHZZ) | ||||
| OPERATIONAL NOTES | PRÉCAUTIONS |
| NOTAS AL MANEJARLA | |
To insure | Afin d’assurer un fonctionnement sans ennui de la | A fin de que su calculadora SHARP funcione sin | |||
calculator, we recommend the following: | calculatrice SHARP, veuillez prendre les | averías, le recomendamos lo siguiente: | |||
1. | The calculator should be kept in areas free from | précautions suivantes: |
| 1. Evite dejar la calculadora en ambientes en que | |
| extreme temperature changes, moisture, and | 1. Ne pas laisser la calculatrice dans les endroits | haya cambios de temperatura, humedad y polvo | ||
| dust. | sujets à de forts changements de température, | bastante notables. |
| |
2. | A soft, dry cloth should be used to clean the | à l’humidité, et à la poussière. |
| 2. Al limpiar la calculadora, utilice un paño suave y | |
| calculator. Do not use solvents or a wet cloth. | 2. Pour le nettoyage de la calculatrice, utiliser un | seco. No use disolventes ni tampoco un paño | ||
3. | Since this product is not waterproof, do not use | chiffon doux et sec. Ne pas utiliser de solvants | húmedo. |
| |
| it or store it where fluids, for example water, can | ni un chiffon humide. |
| 3. Debido a que este producto no es a prueba de | |
| splash onto it. Raindrops, water spray, juice, | 3. Cet appareil n’étant pas étanche, il ne faut pas | agua, no deberá ser utilizado o guardado en | ||
| coffee, steam, perspiration, etc. will also cause | l’utiliser ou l’entreposer dans des endroits où il | lugares donde pudiera ser | salpicado por | |
| malfunction. | risquerait d’étre mouillé, par exemple par de | líquidos, por ejemplo agua. | Gotas de lluvia, | |
4. | If service should be required, use only a | l’eau. La pluie, l’eau brumisée, l’humidité, le | salpicaduras de agua, jugos o zumos, café, | ||
Cleaning the printing mechanism
If the print becomes dull after long time usage, clean the printing wheel according to the following procedures:
1)Remove the printer cover and the ink roller.
2)Install the paper roll and feed it until it comes out of the front of the printing mechanism.
3)Put a small brush (like a tooth brush) lightly to
the printing wheel and clean it by pressing ![]()
![]()
![]() .
.
4)Put back the ink roller and the printer cover.
Note: • Do not rotate the printing mechanism manually, this may damage the printer.
Nettoyage du mécanisme d’impression
Si l’impression devient faible après une longue période d’utilisation, nettoyer la roue imprimante en suivant les instructions ci- dessous:
1)Retirer le couvercle de l’imprimante et le cylindre encreur.
2)Mettre le rouleau de papier en place et faire avancer le papier jusqu’à ce qu’il sorte par l’avant du mécanisme d’impression.
3)Placer une petite brosse (telle qu’une brosse à
dents) sur la roue imprimante et la nettoyer en
appuyant sur ![]()
![]()
![]() .
.
4)Remettre le cylindre encreur et le couvercle de l’imprimante en place.
Note: • Eviter de faire tourner la roue imprimante
àla main, l’imprimante pourrait être endommagée de cette manière.
Limpieza del mecanismo de impresión
Si la impresión se debilita después de usar la calculadora durante un largo tiempo, limpiar la rueda de impresión de acuerdo con el siguiente procedimiento:
1)Quitar la tapa de la impresora y el rodillo entintador.
2)Instalar el rollo de papel y hacerlo avanzar hasta que salga por la parte delantera del mecanismo de impresión.
3)Apoyar un cepillo pequeño (similar a un cepillo
de dientes) ligeramente sobre la rueda de
impresión y limpiarla apretando ![]()
![]()
![]() .
.
4)Volver a colocar el rodillo entintador y la tapa de la impresora.
Nota: • Tratar de no girar la rueda de impresión
SHARP servicing dealer, a SHARP approved | café, la vapeur, la transpiration, etc. sont à | vapor, transpiración, etc. también perjudican el |
service facility or SHARP repair service. | l’origine de dysfonctionnements. | funcionamiento del producto. |
| 4. Si une réparation s’avérait nécessaire, confier | 4. Si necesita reparar esta unidad, diríjase sólo a |
| l’appareil à un distributeur agréé par SHARP et | un distribuidor SHARP, a un centro de servicio |
| assurant l’entretien, à un service d’entretien | autorizado por SHARP o a un centro de |
| agréé par SHARP, ou à un centre d’entretien | reparaciones SHARP. |
| SHARP. |
|
| PAPER ROLL REPLACEMENT | REMPLACEMENT DU ROULEAU DE PAPIER |
| CAMBIO DEL ROLLO DEL PAPEL | ||||
Never insert paper roll if torn. Doing so will | Ne tentez pas d’introduire le papier s’il est | Nunca introduzca un rollo de papel roto. Esto | ||||||
cause paper to jam. | déchiré. En procédant ainsi, vous risquez un | causará atascos del papel. | ||||||
Always cut leading edge with scissors first. | bourrage. | Corte siempre en primer lugar el borde anterior. | ||||||
1) | Insert the leading edge of the paper roll into the | Avant tout, coupez soigneusement le début de | 1) | Introduzca el borde del papel del rollo de papel | ||||
| opening. (Fig. 1) | la bande au moyen d’une paire de ciseaux. |
| en la abertura. (Fig. 1) | ||||
2) | Turn the power on and feed the paper by | 1) Engagez l’extrémité du rouleau de papier dans | 2) | Conecte la alimentación y haga avanzar el | ||||
| pressing |
| . (Fig. 2) | l’ouverture. (Fig. 1) |
| papel apretando |
| . (Fig. 2) |
OPERATING CONTROLS
OFF • P P•IC ON POWER SWITCH; PRINT / ITEM
COUNT MODE SELECTOR:
“OFF”: Power OFF
“•”: Power ON. Set to the non print mode.
“P”: Power ON. Set to the print mode.
“P•IC”: Power ON. Set to the print and item count mode.
For addition or subtraction, each time
is pressed, 1 is added to the item counter,
and each time | is pressed, 1 is sub- |
tracted. |
|
•The count is printed when the calcu- lated result is obtained.
•Pressing of ![]()
![]()
![]() ,
, ![]()
![]()
![]()
![]()
![]()
![]()
![]()
![]() clears the counter.
clears the counter.
Note: The counter has a maximum capacity of 3 digits (up to ±999). If the count exceeds the maximum, the counter will recount from zero.
F 3 2 0 A
DECIMAL / ADD MODE SELECTOR:
“3 2 0”: Presets the number of decimal places in the answer.
“F”: The answer is displayed in the floating decimal system.
“A”: The decimal point in addition and subtraction entries is automatically positioned to the 2nd digit from the lowest digit of entry number. Use of the add mode permits addition and subtraction of numbers without entry of the
LES COMMANDES
| ON INTERRUPTEUR; SÉLECTEUR |
OFF • P P•IC | |
| DE MODE D’IMPRESSION / |
| COMPTAGE D’ARTICLES: |
“OFF”: Mise hors tension. | |
“•”: | Mise sous tension. Pour choisir le mode |
| de non impression. |
“P”: | Mise sous tension. Pour choisir le mode |
| de impression. |
“P•IC”: Mise sous tension. Pour choisir le mode d’impression et de comptage d’articles. Lors des additions et des soustractions,
chaque fois que l’on appuie sur | , une |
unité est ajoutée au compteur d’articles et
chaque fois que l’on appuie sur | , une |
unité est retranchée. |
|
•Le compte est imprimé lorsque le résultat calculé est obtenu.
•Le compteur revient à zéro en agissant
sur ![]()
![]()
![]() ,
, ![]()
![]()
![]()
![]()
![]()
![]()
![]()
![]() .
.
Note: La capacité du compteur est de 3 chiffres maximum (jusqu’à ±999). Si le compte d é passe ce maximum, le compteur repartira de zéro.
F 3 2 0 A
SÉLECTEUR DE MODE DÉCIMAL /
ADDITION:
“3 2 0”: Il préétablit le nombre de décimales dans le résultat.
“F”: Le résultat est affiché dans le système à virgule flottante.
“A”: Lors des op érations d ’addition et de s o u s t r a c t i o n , l e p o i n t d é c i m a l e s t automatiquement placé à gauche du 2ème chiffre en partant de la droite. Le mode addition permet l’addition et la soustraction de
CONTROLES DE FUNCIONAMIENTO
ON | INTERRUPTOR DE |
OFF • P P•IC | CORRIENTE; SELECTOR DEL |
| |
| MODO DE IMPRESION / MODO |
| PARA CONTAR ARTICULOS: |
“OFF”: Apagado (OFF) |
| ||
“•”: | Encendido (ON). Fija el modo de no | ||
| impresión. |
|
|
“P”: | Encendido (ON) . Fija el modo de | ||
| impresión. |
|
|
“P•IC”: Encendido | (ON) . Fija el modo | de | |
| impresión y de cuenta de artículos. |
| |
| En las sumas o restas, cada vez que se | ||
| apriete | se añadira 1 al contador de | |
| artículos, y cada vez que se apriete | se | |
| restará 1. |
|
|
•La cuenta queda impresa cuando se obtiene el resultado calculado.
•Al apretar ![]()
![]()
![]() ,
, ![]()
![]()
![]()
![]()
![]()
![]()
![]()
![]() se borra el contenido del contador.
se borra el contenido del contador.
Nota: El contador tiene una capacidad de un máximo de 3 cifras (hasta ±999). Si la cuenta excede el máximo, el contador vuelve a contar partiendo de cero.
F 3 2 0 A
SELECTOR DEL MODO DE
DECIMAL / SUMA:
“3 2 0”: Prefija el número de lugares decimales de la respuesta.
“F”: La respuesta aparecerá en la exhibición en el sistema decimal flotante.
“A”: El punto decimal en los registros de suma y resta se coloca automáticamente en la segunda cifra a partir de la cifra más baja del número registrado. Utilizando el modo de suma se pueden sumar y restar números sin
3) Lift the attached metal paper holder up and 2) | Mettez l’appareil sous tension et faites avancer | 3) Levante el soporte met álico para papel | |
insert the paper roll to the paper holder. (Fig. 3) | le papier en appuyant sur | . (Fig. 2) | incorporado e introduzca el rollo de papel en el |
3) | Soulevez le support métallique pour papier et | soporte. (Fig. 3) | |
| introduisez le rouleau de papier dans le support |
| |
| pour papier. (Fig. 3) |
|
|
Fig. 1 |
| Fig. 2 |
| Fig. 3 |
|
|
|
|
|
DO NOT PULL PAPER BACKWARDS AS |
| NE PAS TIRER LE PAPIER EN ARRIERE, |
| NO TIRAR DEL PAPEL HACIA ATRAS PUES |
THIS MAY CAUSE DAMAGE TO PRINTING |
| CAR CELA POURRAIT ENDOMMAGER LE |
| P U E D E O C A S I O N A R D A Ñ O S A L |
MECHANISM. |
| MÉCANISME IMPRIMANT. |
| MECANISMO DE IMPRESION. |
|
|
|
|
|
HOW TO CONNECT THE AC ADAPTOR | BRANCHEMENT DE L’ADAPTATEUR CA | MANERA DE CONECTAR EL ADAPTADOR DE CA |
This machine can also be operated on AC power | Cette calculatrice peut être également alimentée | Esta calculadora puede también funcionar con |
by use of AC Adaptor. When the AC adaptor is | par le courant secteur au moyen d’un adaptateur | corriente alterna usando un adaptador de CA. |
connected to the calculator, the power source is | CA. Lorsque l’adaptateur CA est branché à la | Cuando el adaptador de CA está conectado a la |
automatically switched over from dry batteries to | calculatrice, l’alimentation passe automatiquement | calculadora, la fuente de alimentación se conmuta |
AC power source. | des piles sur celle du secteur. | automáticamente de pilas secas a corriente |
|
| alterna. |
AC adaptor: Model | Adaptateur CA: modèle | Adaptador de CA: Modelo |
decimal point. Use of ![]()
![]()
![]() ,
, ![]()
![]()
![]() and
and ![]()
![]()
![]() will automatically override the add mode and decimally correct answers will be printed.
will automatically override the add mode and decimally correct answers will be printed.
ROUNDING SELECTOR:
Set Decimal Selector to 2.
4 ÷ 9 = 0.444 ... , 5 ÷ 9 = 0.555 ...
| 4 | 9 | 5 | 9 |
|
|
|
|
|
|
| 0.45 |
| 0.56 |
5/4 |
| 0.44 |
| 0.56 |
|
| 0.44 |
| 0.55 |
Note: The decimal point floats during successive
calculation by the use of ![]()
![]()
![]() or
or ![]()
![]()
![]() .
.
If the decimal selector is set to “F” then the answer is always rounded down (![]() ).
).
PAPER FEED KEY
NON-ADD / SUBTOTAL KEY
nombres sans que la frappe du point décimal
soit nécessaire. L’emploi des | , | et | ||||
annule automatiquement le mode addition et | ||||||
permet l’impression du résultat, le point | ||||||
décimal étant placé à l’endroit approprié. | ||||||
|
| SÉLECTEUR D’ARRONDI: |
| |||
|
|
| ||||
Placer le sélecteur de décimale sur 2. |
|
| ||||
4 ÷ 9 = 0.444 ... , 5 ÷ 9 = 0.555 ... |
|
| ||||
|
|
|
|
|
| |
| 4 | 9 | 5 | 9 |
| |
|
|
|
|
|
|
|
|
|
| 0.45 |
| 0.56 |
|
5/4 |
|
| 0.44 |
| 0.56 |
|
|
|
| 0.44 |
| 0.55 |
|
Note: La virgule flotte durant un calcul successif
en utilisant ![]()
![]()
![]() ou
ou ![]()
![]()
![]() .
.
Si le sélecteur de décimale est sur la position “F”, le résultat est toujours arrondi à la valeur inférieure (![]() ).
).
TOUCHE DE MONTÉE DE PAPIER
TOUCHE DE NON ADDITION / TOTAL
registrar el punto decimal. El uso de ![]()
![]()
![]() ,
, ![]()
![]()
![]() y
y ![]() anula automáticamente el modo de suma
anula automáticamente el modo de suma
eimprime las respuestas
SELECTOR DE REDONDEO:
Fija el selector decimal en 2.
4 ÷ 9 = 0.444 ... , 5 ÷ 9 = 0.555 ...
| 4 | 9 | 5 | 9 |
|
|
|
|
|
|
| 0.45 |
| 0.56 |
5/4 |
| 0.44 |
| 0.56 |
|
| 0.44 |
| 0.55 |
Nota: El punto (= coma) decimal flota mientras se
hacen cálculos sucesivos usando ![]()
![]()
![]() o
o ![]()
![]()
![]() . Si el selector decimal se coloca en “F”, la respuesta siempre se redondea por defecto (
. Si el selector decimal se coloca en “F”, la respuesta siempre se redondea por defecto (![]() ).
).
TECLA DE AVANCE DEL PAPEL
TECLA DE NO SUMA / TOTAL PARCIAL
CAUTION
Use of other than the AC adaptor
Make sure that you turn the calculator’s power off when connecting or disconnecting the AC adaptor.
To connect the AC adaptor, follow steps ➀ and ➁.
To disconnect the AC adaptor, simply reverse the procedure.
Avant de brancher ou de débrancher l’adaptateur secteur, veillez à mettre la calculatrice hors tension.
Pour brancher l’adaptateur secteur, procédez aux opérations ➀ et ➁. Pour débrancher l’adaptateur secteur, inversez l’ordre de la procédure.
Asegúrese de desconectar la alimentación de la calculadora cuando conecte o desconecte el adaptador de CA.
Para conectar el adaptador de CA, siga los pasos ➀ y ➁.
Para desconectar el adaptador de CA, invierta simplemente el procedimiento.
PRECAUTIONS A PRENDRE | PRECAUCIONES | |
|
|
|
L’emploi d’un adaptateur CA autre que le EA- |
| El uso de otro adaptador que no sea el EA- |
63A/28A pourrait envoyer une tension |
| 63A/28A podría ocasionar la entrada de una |
inadéquate à cette calculatrice SHARP et |
| tensión inadecuada a su calculadora SHARP y |
l’endommager. |
| provocar deterioros en la misma. |
|
|
|
|
|
|
CLEAR/CLEAR ENTRY KEY
TOTAL KEY
EQUAL KEY
CHANGE SIGN KEY:
Changes the algebraic sign of a number (i.e., positive to negative or negative to positive).
MARKUP KEY:
Used to perform
RECALL AND CLEAR MEMORY KEY
RECALL MEMORY KEY
STORE KEY:
This key is used to store the tax rate.
•A maximum of 4 digits can be stored (decimal point is not counted as a digit).
•Only one rate can be stored. If you enter a new rate, the previous rate will be cleared.


TAX-INCLUDING KEY
PRE-TAX KEY
DISPLAY SYMBOLS:
M: Appears when a number is in the memory.
–: Appears when a number is negative.
E: Appears when an overflow or other error is detected.
TAX+ | ▲ |
TAX– |
|
TAX |
|
•Appears when the total calculated includes tax.
- - - - - - - - - - - - - - - - - - - - - - - - - - - - - - - - - - - -
•Visualisé losque le total calculé inclut la taxe.
- - - - - - - - - - - - - - - - - - - - - - - - - - - - - - - - - - - -
• Aparece cuando el total calculado incluye impuesto.
PARTIEL
TOUCHE EFFACEMENT /
D’EFFACEMENT DES ENTREES
TOUCHE TOTAL
TOUCHE SIGNE ÉGAL
TOUCHE DE CHANGEMENT DE SIGNE:
Permet de changer le signe algébrique d’un nombre (c.à.d. de positif à négatif ou de négatif à positif).
TOUCHE DE MAJORATION:
Cette touche sert à effectuer les hausses de prix, le changement de pourcentage et les majorations/ rabais automatiques.
TOUCHE DE RAPPEL ET D’EFFACEMENT DE LA MÉMOIRE
TOUCHE DE RAPPEL DE LA MÉMOIRE
TOUCHE ENREGISTREMENT:
Cette touche permet de mettre en mémoire un taux de taxe.
•4 chiffres, au plus, peuvent être mis en mémoire (le point décimal ne compte pas pour un chiffre).
•Un seul taux peut être mis en mémoire. L’enregistrement d’un nouveau efface le précédent.


 TOUCHE DE TAXE INCLUE
TOUCHE DE PRÉTAXE
SYMBOLES AFFICHÉS:
M: Visualisé lorsqu’un nombre est mis en mémoire.
–: Visualisé lorsque le nombre est négatif.
E: Visualisé en cas d’erreur ou de dépasse- ment de capacité.
TAX+ |
|
TAX– | ▲ |
TAX |
|
•Appears when the total calculated excludes tax.
- - - - - - - - - - - - - - - - - - - - - - - - - - - - - - - - - - - -
•Visualisé losque le total calculé exclu la taxe.
- - - - - - - - - - - - - - - - - - - - - - - - - - - - - - - - - - - -
• Aparece cuando el total calculado excluye impuesto.
TECLA DE BORRADO /
BORRADO DE ENTRADA
TECLA TOTAL
TECLA IGUAL
TECLA DE CAMBIO DE SIGNO:
Cambia el signo algebraico de un número (es decir, de positivo a negativo o de negativo a positivo).
TECLA DE USO MULTIPLE:
Se usa para llevar a cabo aumentos, cambios de porcentaje y recargos/descuentos automáticos.
TECLA DE TOTAL Y BORRADO DE
MEMORIA
TECLA DE TOTAL PARCIAL EN MEMORIA
TECLA DE ALMACENAMIENTO:
Esta tecla se utiliza para almacenar el tipo de impuesto.
•Se podrá almacenar un máximo de 4 dígitos (la coma decimal no se cuenta como un dígito).
•Sólo se podrá almacenar un tipo. Si introduce un nuevo tipo, el tipo anterior se borrar.
![]()
![]()
![]()
![]() TECLA DE INCLUSIÓN DE IMPUESTOS
TECLA DE INCLUSIÓN DE IMPUESTOS
TECLA DE ANTES DE IMPUESTOS
SIMBOLOS DE LA EXHIBICION:
M: Aparece cuando un número se almacena en la memoria.
–: Aparece cuando el número es negativo.
E: Aparece cuando se detecta un error o se supera la capacidad.
TAX+ |
|
TAX– |
|
TAX | ▲ |
•Appears when the tax rate is set.
- - - - - - - - - - - - - - - - - - - - - - - - - - - - - - - - - - - -
•Visualisé aussi losque le taux de taxe est réglé.
- - - - - - - - - - - - - - - - - - - - - - - - - - - - - - - - - - - -
• Aparece cuando se establece el tipo de impuesto.
BATTERY REPLACEMENT (OPTION) | REMPLACEMENT DES PILES (ENOPTION) | REEMPLAZO DE LAS PILAS (OPCIONAL) | |
To Install or Replace Batteries — When the | Pour installer ou remplacer les piles — lorsque | Para instalar o cambiar las pilas — Cuando se | |
batteries become weak, the display will work but | les piles deviennent faibles, l’affichage fonctionne | gastan las pilas, el indicador funcionará pero no la | |
not the printer. This indicates that you should | mais pas l ’imprimante . Vous devez alors | impresora. | Esto indica que hay que cambiar las |
replace the batteries. | remplacer les piles. | pilas. |
|
1. Set the power switch to OFF. | 1. Placer l’interrupteur sur la position OFF. | 1. Poner el interruptor de corriente en “OFF”. | |
2. Remove the battery cover by sliding it in the | 2. Retirer le couvercle du logement des piles en le | 2. Sacar la tapita de las pilas haciéndola correr en | |
direction of the arrow on the cover. | faisant glisser dans le sens de la flèche qui se | la dirección indicada por la flecha de la tapita. | |
3. Replace the batteries. Be sure that the “+” and | trouve sur le couvercle. | 3. Coloque nuevamente las pilas. Cercionarse de | |
3. Remettre les piles en place. S’assurer que leurs | que las marcas “ + ” y “ – ” de las pilas | ||
and | polarités “+” et | correspondan a las marcas “+” y | |
the 4 batteries at the same time. | marques du logement. Toujours replacer les 4 | Siempre coloque las 4 pilas al mismo tiempo. | |
4. Put back the battery cover. | piles en même temps. | 4. Coloque nuevamente la tapa de las pilas. | |
5. Press the RESET switch on the back of the unit. | 4. Remettre le couvercle en place. | 5. Pulse el interruptor RESET de la parte posterior | |
Battery: | 5. Appuyez sur le bouton RESET, au dos de | de la unidad. | |
l’appareil. |
|
| |
AA (or R6) ⋅ 4 |
| Pilas: | Pilas de manganeso de gran potencia |
| Piles: Plies au manganese de grande de | tamaño AA (ó R6) ⋅ 4 | |
| puissance format AA (ou R6) ⋅ 4 |
|
|
Note: • If you pull out the power cord to cut electricity completely or replace the batteries, the presently stored tax | |||
rate will be cleared. |
|
| |
Note: • Si la fiche du cordon d’alimentation est débranchée, ou des piles retirées de telle sorte que l’alimentation | |||
électrique se trouve complètement coupée, le taux de taxe présentement mis en mémoire est effacé. | |||
Nota: • Si desconecta el cable de alimentación para desconectar completamente la electricidad o sustituye las pilas, | |||
el tipo de impuesto almacenado actualmente se borrará. |
|
| |
| ERRORS |
|
|
|
|
| ERREURS |
|
|
|
|
|
| ERRORES |
| |||
There are several situations which will cause an | Il existe | plusieurs cas | qui | entra î nent un | Existen diversos casos en los que ocurre un | |||||||||||||
overflow or an error condition. When this occurs, | dépassement de capacité ou | une situation | exceso de capacidad o una condición de error. Al | |||||||||||||||
“E” will be displayed. The contents of the memory | d’erreur. | Si cela se produit, “E” sera affiché. Le | producirse esto, aparecerá “E”. Los contenidos de | |||||||||||||||
at the time of the error are retained. |
|
|
| contenu de la mémoire au moment de l’erreur est | la memoria, en el momento del error, quedan | |||||||||||||
If an “0·E” is displayed at the time of the error, “– – | préservé. |
|
|
|
|
| retenidos. |
|
|
| ||||||||
– – – – |
|
| must be | Si un “0·E” s’affiche au moment de l’erreur, “– – – – | Si, al ocurrir el error, se visualiza el símbolo “0·E”, | |||||||||||||
used to clear the calculator. |
|
|
|
| – – |
|
| se imprimirá en rojo “– – – – – – | ||||||||||
Error conditions: |
|
|
|
| pour effacer l’erreur. |
|
|
|
| usar |
|
| para borrar la calculadora. | |||||
|
|
|
| Conditions d’erreur: |
|
|
|
| Condiciones de error: |
|
| |||||||
1. When the integer portion of an answer exceeds |
|
|
|
|
|
| ||||||||||||
12 digits. |
|
|
|
| 1. Lorsque la partie entière d’un résultat dépasse | 1. Cuando la parte entera de un resultado excede | ||||||||||||
2. When the integer portion of the contents of the | 12 chiffres. |
|
|
|
| las 12 cifras. |
|
| ||||||||||
memory exceeds 12 digits. |
|
|
|
| 2. Lorsque la partie entière du nombre en mémoire | 2. Cuando la parte entera de los contenidos de la | ||||||||||||
(Ex. | 999999999999 | 1 | ) |
|
| excède 12 chiffres. |
|
|
|
| memoria supera las 12 cifras. |
| ||||||
3. When any number is divided by zero. (Ex. 5 | (Ex. |
| 999999999999 | 1 | ) |
|
| (Ej. | 999999999999 | 1 | ) | |||||||
0 | ) |
|
|
|
| 3. Lorsqu’un nombre est divisé par zéro. (Ex. 5 | 3. Cuando se divide un número cualquiera por un | |||||||||||
|
|
|
|
|
| 0 | ) |
|
|
|
|
| divisor de cero. (Ej. 5 | 0 | ) | |||