Quick guide

Initial auto installation

When the TV is powered on for the first time after purchase, the initial auto installation wizard appears. Follow the menus and make the necessary settings one after another.

Confirm the following before turning

on the power

EIs the antenna cable connected? E Is the AC cord plugged in?

1Press a on the TV.

• The initial auto installation wizard appears.

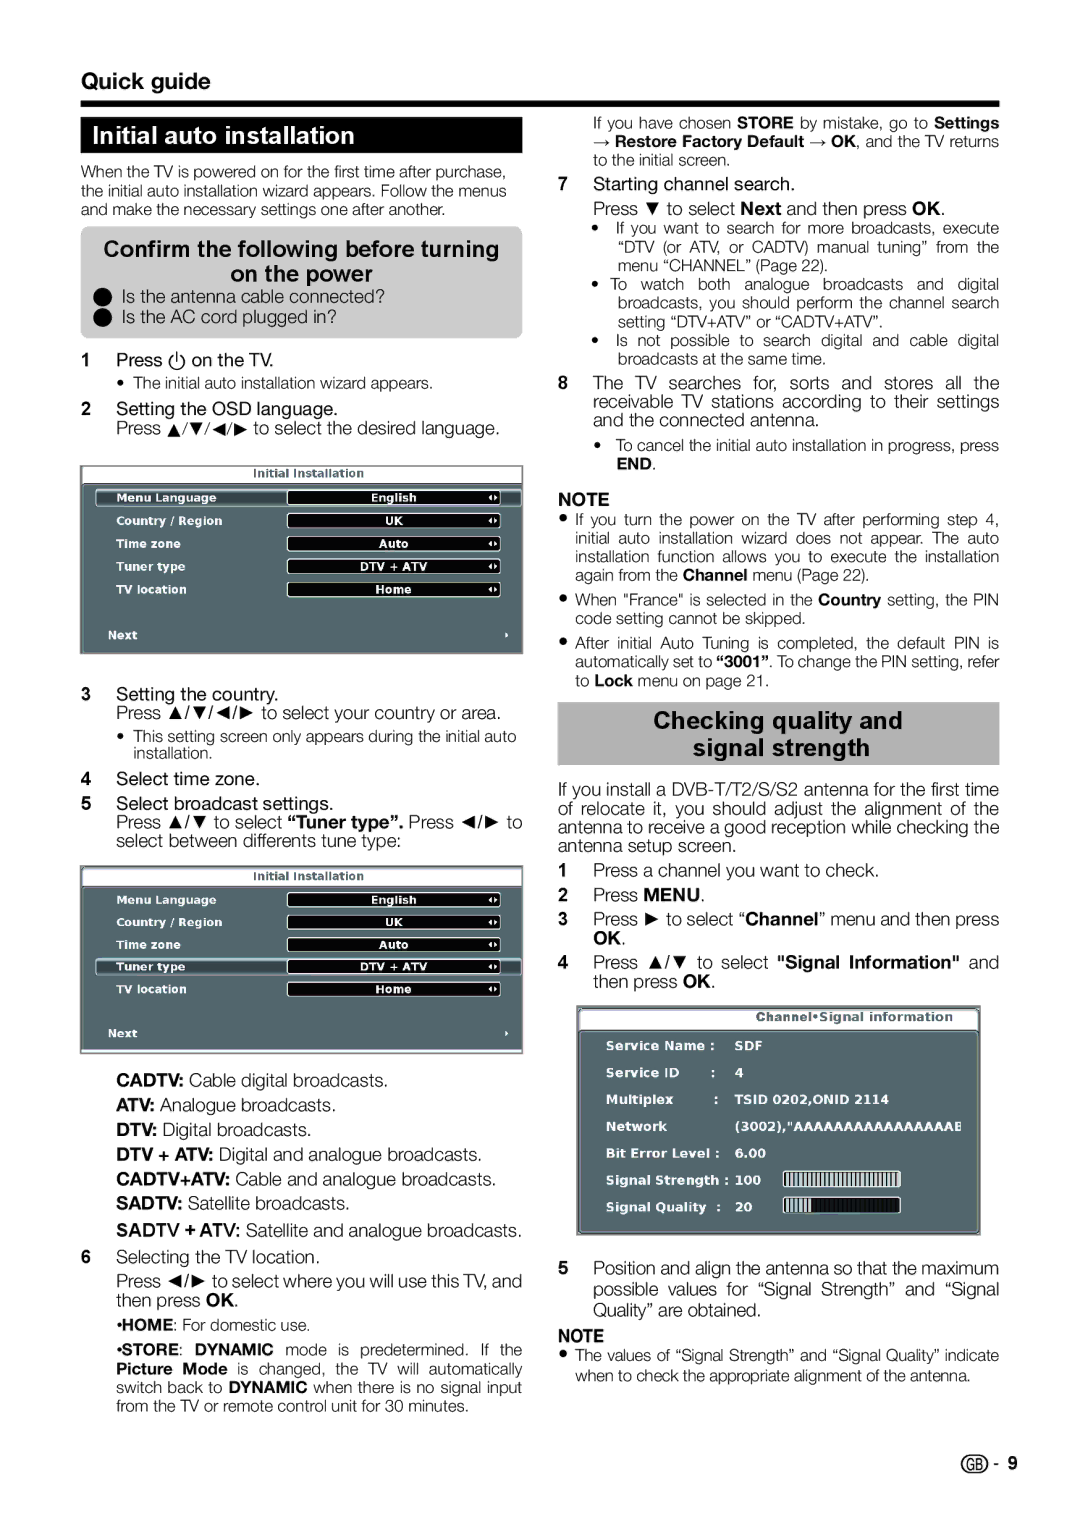
2Setting the OSD language.

Press a/b/c/d to select the desired language.

3Setting the country.

Press ▲/▼/◄/► to select your country or area.

This setting screen only appears during the initial auto installation.

4Select time zone.

5Select broadcast settings.

Press ▲/▼ to select “Tuner type”. Press ◄/► to select between differents tune type:

CADTV: Cable digital broadcasts.

ATV: Analogue broadcasts.

DTV: Digital broadcasts.

DTV + ATV: Digital and analogue broadcasts.

CADTV+ATV: Cable and analogue broadcasts.

SADTV: Satellite broadcasts.

SADTV + ATV: Satellite and analogue broadcasts.

6Selecting the TV location.

Press ◄/► to select where you will use this TV, and then press OK.

HOME: For domestic use.

STORE: DYNAMIC mode is predetermined. If the Picture Mode is changed, the TV will automatically switch back to DYNAMIC when there is no signal input from the TV or remote control unit for 30 minutes.

If you have chosen STORE by mistake, go to Settings

Restore Factory Default OK, and the TV returns to the initial screen.

7Starting channel search.

Press ▼ to select Next and then press OK.

If you want to search for more broadcasts, execute “DTV (or ATV, or CADTV) manual tuning” from the menu “CHANNEL” (Page 22).

To watch both analogue broadcasts and digital broadcasts, you should perform the channel search setting “DTV+ATV” or “CADTV+ATV”.

Is not possible to search digital and cable digital broadcasts at the same time.

8The TV searches for, sorts and stores all the receivable TV stations according to their settings and the connected antenna.

To cancel the initial auto installation in progress, press END.

NOTE

If you turn the power on the TV after performing step 4, initial auto installation wizard does not appear. The auto installation function allows you to execute the installation again from the Channel menu (Page 22).

When "France" is selected in the Country setting, the PIN code setting cannot be skipped.

After initial Auto Tuning is completed, the default PIN is automatically set to “3001”. To change the PIN setting, refer to Lock menu on page 21.

Checking quality and signal strength

If you install a DVB-T/T2/S/S2 antenna for the first time of relocate it, you should adjust the alignment of the antenna to receive a good reception while checking the antenna setup screen.

1Press a channel you want to check.

2Press MENU.

3Press ► to select “Channel” menu and then press OK.

4Press ▲/▼ to select "Signal Information" and then press OK.

5Position and align the antenna so that the maximum possible values for “Signal Strength” and “Signal Quality” are obtained.

NOTE

The values of “Signal Strength” and “Signal Quality” indicate when to check the appropriate alignment of the antenna.

9

Page 11
Image 11
Sharp LC-40LE542E Initial auto installation, Confirm the following before turning On the power, Press a on the TV

LC-40LE542E, LC-40LE540E, LC-46LE540E, LC-40LE541E, LC-46LE542E specifications

The Sharp LC series of LED TVs, including the models LC-46LE541E, LC-46LE542E, LC-40LE541E, LC-46LE540E, and LC-40LE540E, represents a compelling range of options for consumers seeking high-quality visual experiences in their homes. Recognized for their sleek designs and impressive display technologies, these televisions deliver vivid colors and sharp details, making them ideal for a variety of viewing environments.

One standout feature across these models is the Full HD 1080p resolution. With a pixel count of 1920 x 1080, the TVs provide stunning clarity, allowing viewers to appreciate the finer details in their favorite movies, shows, and games. This level of resolution is complemented by the advanced LED backlighting technology that ensures bright and vibrant images, improving contrast and enhancing color depth.

Additionally, the series incorporates Sharp's proprietary Aquos Quattron technology, which adds a fourth yellow pixel to the traditional RGB structure. This enhancement broadens the color spectrum and improves overall color accuracy, making images more lifelike. Viewers will notice a marked difference in the richness and saturation of colors, elevating the home entertainment experience.

The LC-46LE541E and LC-46LE542E models boast larger screen sizes at 46 inches, perfect for those looking to create a cinematic viewing atmosphere. Meanwhile, the LC-40LE541E and LC-40LE540E, at 40 inches, cater to more compact spaces without compromising on performance.

Another significant aspect of these TVs is their energy efficiency, supported by the Energy Star rating. Living up to modern-day expectations, these models consume less power compared to traditional LCD TVs, making them not only eco-friendly but also cost-effective in the long run.

Connectivity options are generous, featuring multiple HDMI ports, USB inputs, and component connections, allowing easy integration with various devices such as Blu-ray players, gaming consoles, and sound systems. This versatility ensures that users can enjoy diverse content seamlessly.

To enhance the user experience, the TVs come with advanced audio technologies, including built-in speakers that deliver clear sound quality. Some models also support a variety of audio formats, ensuring compatibility with different media sources.

In conclusion, the Sharp LC series, with models like LC-46LE541E, LC-46LE542E, LC-40LE541E, LC-46LE540E, and LC-40LE540E, offers a well-rounded selection of features, outstanding imaging technologies, and practical characteristics designed to meet the demands of modern viewers. Whether for entertainment, sports, or gaming, these televisions promise to provide an immersive and enjoyable viewing experience.