R - 5 2 0 L K

R-520LW

Installation

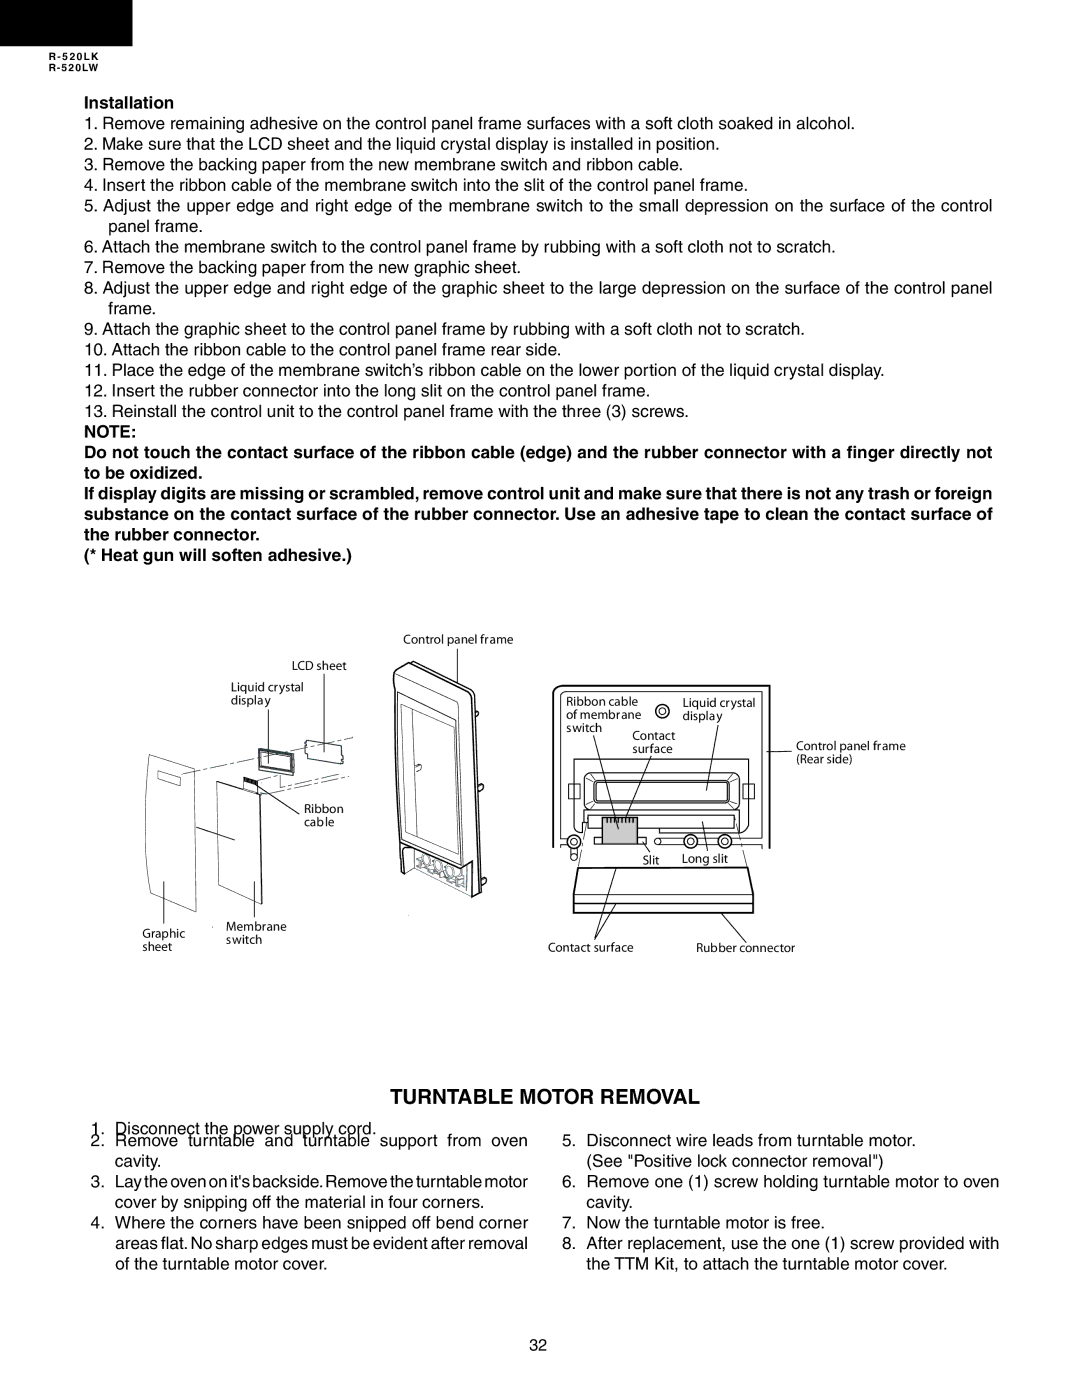
1.Remove remaining adhesive on the control panel frame surfaces with a soft cloth soaked in alcohol.

2.Make sure that the LCD sheet and the liquid crystal display is installed in position.

3.Remove the backing paper from the new membrane switch and ribbon cable.

4.Insert the ribbon cable of the membrane switch into the slit of the control panel frame.

5.Adjust the upper edge and right edge of the membrane switch to the small depression on the surface of the control panel frame.

6.Attach the membrane switch to the control panel frame by rubbing with a soft cloth not to scratch.

7.Remove the backing paper from the new graphic sheet.

8.Adjust the upper edge and right edge of the graphic sheet to the large depression on the surface of the control panel frame.

9.Attach the graphic sheet to the control panel frame by rubbing with a soft cloth not to scratch.

10.Attach the ribbon cable to the control panel frame rear side.

11.Place the edge of the membrane switch’s ribbon cable on the lower portion of the liquid crystal display.

12.Insert the rubber connector into the long slit on the control panel frame.

13.Reinstall the control unit to the control panel frame with the three (3) screws.

Note:

Do not touch the contact surface of the ribbon cable (edge) and the rubber connector with a finger directly not to be oxidized.

If display digits are missing or scrambled, remove control unit and make sure that there is not any trash or foreign substance on the contact surface of the rubber connector. Use an adhesive tape to clean the contact surface of the rubber connector.

(* Heat gun will soften adhesive.)

Control panel frame

LCD sheet

Liquid crystal display

Ribbon cable

Graphic Membrane

sheet switch

Ribbon cable

Liquid crystal

of membrane

display

switch

Contact


Control panel frame


surface


(Rear side)

Slit

Long slit


Contact surface

Rubber connector

TURNTABLE MOTOR REMOVAL

1.Disconnect the power supply cord.

2.Remove turntable and turntable support from oven cavity.

3.Lay the oven on it's backside.Remove the turntable motor cover by snipping off the material in four corners.

4.Where the corners have been snipped off bend corner areas flat. No sharp edges must be evident after removal of the turntable motor cover.

5.Disconnect wire leads from turntable motor. (See "Positive lock connector removal")

6.Remove one (1) screw holding turntable motor to oven cavity.

7.Now the turntable motor is free.

8.After replacement, use the one (1) screw provided with the TTM Kit, to attach the turntable motor cover.

32

Page 32
Image 32
Sharp R-520LW, R-520LK service manual Turntable Motor Removal, Installation

R-520LK, R-520LW specifications

The Sharp R-520LW and R-520LK are innovative microwave ovens that combine advanced technology with user-friendly features to enhance cooking experiences. Designed with modern kitchens in mind, these models embody efficiency, precision, and versatility.

One of the defining characteristics of both the R-520LW and R-520LK is their powerful 900-watt output, which allows for speedy cooking and reheating. This high wattage ensures that food is cooked evenly and retains its moisture, preventing the common issue of dry or unevenly heated meals. Furthermore, the inclusion of multiple cooking power levels provides users with flexibility, making it easy to select the ideal setting for various types of food.

Both models feature Sharp's signature Inverter Technology. Unlike traditional microwaves that use a turn-on and turn-off cycling method, inverter technology delivers a steady stream of cooking power. This results in more consistent heating, allowing delicate foods such as fish or custards to be cooked perfectly without overcooking the edges. This technology not only enhances the quality of cooked food but also improves the overall efficiency of the microwave.

The R-520LW and R-520LK come equipped with a variety of auto-cook settings that cater to different culinary needs. From popcorn to frozen vegetables, these pre-programmed settings allow users to prepare meals with just a touch of a button, making cooking uncomplicated for all skill levels. The large, user-friendly control panel features intuitive buttons and a digital display, ensuring effortless operation and visibility.

In terms of design, the R-520LW boasts a sleek white finish, while the R-520LK offers a modern black aesthetic. Both models are compact yet spacious, with a generous interior capacity that can accommodate a range of dish sizes. The turntable feature further enhances cooking efficiency by ensuring even cooking all around.

Cleaning and maintaining the R-520LW and R-520LK is a breeze, thanks to their easy-to-wipe surfaces and the interior's cavity that can be easily accessed. The durable construction of these microwaves means they are designed to withstand the rigors of daily use.

In summary, the Sharp R-520LW and R-520LK microwave ovens stand out with their advanced features, such as inverter technology and pre-programmed cooking settings, making them excellent choices for anyone looking to streamline their kitchen tasks. Their stylish designs and user-friendly interfaces further enhance their appeal, making them valuable additions to any modern home.