Exploded View/Disassembly&Assembly Instructions
|
|
|
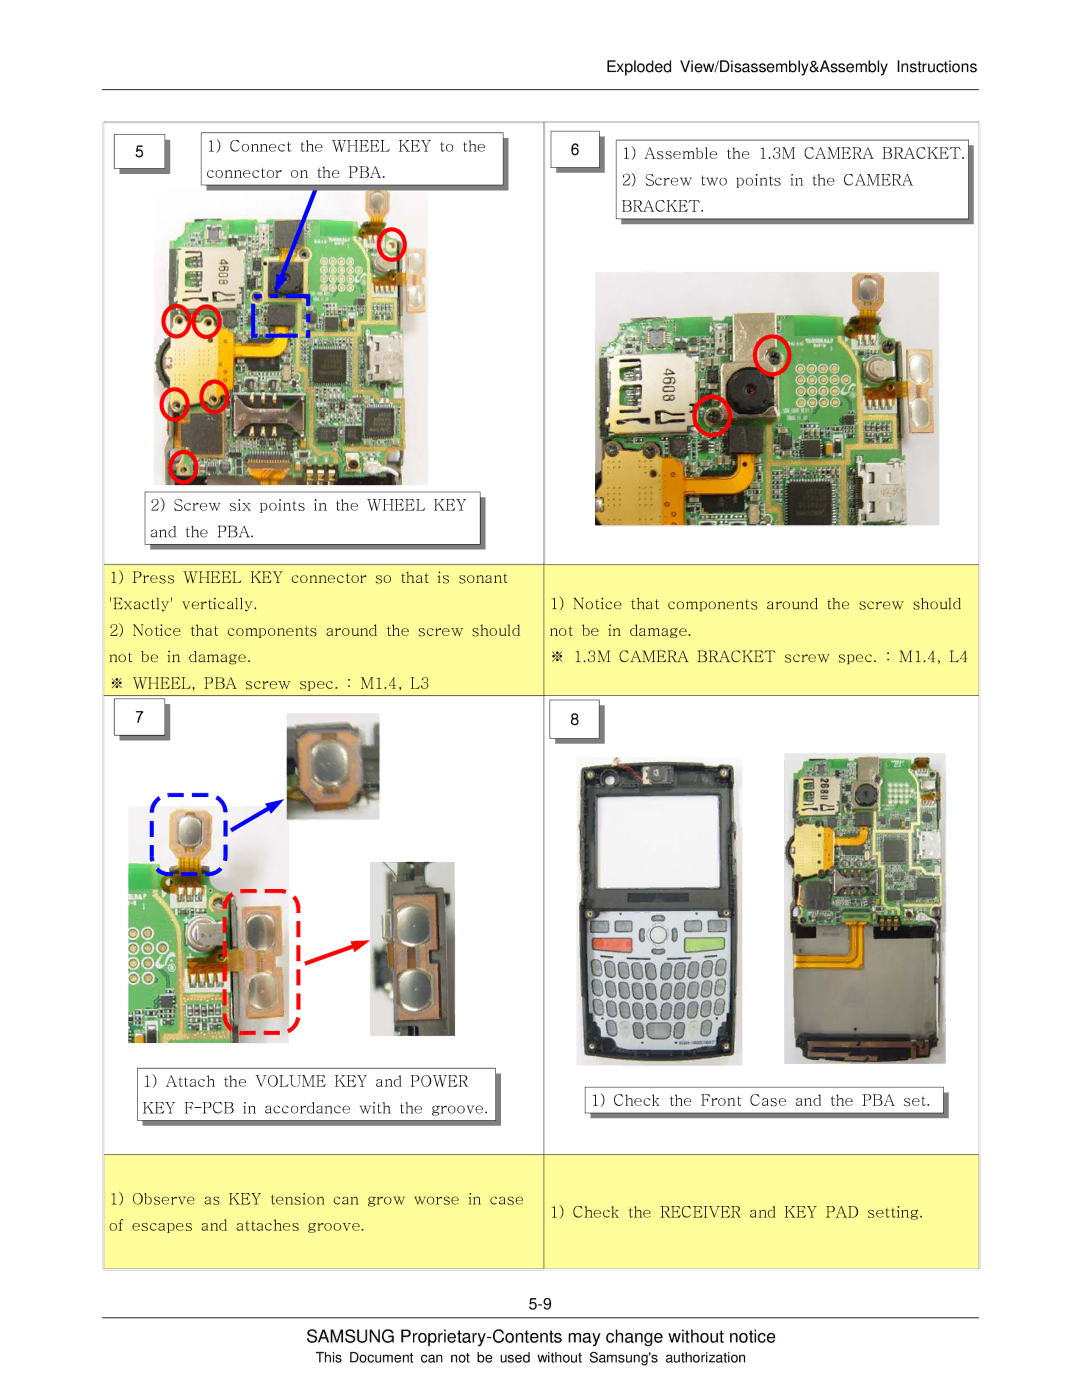
| 1) Connect the WHEEL KEY to the |
|
| 6 |
|
|
|
| ||||||||
| 5 |
|
|
|
|
|
| 1) | Assemble the 1.3M CAMERA BRACKET. | ||||||||||
|
|
|
| connector on the PBA. |
|
|
|
|
| 2) | Screw two points in the CAMERA | ||||||||
|
|
|
|
|
| ||||||||||||||
|
|
|
|
|
| ||||||||||||||
|
|
|
|
|
|
|
|
|
|
|
|
|
|
|
|
|
| ||
|
|
|
|
|
|
|
|
|
|
|
|
|
|
|
|
|
| BRACKET. | |
|
|
|
|
|
|
|
|
|
|
|
|
|
|
|
|
|
|
|
|
|
|
|
|
|
|
|
|
|
|
|
|
|
|
|
|
|
|
|
|
|
|
|
|
|
|
|
|
|
|
|
|
|
|
|
|
|
|
|
|
|
|
|
|
|
|
|
|
|
|
|
|
|
|
|
|
|
|
|
|
|
|
|
|
|
|
|
|
|
|
|
|
|
|
|
|
|
|
|
|
|
|
|
|
|
|
|
|
|
|
|
|
|
|
|
|
|
|
|
|
|
|
|
|
| 2) Screw six points in the WHEEL KEY |
|
|
|
|
| |||||||||||||
|
|
|
|
|
|
| |||||||||||||||||
|
|
|
|
| and the PBA. |
|
|
|
|
| |||||||||||||
|
|
|
|
|
|
|
|
|
|
|
|
|
|
|
|
|
|
|
|
|
|
|
|
|
|
|
|
|
|
|
|
|
|
|
|
|
|
|
|
|
|
|
|
|
|
|
|
1) | Press WHEEL KEY connector so that is sonant |
|
|
| |||||||||||||||||||
'Exactly' vertically. | 1) Notice that components around the screw should | ||||||||||||||||||||||
2) | Notice that components around the screw should | not be in damage. | |||||||||||||||||||||
not be in damage. | ※ 1.3M CAMERA BRACKET screw spec. : M1.4, L4 | ||||||||||||||||||||||
※ WHEEL, PBA screw spec. : M1.4, L3 |
|
|
| ||||||||||||||||||||
|
|
|
|
|
|
|
|
|
|
|
|
|
|
|
|
|
|
|
|
|
|
| |
|
|
| 7 |
|
|
|
|
|
|
|
|
|
|
|
|
|
|
|
|
|
| 8 |
|
|
|
|
|
|
|
|
|
|
|
|
|
|
|
|
|
|
|
|
|
|
|
|
|
|
|
|
|
|
|
|
|
|
|
|
|
|
|
|
|
|
|
|
|
|
|
|
|
|
|
|
|
|
|
|
|
|
|
|
|
|
|
|
|
|
|
|
|
|
|
|
|
|
|
|
|
|
|
|
|
|
|
|
|
|
|
|
|
|
|
|
|
|
|
|
|
|
|
|
|
|
|
|
|
|
|
|
|
|
|
|
|
|
|
|
|
|
|
|
|
|
|
|
|
|
|
|
|
|
|
|
|
|
|
|
|
|
|
|
|
|
|
|
|
|
|
|
|
|
|
|
|
|
|
|
|
|
|
|
|
|
|
|
|
|
|
|
|
|
|
|
|
|
|
|
|
|
|
|
|
|
|
|
|
|
|
|
|
|
|
|
|
|
|
|
|
|
|
|
|
|
|
|
|
|
|
|
|
|
|
|
|
|
|
|
|
|
|
|
|
|
|
|
|
|
|
|
|
|
|
|
|
|
|
|
|
|
|
|
|
|
|
|
|
|
|
|
|
|
|
|
|
|
|
|
|
|
|
|
|
|
|
|
|
|
|
|
|
|
|
|
|
|
|
|
|
|
|
|
|
|
|
|
|
|
|
|
|
|
|
|
|
|
|
|
|
|
|
|
|
|
|
|
|
|
|
|
|
|
|
|
|
|
|
|
|
|
|
|
|
|
|
|
|
|
|
|
|
|
|
|
|
|
|
|
|
|
|
|
|
|
|
|
|
|
|
|
|
|
|
|
|
|
|
|
|
|
|
|
|
|
|
|
|
|
|
|
|
|
|
|
|
|
|
|
|
|
|
|
|
|
|
|
|
|
|
|
|
|
|
|
|
|
|
|
|
|
|
|
|
|
|
|
|
|
|
|
|
|
|
|
|
|
|
|
|
|
|
|
|
|
|
|
|
|
|
|
|
|
|
|
|
| 1) Attach the VOLUME KEY and POWER |
|
|
|
|
|
| ||
| KEY |
|
| 1) Check the Front Case and the PBA set. |
|
|
|
| |
|
|
|
|
|
|
|
|
|
|
1) Observe as KEY tension can grow worse in case
of escapes and attaches groove.
1) Check the RECEIVER and KEY PAD setting.
SAMSUNG Proprietary-Contents may change without notice
This Document can not be used without Samsung's authorization
