Adjusting the Carburetor
It is not necessary to adjust the carburetor when the unit is new. Adjust the carburetor only when you are sure it is necessary due to differ- ences in working conditions such as atmospheric pressure or temperature, or change in unit conditions after more than 10 hours of use.
If you are unfamiliar with carbure- tor adjustment techniques, ask your dealer for advice.
Adjust the carburetor in accor- dance with the following procedures.
WARNING!
Adjusting Idle Speed
To adjust idle speed, turn the Idle Adjust Screw with a screwdriver. See Figure 22. Turn clockwise to increase idle speed. Adjust idle speed so the
Recommended idle speed:
EC7500.30
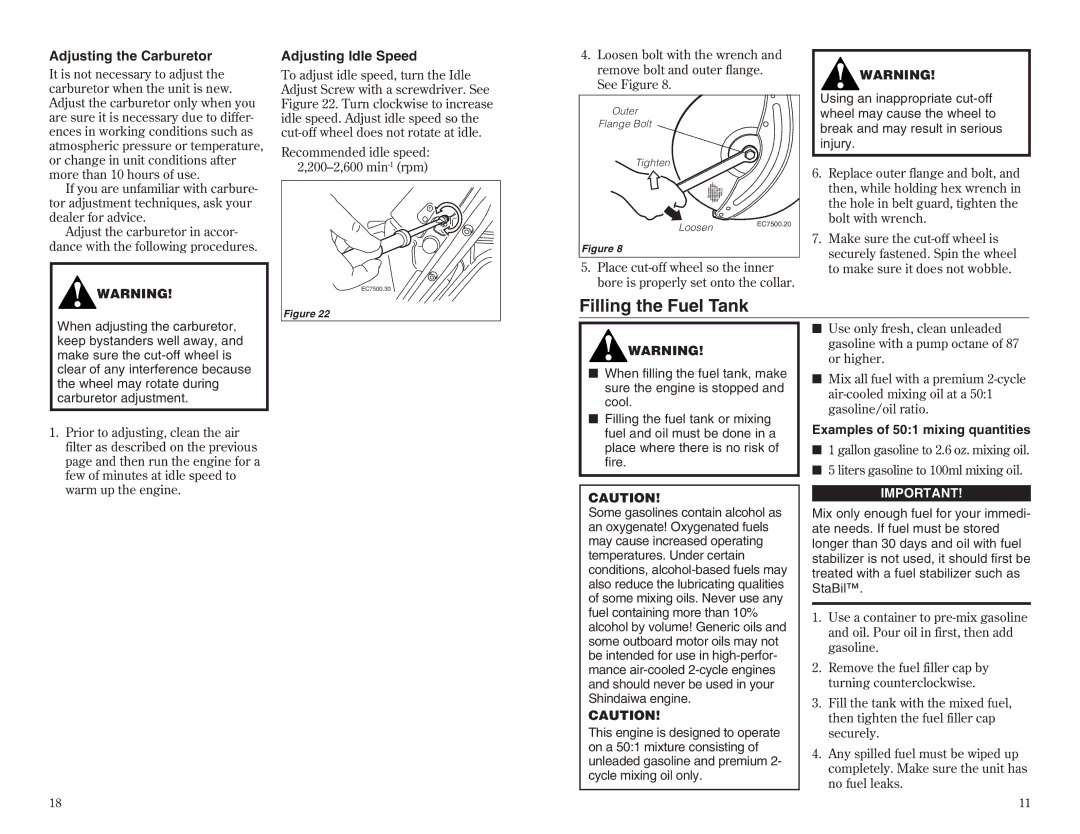
4.Loosen bolt with the wrench and remove bolt and outer flange. See Figure 8.
Outer
Flange Bolt
Tighten
Loosen EC7500.20
Figure 8
5.Place
WARNING!
Using an inappropriate
6.Replace outer flange and bolt, and then, while holding hex wrench in the hole in belt guard, tighten the bolt with wrench.
7.Make sure the
Figure 22
Filling the Fuel Tank
When adjusting the carburetor, keep bystanders well away, and make sure the
1.Prior to adjusting, clean the air filter as described on the previous page and then run the engine for a few of minutes at idle speed to warm up the engine.
WARNING!
■When filling the fuel tank, make sure the engine is stopped and cool.
■Filling the fuel tank or mixing fuel and oil must be done in a place where there is no risk of fire.
CAUTION!
Some gasolines contain alcohol as an oxygenate! Oxygenated fuels may cause increased operating temperatures. Under certain conditions,
CAUTION!
This engine is designed to operate on a 50:1 mixture consisting of unleaded gasoline and premium 2- cycle mixing oil only.
■Use only fresh, clean unleaded gasoline with a pump octane of 87 or higher.
■Mix all fuel with a premium
Examples of 50:1 mixing quantities
■1 gallon gasoline to 2.6 oz. mixing oil.
■5 liters gasoline to 100ml mixing oil.
IMPORTANT!
Mix only enough fuel for your immedi- ate needs. If fuel must be stored longer than 30 days and oil with fuel stabilizer is not used, it should first be treated with a fuel stabilizer such as StaBil™.
1.Use a container to
2.Remove the fuel filler cap by turning counterclockwise.
3.Fill the tank with the mixed fuel, then tighten the fuel filler cap securely.
4.Any spilled fuel must be wiped up completely. Make sure the unit has no fuel leaks.
18 | 11 |