Manuals
/
Shindaiwa
/
Lawn and Garden
/
Trimmer
Shindaiwa
80974
manual
Installing a Trimmer Head T272X
Models:
80974
1
7
40
40
Download
40 pages
21.51 Kb
4
5
6
7
8
9
10
11
Troubleshooting
Install
Maintenance
Additional Problems
Guia Diagnostico
Assembly
Engine Idle Adjustment
Safety
Low Power Output
Page 7
Image 7
Page 6
Page 8
Page 7
Image 7
Page 6
Page 8
Contents
SHINDAIWA OWNER’S/OPERATORS MANUAL
T272 TRIMMER T272X TRIMMER
Espanol
pg. SP1-SP20
Introduction
Contents
General Safety Instructions
SAFETY
Be Aware of the Working Environment
General Safety Instructions The Properly Equipped Operator
FEET
life, and safer operation
Safety Labels
Product Description
your unit and its various compo
6.7kg/14.8 pounds
Assembly and Adjustments Handle T272/T272X
Specifications T272X/C272
6.7kg/14.7 pounds
To Change Position of Line Cutter
Adjusting Throttle Level Free Play T272/T272X
Assembly and Adjustments Cutting Attachment Shield T272/T272X
Install the Cutting Attachment Shield
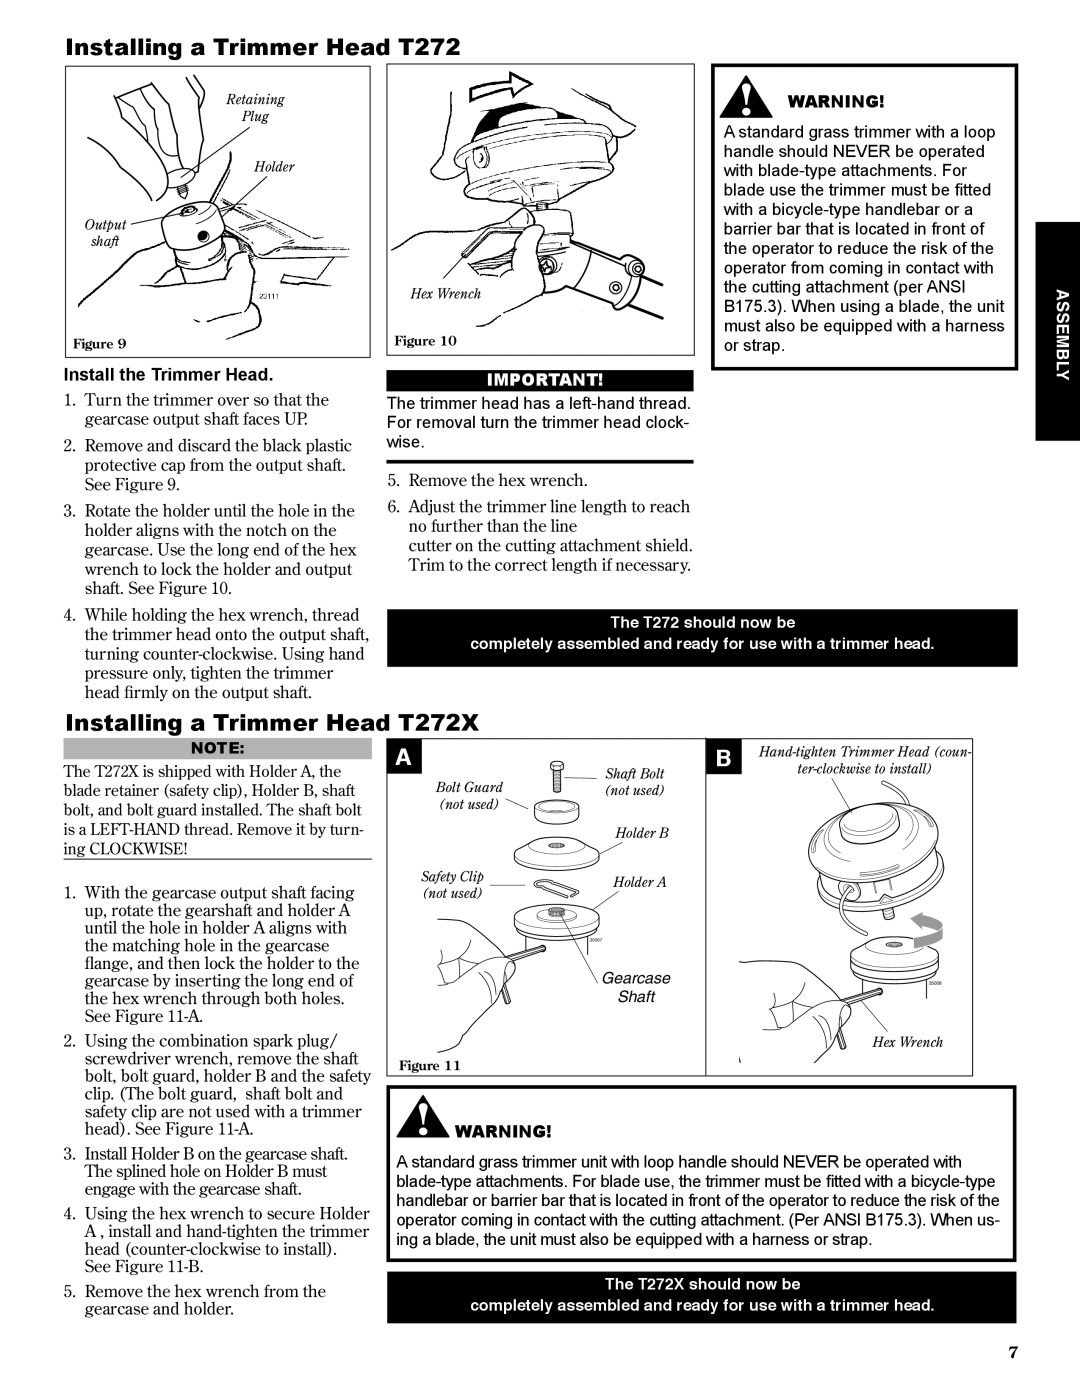
Installing a Trimmer Head T272X
Installing a Trimmer Head T272
ASSEMBLY
Assembly and Adjustments Installing a Blade T272X
Filling the Fuel Tank
Mixing Fuel
Starting the Engine
When the Engine Starts
Engine Idle Adjustment
Starting the Engine continued
Stopping the Engine
Cutting Grass-Units equipped with a trimmer head
Check Unit Condition
Shoulder Strap T272X
T272
Using A Brushcutter Blade T272X
10/15 hour Maintenance
General Maintenance
Daily Maintenance
10 hour Maintenance
135-hour Maintenance
50 hour Maintenance
Every 135 hours of operation, re- move and clean the muffler
Multiple-tooth Circular Blade
Long Term Storage
Blade Sharpening
Shindaiwa Tornado Blade
TROUBLESHOOTING
Troubleshooting Guide
LOW POWER OUTPUT
Troubleshooting Guide continued
TROUBLESHOOTING
ADDITIONAL PROBLEMS
Emission System Warranty Statement
Shindaiwa is a registered trademark of Shindaiwa, Inc
2004 Shindaiwa, Inc Part Number Revision 11/04
Specifications subject to change without notice
Manual Del Propietario/Operador Shindaiwa
PODADORA T272 PODADORA T272X
Numero de part 80974 Rev. 11/04
Instrucciones Generales de Seguridad
Introducción
CONTENIDO
Declaraciones De Seguridad
Esté Alerta del Area de Trabajo
El Operario Debidamente Equipado
Use Buen Juicio
C272
Etiquetas de Seguridad
Descripción del Producto
Desmalezadora C272
Ensamblaje y Ajustes Mango T272/T272X
Especificaciones T272X/C272
Descripción
Ensamblaje y Ajustes Protector del Accesorio de Corte T272X/C272
Ajuste de la Holgura de la Palanca del Acelerador T272X/C272
Ensamblaje
Instalación del Cabezal de Nylon T272X
Instalación del Cabezal de Nylon T272
¡ADVERTENCIA
8. Retire la llave hexagonal
Operación
Mezcla de Combustible
Arranque del motor
Llenando el Tanque de Combustible
Cuando arranca el motor…
Arranque del motor cont
Parada del motor Interruptor de Encendido Apagado
Arnés
Verifique La Condición De La Unidad
Corte de Césped - Máquinas equipadas con cabezal de Nylon
Usando un disco T272X/C272
Mantenimiento cada 10/15 Horas
Mantenimiento General
Mantenimiento Diario
Mantenimiento Cada 10 Horas
Cada 135 Horas Mantenimiento
Mantenimiento Cada 50 Horas
Mantenimiento
Afilado de Discos
Almacenamiento de Largo Plazo
Posible Causa
GUIA DIAGNOSTICO
El Motor No Arranca
Que Revisar
Que Revisar
GUIA DIAGNOSTICO continuación
BAJA POTENCIA
Diagnóstico
Síntoma
PROBLEMAS ADICIONALES
3. Convertidor catalítico si está origi- nalmente equipado
Declaración de Garantía del Sistema de Emisión
1. Los componentes internos del car- burador
2. Los componentes del sistema de encendido
Revision 11/04
Shindaiwa Inc
2004 Shindaiwa, Inc
Part Number
Top
Page
Image
Contents